Introduction
Flight planning starts long in advance of the few hours before the launch. Title 14 of the Code of Federal Regulations (14 CFR) part 91, section 91.103 states: “Each pilot in command (PIC) shall, before beginning a flight, become familiar with all available information concerning that flight…(to include) weather reports and forecasts, fuel requirements…(and) other reliable information appropriate to the aircraft, relating to aircraft performance under expected values of airport elevation,…aircraft gross weight, and wind and temperature.”
The practical test standards (PTS), for both Private and Commercial certificates, indicate a number of items that must be considered, evaluated, and planned in the execution of a safe flight. Some of these items are the use and interpretation of weather data to plan a flight, the use and interpretation of aeronautical charts and local area maps, and performance and limitation of the balloon.
Weather Theory and Reports will be covered in some detail in Chapter 4 and The National Airspace System (NAS) will be reviewed in Chapter 5. The following discussions assume familiarity with both subjects, and will introduce a number of other new subjects.
Purpose of Flight
Preflight planning will vary according to the flight’s purpose. For example, if a training flight is planned, more detailed attention to map work and performance planning may be appropriate. If a passenger-carrying flight is being undertaken, a meeting point for the passengers and crew will need to be designated, and refreshments will need to be planned. If the flight is to participate in an organized rally, particular attention must be paid to weather trends and wind plotting, to ensure the pilot is able to reach the intended target and score points. These type of considerations are part of the initial balloon preflight planning process.
Weather
A good balloon pilot studies the weather several days before the day of the flight in order to understand the weather trends, cycles, and the correlation of weather report information with the actual weather in a particular flying area. Most, if not all, weather reporting information is computed for a large regional area, whereas balloon flying is generally conducted in an area about 15 square miles. When a balloon pilot makes the correlation between the weather outlooks and forecasts, and how that will impact winds and environment in the local flying area, he or she is well on the way to understanding the effects of weather on preflight planning, as well as the balloon flight.
Particular attention should be paid to the location and movement of pressure systems and the jet stream, frontal activity, temperatures in front of and behind frontal zones, and winds. As the proposed flight date draws closer, a reasonable prediction of possible weather can be forecast, but a pilot must remember that a weather forecast more than 72 hours prior to a flight is not an absolute. It is also worthwhile to watch local and nationally televised weather broadcasts to gain insights on the weather systems that may be affecting the desired flying area at the time of the flight.
Unofficial sources of weather information can also prove helpful for obtaining weather information about a particular area. It is beneficial to contact balloon pilots who fly in the area of intended flight to learn of nuances in the weather patterns, especially during initial training or when flying in a new area. Another source of information for weather is pilots who fly other types of aircraft in the proposed flight area. They can be located through the local airport’s fixed base operator (FBO). People who make their living outside, particularly farmers, have a unique perspective on local weather. They often offer weather information on local weather that is unavailable through a commercial source.
When possible, it is valuable for a balloon pilot to visit the local National Weather Service (NWS) office. [Figure 3-1] NWS provides information and sources for a number of weather products, which must be considered in the weather planning process. A visit to the NWS office also gives a balloonist the opportunity to talk with the individuals who provide the weather information used in the briefings. NWS can provide the balloonist with a clear explanation of what products and information are required to make an intelligent flight decision.

Figure 3-1. National Weather Service Office, Falcon Field, Peachtree City, Georgia.
The night before a flight is anticipated (or in the morning, in the event of an afternoon flight), a call should be made to the Flight Service Station (FSS) for an outlook briefing. These are generally available 6 hours or more before a specific flight period. (There are three different types of briefings available: standard, abbreviated, and outlook. They will be discussed in more detail in Chapter 4, Weather Theory and Reports). This briefing information is used to make tentative decisions regarding the flight, such as go/no-go, and potential directions of travel. Additionally, a pilot should pay particular attention to local and regional forecasts in the media, as they may provide information specific to the area of flight.
Prior to flight, a standard briefing should be obtained from the FSS. This briefing will contain the most recent weather information and data, and will serve either to verify information obtained through other sources, or validate the possibility of a go/no-go decision. It is also helpful to check one or more automated weather reporting sites, such as the Automatic Terminal Information Service (ATIS) or Automatic Weather Observing System (AWOS) that are close to the intended flying area. ATIS and AWOS provide the advantage of a real-time, immediate information source. They may be contacted by telephone, or often monitored by aviation radio. Phone numbers for the ATIS and AWOS systems may be found in the Airport/Facility Directory (A/FD). Radio frequencies for the ATIS and AWOS are shown on aviation sectional charts.
Gathering weather information en route to the launch site can be done by searching for indications of current winds. For example, observe how the leaves on a tree move, track the smoke from a factory smokestack, or notice the direction a flag blows. All of these signs give good indications of the current winds, both on the ground and at low altitude. Once at the launch site, or possible launch site, most experienced pilots inflate and release a pibal (pilot balloon) to assess on site wind speeds and direction. [Figure 3-2]

Figure 3-2. Preparing to release a pibal.
Many pilots develop historical data on weather conditions in their home flying areas. When shared with the beginning pilot, this weather data provides a wealth of information on trends and cycles. The comparison of individual predictions with actual weather experienced offers understanding and insight into micro-area weather conditions. Comparison of weather reports from nearby weather reporting stations with the actual weather experienced is also be an excellent learning tool. This exercise provides insight into the weather patterns common in a particular flying area. See Appendix A for a sample weather briefing checklist that may be used as a guide to develop personal forms for recording weather briefings.
There are numerous sources of weather information available on the Internet. These include but are not limited to web sites operated by the NWS (www.nws.noaa.gov), Intellicast (www. intellicast.com), and Unisys (www.weather.unisys.com). Web sites devoted to weather and ballooning include but are not limited to Blastvalve.com (www.blastvalve.com/weather), US Airnet.com (www.usairnet.com), and the Balloon Federation of America (BFA) at www.bfa.net. Ballooning enthusiast Ryan Carlton has developed a wind forecasting site that is located at ryancarlton.com/wind.php. All of these sites provide resources and reference information on weather.
It should be remembered that none of these web sites provide an official weather briefing. It is necessary to call the FSS, or use an on-line briefing service such as Direct User Access Terminal System (DUATS) to receive an official briefing. Failure to receive a proper briefing may create a liability issue for a pilot in the event of an incident or accident.
Some weather related tips are:
- Forecasts are a good place to start, but are not the end of weather planning. Unforecast events happen continuously. Proficiency in understanding small area weather is necessary, and can only be developed with practice and experience.
- Balloons generally fly early in the morning, within the first two hours after sunrise, to avoid unstable conditions, which may prove to be hazardous to balloon flights and operations. It may be possible to fly in the late afternoon, within an hour or two of sunset, when thermal effects are calming down and winds are usually decreasing.
- Almost all balloon flying is done in relatively benign weather conditions and mild winds. Most pilots prefer to launch and fly in winds less than 7 knots. While balloon flying is performed in higher winds, pilots accept that the faster the winds, the more they are exposed to risk and injury. Balloon flight manuals list the maximum launch winds for a particular balloon; this information, as well as personal limitations, are considerations for any pilot.
- Balloons do not fly in significant (or unstable) weather. A balloon should not be launched in the face of a squall line, or during a tornado warning or watch.
- Flying in precipitation is a bad practice. Rainwater (or any frozen precipitation) on the balloon causes it
to get wet and become heavier, often to the point of being unable to maintain altitude without exceeding temperature limitations of the envelope. A wet envelope heated to flight temperatures can be seriously damaged because the heat often causes fabric coatings and treatments to degrade, decreasing the life of the fabric. If a balloon gets wet, it should never be dried out by the application of heat to the point of equilibrium, or neutral buoyancy.
- Precipitation also often causes the atmosphere to become increasingly unstable. Downdrafts, wind gusts, and the possibility of hail and lightning follow. The pilot may be the last one to know that it is raining because the balloon will shield him or her from the precipitation. Ground crew can detect the slightest trace of precipitation before a pilot does, and need to communicate this information immediately to the pilot. In the face of possible precipitation, cancellation of the flight is the best plan.
Navigation
Navigation of a balloon is unlike that of any other aircraft because it cannot be steered in the conventional sense. Directional control is achieved through the use of differing wind directions at different altitudes. With effort, study, and some practice, it is possible for a balloon pilot to determine a point on the ground at some distance, and fly to it with relative ease and accuracy.

Figure 3-3. Sectional chart depicting the Atlanta-Hartsfield-Jackson International Airport Class B airspace.
The first step in learning balloon navigation is understanding the maps used in balloon flight. Two types of maps are used: sectional aeronautical charts and local topographical maps. Both have their uses and each has advantages and disadvantages. Another type of map may be available to the balloon pilot. This is a local area map developed by the local balloon club which shows prohibited zones and sensitive areas.
Sectional aeronautical charts (or sectionals) are published on a routine basis by the National Aeronautical Charting Office (NACO), a division of the Federal Aviation Administration (FAA). [Figure 3-3] These charts are at a scale of 1:500,000 (one inch representing 500,000 inches on the ground, or about 7.9 miles), are similar to an automobile road map, and provide useful information to a balloon pilot flying under visual flight rules (VFR). Charts are generally named for the most prominent city contained within the area of the sectional chart.
There are also sectional charts with a smaller scale, 1:250,000, to represent the areas immediately surrounding Class B airspace, which is the airspace surrounding major air traffic facilities in the United States. Airspace is discussed in detail in Chapter 5, The National Airspace System. These charts (commonly referred to as terminal area charts) show a significantly increased level of detail, and, if available, may be of more value than a standard sectional.
Sectionals depict many different things, including controlled and uncontrolled airspace, airports, major roads and highways, cities and small towns, etc. They also indicate obstacles to flight, such as major transmission lines, radio, TV, and water towers, smokestacks, and other items. The legend of the sectional provides a means to identify these landmarks. A more detailed explanation of sectionals and the information they contain, is found in the FAA Aeronautical Chart User’s Guide, a publication of the NACO. This publication may be found at many pilot supply stores where sectionals are sold, or may be purchased online, along with the maps themselves, at www.naco.faa.gov.
Pilots review the sectional chart and familiarize themselves with the airspace they may be using when flying in a new area or refreshing their memory of a frequently flown area. The sectional helps a pilot determine obstacles to flight (towers, powerlines, etc), as well as locating landmarks for use during the flight. While sectionals offer much valuable information on an area, their lack of resolution on a small scale means they do not provide enough information for a balloon flight. The length of the average balloon flight is 6 to 8 miles. On the sectional, this equates to the distance between the first joint and tip of one’s thumb. This lack of significant detail is a disadvantage for navigation in a balloon, but sectionals are useful as a source of general information about a given area.
A good topographic chart, such as the commercially available United States Geological Survey (USGS) maps offer more value to the balloon pilot. These maps depict information on a relatively small scale and are more useful to the balloon pilot. They show individual terrain features such as roads and road networks, built up areas, schools and churches, and will indicate wooded areas, as well as open pastureland. [Figure 3-4]
With any map, it is important to insure the map is current and has an accurate depiction of north. To check the orientation of a map, select one particular road or feature with a specific directional orientation. Then orient the map to that feature, matching the direction of the road with the map. Place a compass (preferably a sighting compass) on the map to determine the azimuth. Use the same compass that will be used for computing the flight path. Ensure that nothing is affecting the compass reading. It is important to distinguish “true north,” used by most cartographers, and “magnetic north,” as indicated on the compass. Once the azimuth is established, sketch a compass rose, or place a “stick-on” type compass rose on the map.
Once the map is oriented and aligned to north, fill in other information as necessary as reminders. For example, airspace

Figure 3-4. Detailed topological map.
that may preclude balloon operations, local no-fly areas, or areas with potential landowner relations problems should be marked. If the pilot is flying competitively, he or she may elect to mark designated “targets” on the map for ease in identifying them at a later time.
Perhaps the most underutilized use of maps is predicting likely flight paths, landmarks, and potential landing sites. Using the simple technique outlined below, this field technique allows pilots accurate real time and on-site weather data for flight planning information. A pilot needs to know where he or she is going in order to plan how to get there. This is a necessary part of flight planning, and learning the basic skills and knowledge required to plot this information improves the flight experience.
Pat Cannon, a former BFA National Champion and competitive pilot, developed a technique derived from a NWS procedure (that was later modified) to plot the information obtained from a pibal reading. This procedure requires a pencil, large square graph paper, an aviation plotter, pibals, the compass used to calibrate the map, and a watch with a sweep second hand. Two assumptions are made with this procedure. First, most pibals rise at an average rate of 300 feet per minute (fpm). (A chart of pibal climb rates can be found in Appendix B.) Therefore, after 30 seconds, a pibal will be approximately 150 feet above ground level (AGL).
Second, for the purposes of this exercise, the winds do not have any significant speed changes.
Prior to starting the plot, a scale depicting the wind speed must be established. In this example illustrated, two squares on the graph paper will represent a wind speed of 5 miles per hour (mph). In the absence of a wind meter, or other accurate wind reading, a rough estimate of the wind speed may be made using the technique shown in Figure 3-5.

Figure 3-5. A method for determining wind speed.
To begin plotting the pibal recording information, release the pibal and track it with the compass. After 30 seconds, take a reading and make a mark on the graph paper to represent the start point. Make a second mark to represent the direction plotted. In Figure 3-6, a track of 300° at 5 mph is depicted. Label the first two points “A” and “B.” [Figure 3-6]

Figure 3-6. First pibal plot showing 300° at 30 seconds.
At 1 minute, take a second reading. The pibal will be at approximately 300 feet AGL. In this example, the reading taken is 310°. Using the plotter, draw a line 10° off the original azimuth (the A-B line), and make another mark approximately two squares away from the mark labeled “B.” For clarity, this is be labeled “C”. See the example in Figure 3-7. (NOTE: The angles in the successive graphics are exaggerated for clarity.)
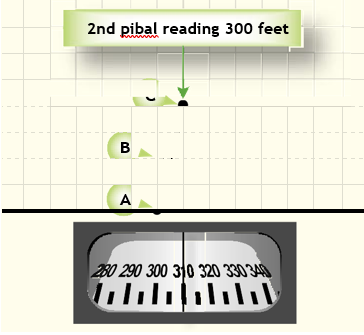
Figure 3-7. Second pibal plot showing 310° at 1 minute
At 1:30 minutes, take another reading. The pibal will be at approximately 450 feet. Using the plotter, draw a line 30° off the original azimuth (the A-B line), and make another mark approximately two squares away from the mark labeled “C.” This mark may be labeled “D” for clarity. [Figure 3-8]

Figure 3-8. Third pibal plot showing 330° at 1:30 minutes.
Althoughplottingcanbecontinuedaslongasthepibalremainsin sight, only the three points marked will be used for this exercise. Figure 3-9 illustrates the results of the above sequence.

Figure 3-9. A line drawn through the last two plots provides a basis to measure the angle and determine the wind at that altitude. In this case, it is 450 feet.
To determine the wind directions at different altitudes, extend lines between the plotted points as shown in Figure 3-9 back through the initial azimuth. Using the plotter, measure the angle between the lines (the angle between the A-B line and the C-D line). That angle, added to the original azimuth heading, gives a good approximation of the winds at that altitude. For the example shown in this sequence, the true track at 450 feet AGL is 005°. A grid appropriate for this computation is located in Appendix B.
This exercise demonstrates a practical method for determining approximate wind directions using items readily available to most pilots. It does not require expensive handheld calculators, laptop computers, or a theolodite that costs thousands of dollars. There is some error inherent in this process that can be lessened with experience and practice, but the readings obtained by this method can offer real time, on site weather data no forecast or briefer can provide. [Figures 3-10 and 3-11]
The information on basic surface winds and winds aloft readings gathered by this method can be used by a pilot to project a flight path and anticipated landing sites with a sectional or topographic map. This plot will form a “V,” with the cone beginning at the launch site. The two legs will represent the extremes of the plotted measurements. The difference between these two extremes is called steerage. Flying higher will track the flight path closer to the winds

Figure 3-10. Practice pibal plots. These exercises are designed to assist the student pilot in devleoping proficiency in using the pibal plotting method. (answers on next page)
aloft reading, while contour flying will put the balloon closer to the ground track leg. Varying altitude will allow the pilot to fly down the middle of the “v.” Accuracy will depend on the consistency of the conditions, but flight paths and landing sites may be predicted, after practice, with a high degree of reliability.
The balloon pilot, more than pilots who fly other types of aircraft, must have the capability of visualizing the winds aloft in three dimensions. Continued spatial awareness (how the balloon is moving through the air), is important for maintaining control of the balloon and navigating to the desired point on the ground. Every other safety measure taken is compromised by inflating a balloon and taking off without proper planning and an understanding of the winds and terrain to be navigated. [Figure 3-12]

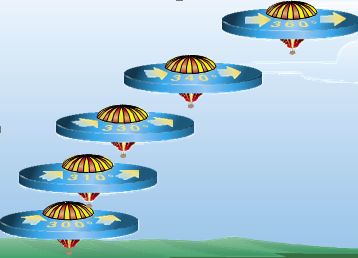
Figure 3-12. As the balloon ascends, the flightpath inclines to the right. Correlate this visualization to a map to determine the ground track of the balloon during flight.
Performance Planning
Prior to a discussion of performance planning, a number of terms must be defined.
Maximum Allowable Gross Weight is that maximum amount of weight that the balloon may lift, under standard conditions. This figure is usually stipulated in design criteria, and addressed in the Type Certificate Data Sheet pertaining to that balloon. It can also be found on the weight and balance page of the flight manual for that particular balloon. An average of 1,000 cubic feet of air, when heated, will lift 20 pounds.
Useful lift (load) in aviation is the potential weight of the pilot, passengers, equipment, and fuel. It is the basic empty weight of the aircraft (found in the flight manual for each balloon) subtracted from the maximum allowable gross weight. This term is frequently confused with payload, which in aviation is defined as the weight of occupants, cargo, and baggage.
Density altitude is defined in the Pilot’s Handbook of Aeronautical Knowledge (FAA-H-8083-25) as “pressure altitude corrected for nonstandard temperature.” Density altitude is determined by first finding pressure altitude, and then correcting this altitude for nonstandard temperature variations. For example, when set at 29.92, the altimeter may indicate a pressure altitude of 5,000 feet. Under standard temperature conditions (59 °F), this may allow for a useful load of 1,050 pounds. However, if the temperature is 20° above standard, the expansion of the air raises the density altitude level (the air is less dense, thereby mimicking the density of the air at a higher altitude). Using temperature correction data from tables or graphs, it may be found that the density level is above 8,000 feet, and the useful load is then reduced to 755 pounds. This definition, however, has a tendency to confuse many new (and some not-so-new) pilots, so a more thorough explanation is justified.
The AIM explains density altitude as being nothing more than a way to comparatively measure aircraft performance. Paragraph 7-5-6 states, in part, “Density altitude is a measure of air density. It is not to be confused with pressure altitude, true altitude or absolute altitude. It is not to be used as a height reference, but as a determining criteria [sic] in the performance capability of an aircraft.” With respect to ballooning, this is a more useful definition of the term.
How does density altitude affect balloon performance? Density altitude affects balloon performance in two ways. First and more important, as a balloon gains altitude, it loses capacity, insofar as its lifting capability is concerned. This means a balloon capable of lifting 1,400 pounds at sea level may only be able to lift 1,150 pounds or less at 4,000 feet. For a pilot who seldom leaves the local area, this rarely causes a problem. For the pilot who travels from the low area of the Southeast to fly in the mile-high altitudes of Albuquerque, New Mexico, the changes in balloon capability and decrease in burner performance are important considerations while planning for the flight.
Second, heater performance is degraded at a rate of 4 percent per 1,000 feet of altitude. This means on a standard reference day, a particular heater will have lost 12 percent of its efficiency at 3,000 feet, or be performing at 88 percent of its capability. This is due to the loss of the partial pressure of oxygen, a necessary component of combustion.
Preflight planning requires consideration of balloon loading and performance with respect to altitude and expected temperatures. Balloon manufacturers have provided the information necessary to determine these factors in the form of a performance chart in the flight manual. Referred to as nomographs or nomograms, performance charts are simple to use and provide excellent planning information.

Figure 3-13. Typical performance chart for a 77,000 cubic foot balloon.
[Figure 3-13] If three of the above factors are known, a fourth may be determined. The performance charts may be used in many ways to determine performance of the balloon on a given day. This process does not have to be computed at the beginning of each flight. Many pilots develop a listing of possible weights, temperatures, and altitudes, depending on the average flying conditions for their home area. This is an acceptable practice as long as the information is available and consulted when appropriate.
Using the chart in Figure 3-13, determine the maximum gross lift that may be expected on a 60 °F day, with decisions not to exceed 190 °F envelope temperature and 1,500 feet pressure altitude. In this example, the established parameters equate what many pilots consider when doing performance planning. They decide they do not want to exceed a given altitude or envelope temperature.) To determine the maximum gross lift available, the nomograph should be entered at point A, at the ambient temperature of 60 °F. Move right, to the line indicating an envelope temperature of 190 °F (point B). Then, move down vertically to a point equidistant between the lines denoting altitude of 1,000 and 2,000 feet (point C). Then, move horizontally to the left to the gross lift axis of the chart and read the result (point D). In the illustrated example, this computation results in a maximum gross lift of 1,120 pounds.
Using the chart again in Figure 3-13, determine the maximum altitude to which the balloon may climb, given the same maximum gross lift figure of 1,150 pounds. In this example, it is simply a matter of extending the lines appropriately. The A-B line would be extended to the diagonal line indicating a maximum temperature of 250 °F (which is the maximum continuous operating temperature for most balloons). Then, a perpendicular line would be drawn from that intersection point. After that line is drawn, extend the C-D line to the right, and the intersection of those two lines will indicate the maximum altitude. In this example, this computation results in a maximum altitude of 10,000 feet.
Special Conditions
Most balloon flying is done in non-hostile terrain and benign weather. There are, some instances in which the terrain may be more difficult, both for the pilot and the chase crew, and the weather may become a significant factor. With proper preflight planning, the problems inherent in mountain flying and cold weather flying can be resolved. While somewhat riskier than normal flying, this type of flying can be safely conducted.
Cold Weather Flying
Some pilots prefer flying in cold weather, which offers the advantages of more stable air and less fuel consumption to maintain flight. This means long, gentle flights for the pilot. There are two main disadvantages to cold weather flying: the need to maintain adequate pressure in the balloon’s fuel system and the difficulty of keeping the pilot, crew, and passengers warm.
As propane gets colder, it has less vapor pressure. (See chart of propane and butane partial pressures, Appendix C). To ensure adequate pressure in cold weather, follow the manufacturer’s recommended method, which will be described in the flight manual. Many manufacturers recommend the use of nitrogen, an inert gas that may be added to the fuel tanks by means of a regulator. This is perhaps the easiest way to pressurize tanks, as it may be done on site, and with little or no prior planning. It does require the use of a nitrogen tank and a two-stage regulator. These items must be available to the pilot before the flight. If the flight is cancelled after pressurization, and the anticipated rise in temperature is expected to be more than 30°, the pressure will need to be bled off by using the fixed liquid level gauge.
Balloon systems using a vapor feed pilot system may not be able to use nitrogen as it can result in an unreliable pilot light. Those systems commonly use heat tapes or heated tank covers in order to warm the propane. Heat tapes, similar to those used to prevent water pipes from freezing, are reliable. They do require frequent inspection, as normal wear and tear may cause an electrical short, with potential danger of damage to the fuel tanks. Among the aftermarket types of heat tapes, the ones with an internal thermostat will cycle once a particular temperature is reached, reducing the possibility of overheating the tanks.
Use tank heaters and heat tapes with extra caution. Tanks must not be heated in an area within 50 feet of an open flame, near an appliance with a pilot light, or in a closed area without natural ventilation.
Pilots, as well as crew, should be dressed appropriately for the environment. Layered clothing that entraps warm air is standard cold weather gear. Note that cold weather environments commonly promote static electricity. It is important that clothing of natural fibers be used, rather than synthetics. A hat is important, as significant body heat escapes from the head. Warm gloves and footwear are a must. Remember that certain types of hypoxia, or lack of oxygen to the brain (discussed in Chapter 9, Aeromedical Factors), may be aggravated by exposure to continued cold. Pilots and crew should be aware of the symptoms of hypothermia and frostbite, guard against them, and have a plan in place to deal with potential medical emergencies.
From an equipment standpoint, the balloon requires no special preparation, other than insuring proper pressure in the fuel system. Pilots should be aware that seals and O-rings may shrink somewhat or become brittle in cold weather. This may cause a propane leak, and special caution should be taken during the equipment preflight process to ensure that this will not be an issue. The pilot and chase crew should also be careful not to pack snow in the envelope, particularly if the balloon will be stored for a long period of time before the next flight. With respect to the chase vehicle, remember to have antifreeze in the cooling system. It is advisable to carry chains, a shovel, and a windshield wiper/scraper if there is a possibility of snow.
Mountain Flying
Flying in mountainous terrain can provide one of the most exhilarating flights imaginable, but there are numerous planning factors that must be considered. [Figure 3-14]

Figure 3-14. Mountain flying.
Weather, with its associated phenomena, is perhaps the most important to understand of the many factors involved in mountain flying. When inflating a balloon, drainage winds (a form of orographic wind) may cause the envelope to move from its planned position, and may even roll back over the basket, pilot, and crew. As most weather forecasts do not address this issue, consult with local pilots regarding these wind’s formation, strength, and onset. In flight, winds flowing across mountain terrain set up features, such as rotors and standing waves (discussed in Chapter 4, Weather) which may cause a complete loss of control of the balloon. Other less violent winds may cause the balloon to proceed in unplanned directions, and require adjustments to landing and retrieval plans. It is important that any pilot contemplating flight in mountainous terrain be aware of these potential conditions, and plan to minimize their effects.
Communications in mountainous terrain can be a significant factor because most radios used by balloonists are line of sight, and will not work well, if at all, in particularly hilly or mountainous terrain. Cell phones may be used after landing, but again may be limited by the lack of cell towers and general reception problems. A good communications plan between pilot and ground crew includes a “lost balloon” contact with a common phone number that both parties call in order to find where the other is. This could possibly be a person at home, willing to relay the information as necessary, or perhaps an answering machine from which both the pilot and crew may retrieve messages.
Mountain flying that involves long distances requires appropriate clothing. Refer to the earlier paragraph on dressing for cold weather flying, which also applies to mountain flying. Good preflight planning will ensure that the pilot and passengers are prepared for a cold weather flight. It also prepares for the possibility of remaining out in the cold while the ground crew locates the balloon, since following a balloon can be difficult in mountainous terrain. Some pilots carry additional equipment in the balloon that they do not carry on flatland flights. Suggested provisions and equipment are water, additional warm clothing or a sleeping bag, a strobe, a radio, a compass, a lightweight shelter (a Mylar® sheet can be made into a simple tent, for example), and a good map or maps of the area.
The Ground Crew
As ground crew have no legal status or authority within 14 CFR, it is easy to overlook or downplay their role in the preflight process, as well as flight safety. Ground crew knowledge and skill bring both the brains and brawn necessary at every stage of a flight—from equipment set-up and flight path plotting to taking inflight wind readings and assisting challenging landings. Without sufficient crew, a pilot becomes rushed, distracted, uninformed, or in the midst of hazardous conditions. Ground crews serve not only as physical help and assistance, but also serve as a form of redundancy for a pilot’s eyes, muscles, and mind. [Figure 3-15]
While crew requirements may vary from flight to flight, consider the following during the preflight process:
- Two crew members to assist is a good starting point. During the chase phase, one may drive while the other navigates; two may handle emergencies better than one. Words of caution: more is not always better. In some cases, passengers on board the balloon may be able and willing to help pack and unpack equipment. Another factor may be the capacity of the chase vehicle.

Figure 3-15. Equipment set-up with a ground crew
- At least one crew member should be familiar with the balloon, the pilot’s flight planning and routines, emergency procedures, vehicle operations (liftgate operations, trailer backing, etc.) and the local area. If out of town, a local person who knows the area and roads can prove to be invaluable.
- A crew chief should be designated early in the preflight planning process to avoid conflicts or communications breakdowns later. This person oversees all ground operations, under the direction of the pilot, directs other crew members, and speaks on behalf of the pilot when meeting landowners.
- The crew should be free of major disabilities (pre-existing back conditions, severe allergies/ respiratory conditions), capable of lifting/moving heavy equipment, and in good physical shape.
- A meeting place should be designated well in advance of the launch time. It is prudent to err on the early side, as being late causes all other facets of the flight process to be rushed, increasing the potential for risks. If the meeting site is to serve also as the launch site, there should be a secondary location available in case of relocation.
- Crew members who are healthy, rested, and focused perform best. Minimize conditions or distractions that compromise these items.
While most crew members participate in ballooning for the fun and friendship it offers, it is essential they are committed to their ongoing role in flight safety. Preflight planning requires that a pilot consider how crew will help each flight unfold safely.
Flying in New Territory
When planning a flight in a new or unfamiliar area, it is important to insure that balloonists are welcome. If possible, talk to local balloonists who may be familiar with the area, and who may be able to point out local no-fly areas, potential launch and landing sites, and potential landowner problem areas. To locate local balloonists:
- Call the nearest Flight Standards District Office (FSDO) and ask for the name of a balloon pilot examiner or FAA Safety team member.
- Look in the local telephone book under “Balloons— Manned.”
- Check for local balloon clubs in the area.
- Check the BFA membership roster online at www.bfa. net.
If there are no balloonists in the local area, talk to other aircraft pilots or local law enforcement offices. Let them know that a balloon flight is being planned and ask for advice.
Equipment
Pack all equipment; have it ready and double checked the night before a flight. New pilots should create and follow a checklist that covers all of the home station preparations for the chase vehicle and equipment. Simple tasks, such as ensuring that radios and cell phones are properly charged, can easily be overlooked. Check to see that the balloon, fan, and vehicle are fueled; vehicle tires are inflated; required documentation is in the balloon; and all necessary maps, radios, and other equipment are loaded in the chase vehicle. [Figure 3-16]

Figure 3-16. It is important to check that all equipment is in proper working condition prior to flight.
Personal Preparation
The most important single element in preflight preparation is the pilot. A pilot anticipating a flight should do a quick self- analysis to ensure that he or she is mentally and physically capable and competent to perform. It is not uncommon to see pilots and crews drive all night to get to an event, and, without sleep or perhaps suffering from a cold or other ailment, go ahead and fly. Allow enough time and resources to remain healthy, rested, and focused enough to make wise flight preparations and decisions that maximize flight safety.
It is a good policy to do an individual “preflight,” using the “I’M SAFE” evaluation checklist as illustrated in Chapter 1, Introduction to Balloon Flight Training, Figure 1-5.
Chapter Summary
Flying a hot air balloon requires extensive preflight planning which depends upon a knowledge of meteorology applied to local weather conditions, the ability to navigate using charts and maps, familiarity with the equipment used in ballooning, a good support ground crew, and a dash of common sense. Safe flight experiences for a pilot in ballooning or any other aircraft depend upon continuing education and experience.


