Get Ready to Fly
Your preflight preparations should include evaluating the airworthiness of the;
- Pilot: experience, sleep, food and water, drugs/
- Aircraft: fuel, weight (does not exceed maximum), density altitude, takeoff and landing requirements, equipment
- Environment: weather conditions and forecast for departure and destination airfields and route of flight, runway lengths
- External pressures: schedules, available alternatives, purpose of flight
Often remembered as PAVE, it is important for you to consider each of these factors and establish your own personal minimums for flying. Once you determine the PAVE factors are favorable for flight, you should obtain a weather briefing, check Notices to Airmen (NOTAMs) and Terminal Flight Restrictions (TFRs), plan your flight (determine the departure and destination airfield and route of flight), file a flight plan (if planning to fly cross-country), and head to your aircraft and point of departure. The powered parachute (PPC) may be stored in a hangar, garage, or covered trailer—any place out of the weather. Begin with a visual inspection of the cart, then warm up the engine. Push or taxi the PPC to the takeoff point, shut down the engine, layout, and inspect the wing. Finally, strap into the PPC, start the engine, kite the wing, and then continue the takeoff roll to lift off. [Figure 5-1]
Trailering
Trailers may be used to transport, store, and retrieve powered parachutes. The PPC components should fit snuggly without being forced, be guarded against chafing, and be well secured within the trailer. Once the loading is completed, take a short drive, stop, and check for rubbing or chafing of components.

Figure 5-1. Typical sequence for a preflight inspection. Use the preflight checklist in your POH for every flight.
Prior to taking the trailer on the road, inspect the tires for proper inflation and adequate tread; check all lights to make sure they are operating; ensure the hitch is free moving and well lubricated; make sure the vehicle attachment is rated for the weight of the trailer; check the vehicle and trailer brake operation.
When using a trailer, there are other precautions to note. First, avoid towing with too much or too little tongue weight as this causes the trailer to fishtail at certain speeds, and it may become uncontrollable. Second, take care when unloading the PPC to avoid damage.
Where to Fly
The powered parachute can be transported by trailer from one flying field to the next. For as many benefits as this provides, transporting the powered parachute into unfamiliar territory also includes some safety and operational issues.
Make contact with the airport management to inquire about any special arrangements that may need to be made prior to departing from an unfamiliar airport. Check the Airport/Facility Directory (A/FD) for traffic pattern information, no-fly zones surrounding the airport, and special accommodations that may need to be arranged.
Title 14 of the Code of Federal Regulations (14 CFR) part 91 states that powered parachutes are to avoid the flow of all other air traffic. In addition, you should inform local pilots about some of the incidentals of powered parachute flight (such as flying low and slow); the more information that other category pilots know about PPC flight characteristics, the more they will understand the specific needs of the powered parachute in flight. Sharing the same airspace with various aircraft categories requires pilots to know and understand the rules, and understand the flight characteristics and performance limitations of the different aircraft.
The ideal departure area for a powered parachute is an open grassy area clear of debris and obstacles with a groomed, even surface. Concrete and asphalt surfaces should be avoided, as well as lit runways, as the structural integrity of the wing and suspension lines may be compromised during takeoffs and landings if the wing catches on the runway surface or surrounding lighting.
Powered parachutes do not normally take off where the rest of the airport traffic takes off. This is to help both the PPC pilot and the pilots of other aircraft. A powered parachute requires time to set up and depart; it is not polite or safe to tie up an active runway while this is being done. Exceptions to this would be the edge of a very wide runway or an undeveloped area next to the active runway where setup can take place well away from the centerline of that active runway.
Another reason PPC pilots typically don’t use standard runways is that you want to set up into the wind to avoid a crosswind takeoff. While slight crosswind takeoffs are possible, they are usually unnecessary due to the short-field capabilities of a powered parachute. You should do your best to point the machine into the wind before you lay out the wing.
Extend consideration to land owners who may own a flight strip in their field. You need permission to use private property as an airstrip. Locate the area on an aeronautical sectional chart to check for possible airspace violations or unusual hazards that could arise by not knowing the terrain or location. Avoid loitering around residential structures and animal enclosures because of the slow flight attributes of the powered parachute and the distinct engine noise.
While selecting a takeoff position, make certain the approach and takeoff paths are clear of other aircraft or will be clear by the time the equipment is set up. Fences, power lines, trees, buildings, and other obstacles should not be in the immediate flight path unless you are certain you will be able to safely take off and clear them during takeoff and climb out.
Walk the entire length of the intended takeoff and landing area prior to departure. Look for holes, muddy spots, rocks, dips in the terrain, high grass, and other objects that can cause the aircraft to be damaged or the wing to snag during takeoff and landing. Physically mark areas of concern with paint, flags, or cones; a pothole may not look like a pothole from the air.
There are a number of preflight actions you must perform, mandated by 14 CFR part 91. You must become familiar with all available information concerning your flight, including runway lengths at the airport of intended use, takeoff and landing distance accounting for airport elevation and runway slope, aircraft gross weight, wind, and temperature. For a flight not in the vicinity of a conventional airport, this information must include weather reports and forecasts, fuel requirements, and alternatives available if the planned flight cannot be completed.
Weather
The weather is a determining factor for all flight operations. Get a full weather briefing prior to your flight, including the current conditions and forecasts for your departure and destination areas, and along the route of flight. There are many sources for obtaining a weather briefing, such as www.nws.noaa.gov, calling 1-800-WX-BRIEF, and a variety of internet sites that specialize in local and regional weather. Crosswind landings are possible in a powered parachute, but crosswind takeoffs should be avoided. It is important to review your departure procedure at your destination to ensure you don’t get into a field you cannot depart from. In gathering your weather information, know the wind conditions, temperature and dew point spread, sky condition, and visibility. Review Chapters 10 and 11 in the Pilot’s Handbook of Aeronautical Knowledge for a comprehensive understanding of weather theory, reports, forecasts, and charts.
PPCs fly best in calm air. Check the wind forecast as well as current conditions, as this information will determine whether a safe flight can be conducted. Winds less than 10 miles per hour (MPH) are ideal; follow the recommendations provided by the PPC manufacturer for the aircraft you will be flying. Steady winds that are not gusting are more desirable, as the inflation and overall performance of the wing are more predictable. For example, 5 MPH with no gusting is better than 1 MPH gusting to 5 MPH. Some types of wings perform differently in certain types of wind conditions and pilotage skills—know your wing and your abilities. Crosswind takeoffs in a powered parachute are dangerous and should be avoided. If the runway configuration does not allow for takeoff into the wind, then the flight should be canceled or postponed from that takeoff area. Do not attempt to take off in a crosswind with a powered parachute unless it is within the pilot and aircraft capabilities, not a limitation in the aircraft POH, and you have been trained thoroughly for this advanced procedure. Crosswind landings are possible in a powered parachute, but crosswind takeoffs should be avoided. It is important to review your departure procedure at your destination to ensure you don’t get into a field you cannot depart from.
Air temperature and humidity directly affect the performance of the powered parachute wing and engine. The powered parachute pilot who doesn’t understand and respect the effect(s) density altitude has on any given flight may get into situations that are not desirable and could be hazardous. The higher the temperature, humidity, and actual altitude of the field you are operating from, the greater the role density altitude plays in determining how much runway the powered parachute needs to get off the ground with the load on board, and how much climb performance the wing will have once airborne. The powered parachute may have cleared that obstacle at 8 a.m. when the weather conditions were cooler with less humidity, but at 1 p.m. with increased air temperature and higher humidity levels, the pilot will have to reevaluate the performance of that same aircraft. You need a full understanding of density altitude to be a safe PPC pilot; refer to Chapter 9 in the Pilot’s Handbook of Aeronautical Knowledge.
Understand the different cloud formations and the ground/air effects they can produce. [Figure 5-2] Cloud clearance and visibility should be maintained for the operations you intend to conduct (see Chapter 8 for cloud clearance requirements in each class of airspace). Knowledge of thermals and turbulence, and how to determine where they can occur is also important. [Figure 5-3]
Do not fly when ground and flight visibility is below minimums for your pilot certificate and the class of airspace where you will be operating (see Chapter 8). Be particularly watchful for low visibilities when the air and dewpoint temperatures are within a spread of three or four degrees. The closer these temperatures are to each other, the greater the chance for fog and reduced visibility conditions.
In addition to adhering to the regulations and manufacturer recommendations for weather conditions, it’s important for you to develop your own set of personal minimums. These minimums will evolve as you gain experience and are also dependent on your recency and currency in the make/model of aircraft you will be flying.
Weight and Loading
Weight and loading must be considered before each flight. Do not exceed the maximum gross weight as specified in the POH. Always follow the POH performance limitations. The balance of the pilot, passenger, fuel, and baggage must be compared to the limitations, and the wing attachment to the fuselage position must be within the limits as specified in the POH. The cart must be balanced properly or an unsafe cart configuration, either nose-high or nose-low will result.
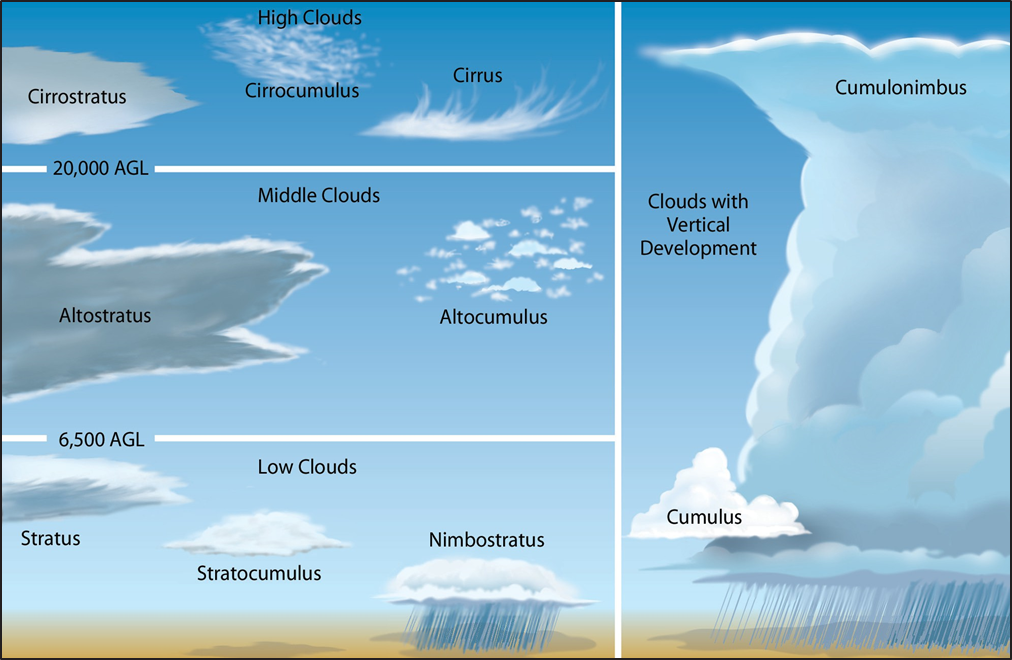
Figure 5-2. Basic cloud types.
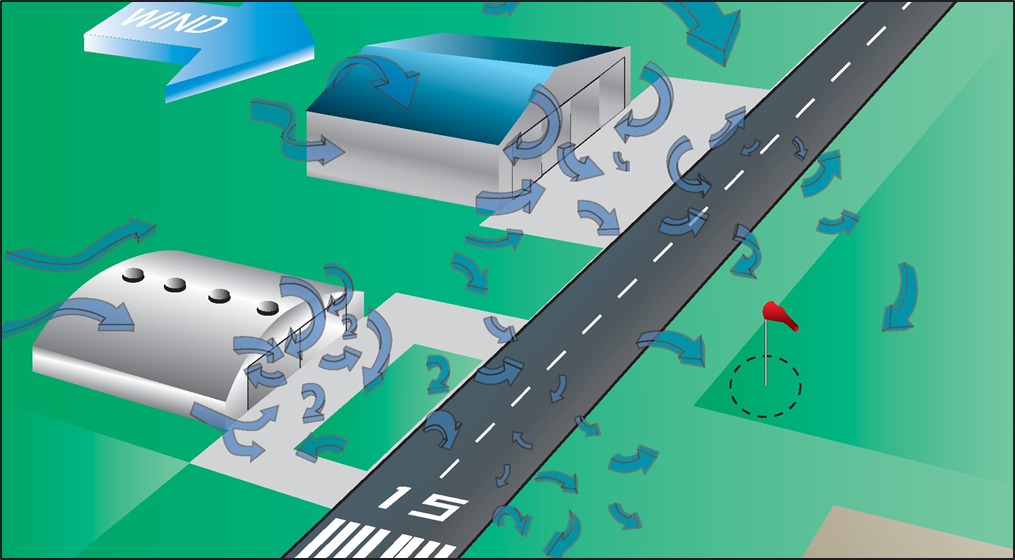
Figure 5-3. Turbulence encountered over manmade items and in nature.
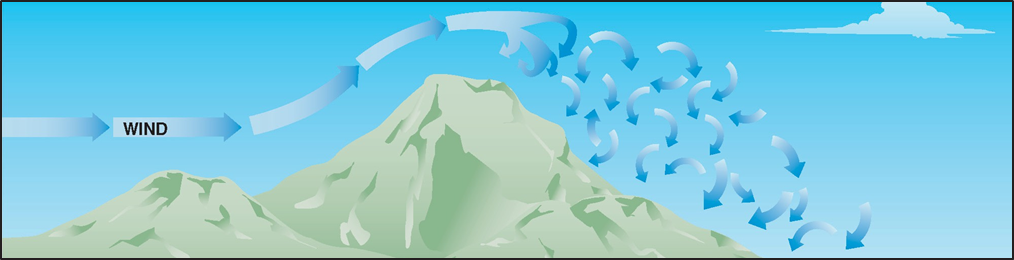
Figure 5-3 continued. Turbulence is encountered over manmade items and in nature.
The Preflight Checklist
Use a written checklist during preflight and ground operations. The checklist is an aid to memory and helps to ensure that critical items necessary for the safe operation of the aircraft are not overlooked or forgotten.
Certificates and Documents
The airworthiness of the powered parachute is determined, in part, by the following certificates and documents, which must be on board the aircraft when operated:
- Airworthiness certificate.
- Registration certificate.
- Operating limitations, which may be in the form of an FAA-approved Aircraft Flight Manual and/or Pilot’s Operating Handbook (AFM/POH), placards, instrument markings, or any combination thereof.
- Weight and balance
AROW is the acronym commonly used to remember these items. The pilot in command is ultimately responsible for making sure the proper documentation is on board. [Figure 5-4]
Aircraft logbooks are not required to be on board the powered parachute when it is operated. However, you should inspect the aircraft logbooks prior to the flight to confirm the PPC has had all required tests and inspections. The owner/operator must keep maintenance re- cords for the airframe and powerplant.
At a minimum, there must be an annual inspection within the preceding 12 calendar months. In addition, the powered parachute may also need a 100-hour inspection in accordance with 14 CFR part 91 if it is used for hire (for example, for training operations). If a transponder or a transponder/encoder with a pitot-static system is used, it must be inspected within each preceding 24 calendar months.
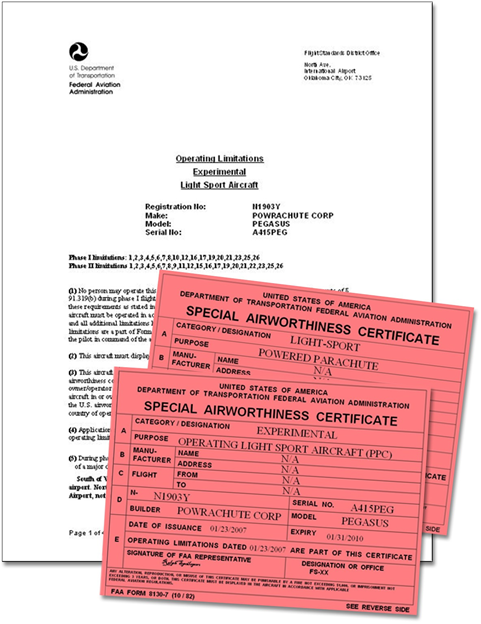
Figure 5-4. Required documentation must be carried on the aircraft at all times.
The pilot must have in his or her possession a valid
U.S. driver’s license, or a valid medical certificate accompanied by a photo identification and pilot certificate. Sport pilots must also carry a copy of the en- dorsements issued from their logbook indicating they are qualified for the powered parachute category/class for the aircraft they are flying. The wing shape (rectangular or elliptical) and the landing system (land or sea) will be specified in this endorsement.
Visual Inspection
The accomplishment of a safe flight begins with a careful visual inspection, regardless of the category/ class of aircraft you will be flying. The purpose of the routine preflight inspection is twofold: to determine the powered parachute is legally airworthy, and that it is in condition for safe flight. You determine whether the PPC is in a condition for safe flight by a thorough and systematic preflight inspection of the aircraft and its components. The preflight inspection should be performed in accordance with a printed checklist provided by the powered parachute manufacturer for the specific make and model of aircraft. However, the following general areas are applicable to all powered parachutes.
The preflight inspection should begin as soon as you approach the aircraft. Since the powered parachute can be transported by trailer, the unloading of the aircraft allows you an extra opportunity to look the cart over from front to back and top to bottom. First and foremost, you need to look for any damage that may have occurred during transit. Make note of the general appearance of the aircraft, looking for obvious discrepancies such as tires with low air pressure, structural distortion, wear points, cart damage, and dripping fuel or oil leaks. All tie-downs, control locks, and chocks should be removed during the unloading process.
It is absolutely necessary you are thoroughly familiar with the locations and functions of the aircraft systems, switches, and controls. Use the preflight inspection as an orientation when operating a make/model for the first time.
The actual “walk around” is a routine preflight inspection and has been used for years from the smallest general aviation airplane to the largest commercial jet. The walk-around is thorough and systematic and should be done the same way each and every time an aircraft is flown. In addition to “seeing” what you’re looking at, it requires you to take the appropriate action whenever a discrepancy is discovered. A powered parachute walk-around will cover five main tasks:
- Cart inspection
- Powerplant inspection
- Equipment check
- Engine warm-up and check
- Wing and suspension line inspection
Each PPC should have a specific routine preflight inspection checklist, but the following can be used as a guideline for most PPCs.
Cart Inspection
Check the front nosewheel for proper play, tire inflation, and secure axle bolt. Test the ground steering bar connection points and ensure there is a smooth steering range of motion from the steering bar. Check and secure the connections between the front fork and the front axle and the front fork and the gooseneck. [Fig- ure 5-5]
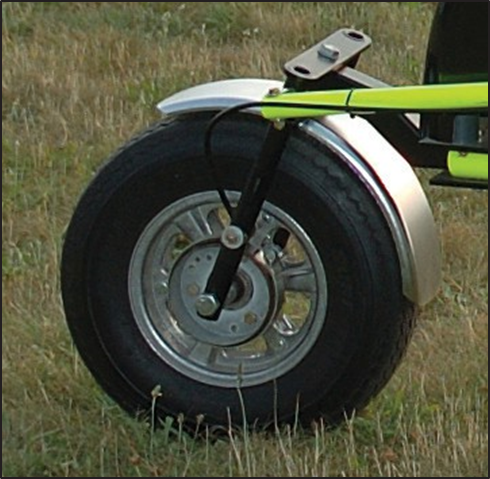
Figure 5-5. Check for proper tire inflation and that the axle bolt is secure.
When brakes are installed, it is common for them to be on the front nosewheel. Typically, they are drum or disk style operated by a cable; it is important to inspect the cable lock, to ensure it is tight. The brakes may be hydraulic disk brakes that also incorporate a cable; in this case, inspect both components. Check brakes and brake systems for rust and corrosion, loose nuts/bolts, alignment, brake pad wear/cracks, signs of hydraulic fluid leakage, and hydraulic line security/ abrasion. Inside the cart where the pilot sits, check the seats, seat rails, and seat belt attachment points for wear, cracks, and serviceability. A few manufacturers offer powered parachutes with adjustable front seats. The lever moves the pin in and out of the seat rail holes and the seat then moves forward and back along the rail. The seat rail holes should be checked for wear; they should be round and not oval so there is no play
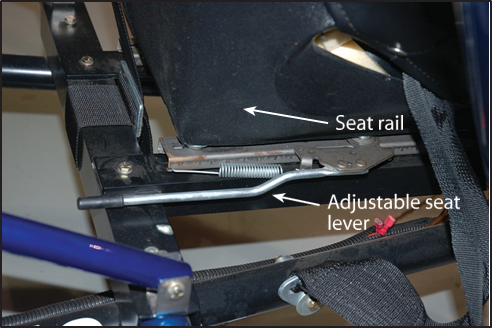
Figure 5-6. Adjustable powered parachute front seat mechanism.
in the fixed position of the pilot seat. Inspect where the seat lock pins fit; check the pin and seat rail grips for wear and serviceability. [Figure 5-6]
The battery and ignition switches need to be in the OFF position at the beginning of the preflight inspection. They will be turned on and then off again to check the different components operated by the power source during the preflight. While checking the ignition switches, check that the strobe is operational if one is installed. Exercise the primer or primer bulb, if the PPC is so equipped; you should feel resistance when exercised. Faulty primers can interfere with proper engine operation.
Manipulate the engine throttle control by slowly moving through its full range of motion to check for binding or stiffness. On two-stroke engines with oil injection, it is important to check that the oil injection mechanism is moving freely. [Figure 5-7]
Set the altimeter to the field elevation or set in the barometric pressure, if equipped. Turn on the ignition or engine instrument system master and make note of the fuel quantity gauge indications, if applicable, for comparison with an actual visual inspection of the fuel tank(s) during the exterior inspection.
Inspect for any signs of deterioration, distortion, and loose or missing bolts or locknuts. Gently shake the cart to determine if objects and airframe parts are loose and need to be tightened. Treat all aircraft and their components with respect and care while conducting a preflight. As with all aircraft, the PPC does not need to be “over-handled” to perform an adequate preflight inspection. Check that all cables are free of kinks, frays, abrasions or broken strands; check each end of each flying cable for bolt security and check that the thimbles are not twisted or elongated.
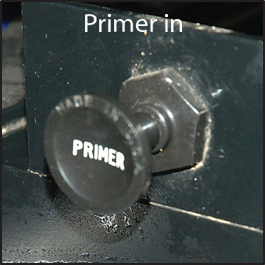
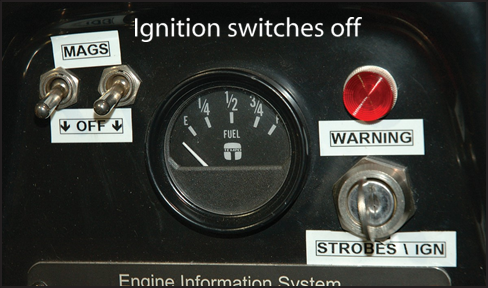
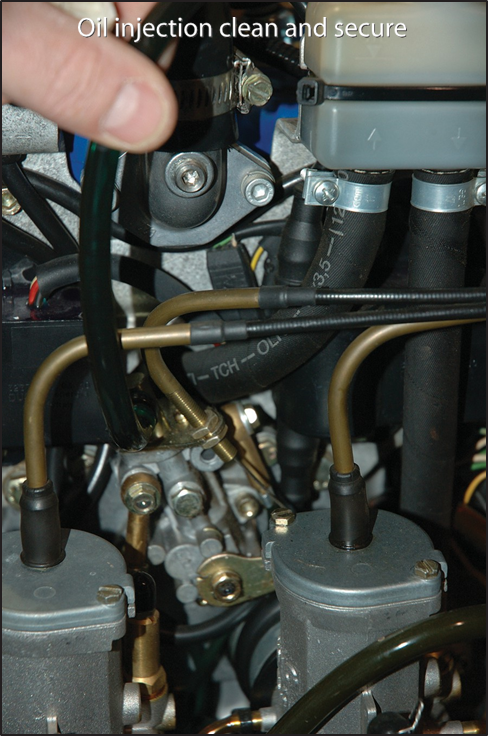
Figure 5-7. Check the ignition switches, primer and oil injections mechanism during preflight inspections.
Check the steering bars for freedom of movement, for proper steering line attachments, and confirm the steering bars are securely attached.
Inspect the rear wheel and axle assembly. Check the tires for proper inflation, as well as cuts, bruises, wear, bulges, embedded foreign objects, and deterioration. As a general rule, tires with cord showing, and those with cracked sidewalls are unairworthy. Check the axle and axle hardware, and inspect that the wheels rotate properly.
Fuel and Oil
Pay particular attention to the fuel quantity, type, grade, and quality. Many fuel tanks are sensitive to attitude when attempting to fuel for maximum capacity. The powered parachute attitude can also be affected laterally by a ramp that slopes. Always confirm the fuel quantity indicated on the fuel gauge(s) by visually inspecting the level of the fuel tank(s).
The engine manufacturer recommends the type of fuel that any given powered parachute engine should burn; this recommendation should be strictly conformed to. Although most PPC engine manufacturers recommend premium grade auto fuel, it is usually acceptable to burn 100LL AVGAS on a limited basis. Most airports will not have auto fuel available on the field.
Ensure the fuel caps have been securely replaced following each fueling and the vents are free and open. Most powered parachutes have an inline fuel filter located somewhere between the tank and the carburetors; check the fuel filter for contaminates. [Figure 5-8]The fuel tank vent is an important part of all preflight inspections. [Figure 5-9] Be alert for any signs of vent
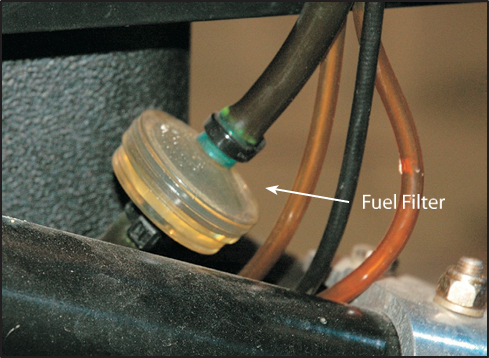
Figure 5-8. Inspect the inline fuel filter during preflight.
tubing damage, as well as vent blockage. A functional check of the fuel vent system can be done simply by opening the fuel cap. If there is a rush of air when the fuel tank cap is opened, there could be a serious problem with the vent system.
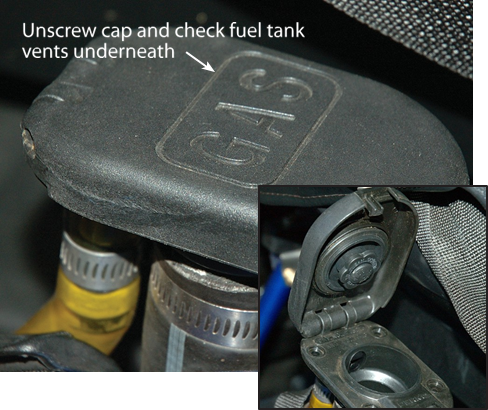
Figure 5-9. Inspect that the fuel tank vents are free of dirt and debris to prevent fuel starvation during flight.
Check the oil reservoir to ensure the proper oil is used. Check the oil level during each preflight and after each refueling. [Figure 5-10] If the consumption of oil steadily increases or suddenly changes, qualified maintenance personnel should investigate. After checking or adding oil to the PPC, ensure that the oil cap has been securely replaced. The oil reservoir on a two-stroke must be checked for adequate venting; if this becomes plugged, it could cause starvation of the oil to the engine.
Two-cycle engines without oil injection premix the oil with the fuel. Assure the mixture ratio is correct. Proper mixing techniques are covered in the fuel section.
Powerplant Inspection
Inspect the propeller for any signs of propeller blade chafing, and defects such as cracking. Check the propeller for large nicks in the leading edge, cracks, pitting, corrosion, and security. All propeller tape should be securely attached to the propeller surface, paying special attention to the convex side of the propeller for any delaminating; propeller tape is used primarily for protection on the leading edge of the propeller as well as a supplemental balancing device. Check the propeller hub for security, bolt threads showing, and general condition.
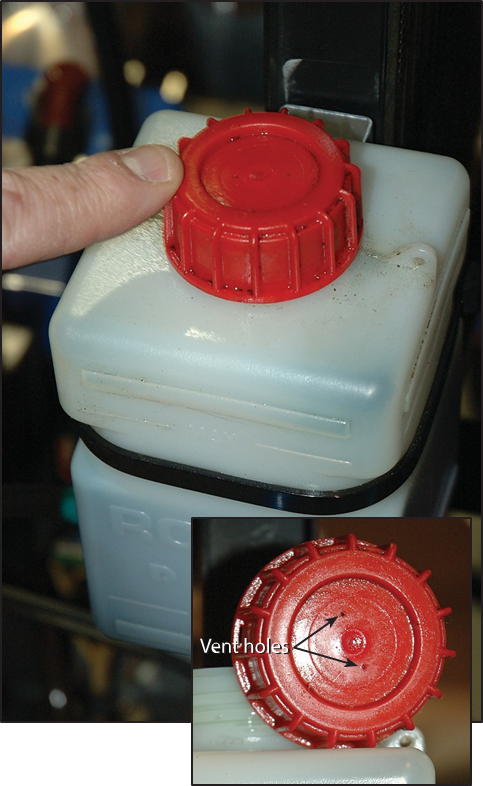
Figure 5-10. It is important to check the oil reservoir cap to make sure the vent holes are open and free of debris.
Powered parachute engines are set up in a pusher configuration, so it is essential to check the engine area for loose items to ensure nothing is blown through the propeller, possibly injuring the aircraft, observers, or property. Carburetor(s) must be checked to make sure they are secure; check the air filter for condition and secure fit. Check the rubber manifolds for cracks and check spark plugs to make sure all of the spark plug caps are secure. On some two-stroke engines, there is a reservoir that contains the lubricant for the rotary valve; check this level on every preflight. Check gear reduction boxes for leaking seals and make sure there is not play within the gears. Look for signs of fuel dye which may indicate a fuel leak and deterioration of fuel lines. Check for oil leaks, and deterioration of oil lines, and make certain that the oil cap, filter, oil cooler, and drain plug are secure. Check the exhaust system for white stains caused by exhaust leaks at the cylinder head or cracks in the stacks. Check exhaust components for freedom of movement; they must be secure with all exhaust springs in place.
On liquid-cooled engines, the radiator fluid level, as well as the overflow reservoir, must be checked and filled as necessary.
Check all visible wires and lines for security and condition.
Engine Starting
Prior to starting the engine, it is imperative to precisely follow the engine manufacturer’s recommendation for engine warm-up. Follow the before-engine starting and engine-starting checklist procedures in the POH. Certain precautions apply to all powered parachutes.
Do not start the engine with the back of the cart of the powered parachute pointed toward an open hangar door, parked automobiles, or a group of bystanders. This is not only discourteous but may result in personal injury and damage to the property of others as a propeller blast is surprisingly powerful.
When ready to start the engine, look in all directions to be sure nothing is or will be in the vicinity of the propeller. This includes nearby persons and aircraft that could be struck by the propeller blast or the debris it might pick up from the ground. Turn on the anticollision strobe prior to engine start (if so equipped), even during daylight operations.
First, look around, and then shout “CLEAR PROP.” Wait for a response from persons who may be nearby before activating the starter.
When activating the starter, keep one hand on the throttle. The other hand should be on the ignition in case the engine races immediately after start and the throttle has no effect. This allows prompt response if the engine falters during starting, and allows you to rapidly retard the throttle if revolutions per minute (RPM) are excessive after starting. A low RPM setting is recommended immediately following engine start. Do not allow the RPM to race immediately after the start, as there will be insufficient lubrication until the oil pressure rises. In freezing temperatures, the engine will also be exposed to potential mechanical distress until it warms and normal internal operating clearances are assumed.
As soon as the engine is operating smoothly, check the oil pressure, if applicable. If it does not rise to the manufacturer’s specified value, the engine may not be receiving proper lubrication and should be shut down immediately to prevent serious damage. Although quite rare, the starter motor may remain on and engaged after the engine starts. This can be detected by a continuous very high current draw on the ammeter. Some powered parachutes also have a starter engaged warning light specifically for this purpose. The engine should be shut down immediately should this occur.
Starters are small electric motors designed to draw large amounts of current for short periods of cranking. Should the engine fail to start readily, avoid continuous starter operation for periods longer than 30 seconds without a cool-down period of at least 30 sec- onds to a minute (some POHs specify even longer). Their service life is drastically shortened from high heat through overuse.
If the engine fails to start at all, it may be necessary to charge the battery or use the backup pull starter. Hand propping is not a procedure typically used on powered parachutes. Always follow the manufacturer- ers’ recommendations while troubleshooting and follow those specific procedures.
Engine Warm-Up
Engine warm-up, or run-up, not only brings the engine up to proper operating temperatures but also allows you to determine that the engine and its components are operating properly.
Generally, the engine start-up will follow these steps:
- Walk-around is complete.
- Safety check to include: front wheels properly braced, engine and propeller area clear of loose and foreign objects, the area behind the cart is clear of debris, wing lines are away from the propeller.
- Prime the fuel system (as equipped).
- Activate the strobe light if the switch is independent of the magneto switch.
- Shout “CLEAR PROP” and wait for “CLEAR” response from bystanders.
- Turn magnetos on.
- Engine gauge switch on.
- Check the throttle at idle.
- Start engine.
The warm-up procedure should never be skipped, as the result can be costly in engine repairs and detrimental to the physical well-being of the pilot and passenger. Pilots should know their engine temperature parameters from the markings on the panel and the POH limitations. Once the engine has been brought up to normal operating temperatures, check that the engine will produce sufficient RPM. Once again, refer to the engine manufacturer’s manuals for recommended procedures and parameters.
Continually monitor all the engine’s temperature gauges and know the engine’s operational minimum, normal, and maximum temperature ranges. The engine manual will also specify “difference” temperatures between cylinders. Excessive split differences between cylinders should not be overlooked, even if both temperature readings are within the acceptable ranges for the engine. Do not fly the powered parachute if the temperature readings are not normal! Figure out what the problem is before it results in a dangerous situation or costly engine repair. Finally, test the ignition switches if the engine has dual ignition systems installed. By turning one switch off checking the RPM and then alternating the check with the other switch, you can ensure that both ignition switches are operational. An engine with a dual ignition system is intended to be run with both systems operating.
Taxiing
You taxi the aircraft to get the cart from one place to another. The wing bag is typically hung from the cart or placed on the rear seat unless there are extra bars installed specifically to accommodate the wing bag while taxiing; check with your manufacturer for the recommended procedure. [Figure 5-11] You can taxi with the wing packed or with the wing inflated above you; it is called “kiting” if it is inflated. During all ground operations, it is important to keep your hand on the throttle and your feet on the steering bars. Do not dangle your feet off of the steering bars as this could result in a broken ankle, foot, or leg. Do not use your feet to stop the PPC, even at low speeds. Wind is not a factor when taxiing with the wing in the bag; follow the procedures for initial takeoff if taxiing with the wing inflated, or “kiting,” in any wind.
Be aware of other aircraft that are taking off, landing, or taxiing, and provide consideration for the right-of-way of others. Keep a lookout in front of you and on both sides. Be aware of the entire area around the powered parachute to ensure the PPC will clear all obstructions and other aircraft. If at any time there is doubt about the clearance from an object, you should stop the powered parachute and verify clearance.
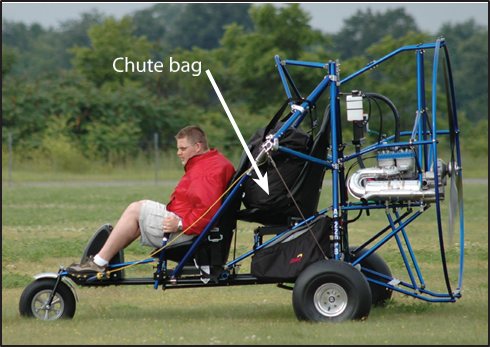
Figure 5-11. Follow manufacturer recommendations for bag placement when taxiing.
Even though you may not be using a standard runway, you may need to cross active runways or taxiways to get to the area designated for powered parachute operations. That means understanding radio communications and keeping your eyes and ears open. You probably have better visibility than a pilot in a typical airplane.
The primary requirements for safe taxiing are positive control of the aircraft at all times, the ability to recognize potential hazards in time to avoid them, and the ability to stop or turn where and when desired. While on the ground, the throttle directly controls your ground speed. It is important not to taxi too fast, and be careful no one is in your prop blast. Going too fast can damage the frame or the suspension. The grass you taxi on could have holes and ditches, and damage the suspension. When taxiway centerline stripes are provided, they should be observed unless necessary to clear airplanes or obstructions.
Ground steering is accomplished by controlling the ground steering bar. The ground steering bar may in fact be a bar, handle, wheel, or lever; ground steering controls are as varied as the powered parachutes themselves. Operate the ground steering in a slow and deliberate manner, never jerky or erratic. Some ground steering bars are pushed forward to turn right and pulled back to turn left. Others are just the opposite. Consult the POH for each make and model of aircraft you fly to determine the safe and proper operation of the ground steering. When taxiing, it is best to slow down before attempting a turn. Sharp, high-speed turns place undesirable side loads on the landing gear and may result in an uncontrollable swerve. If the wing is inflated, the cart will not follow the direction of the wing due to the friction (via the wheels) with the ground. If the cart and the wing are not going in the same direction, you must prevent the wing from gaining enough lift (via cart groundspeed) to pull the cart over on its side. (See Chapter 12 for more details on pullovers.) Ad- just power or apply braking as necessary to control the taxi speed. More engine power may be required to start the powered parachute moving forward, or to start a turn than is required to keep it moving in any given direction. When using additional power, retard the throttle immediately once the powered parachute begins moving, to prevent excessive acceleration.
When first beginning to taxi the PPC cart, if equipped with brakes, test them for proper operation as soon as the powered parachute is put in motion (typically with a hand control). Apply power to start the powered parachute moving forward slowly, and then retard the throttle and simultaneously apply pressure smoothly to the brakes.
To avoid overheating the brakes when taxiing, keep engine power to a minimum. Rather than continuously riding the brakes to control speed, it is better to apply brakes only occasionally. Other than sharp turns at low speed, the throttle should be at idle before the brakes are applied. It is a common error to taxi with a power setting that requires controlling taxi speed with the brakes. This is the aeronautical equivalent of driving an automobile with both the accelerator and brake pedals depressed at the same time.
When taxiing with an inflated wing (kiting), the ram-air wing will try to weathervane. The wing is designed to be self-centered; its strongest desire is to point into the wind.
Stop the powered parachute with the nose wheel straight ahead to relieve any side load on the nose wheel and to make it easier to start moving ahead.
At nontowered airports, you should announce your intentions on the common traffic advisory frequency (CTAF) assigned to that airport. When operating from an airport with an operating control tower, you must contact the appropriate controller for a clearance to taxi, and a takeoff clearance before taxiing onto the active runway.
After landing, taxiing with the parachute inflated requires you to coordinate movements between the rolling cart on the ground and the flying wing in the air. Cross-controlling by steering the cart one way while failing to steer the wing in the same direction creates a dangerous situation that may end in a rollover. Common errors in taxiing with the wing inflated are:
- Failing to maintain enough forward speed to keep the wing inflated and flying overhead.
- Maintaining too much speed over the ground and thereby lifting the nosewheel off the ground; preventing the nosewheel from being able to control the direction of the cart.
- Not steering the wing along with the cart.
- Attempting to turn the cart too tight for the wing to be able to keep up.
- Failing to take wind into account.
- Attempting to taxi when winds are too high, change in direction, or are gusty.
Wing Inspection
The powered parachute flight instructor will spend a great deal of time explaining the systems of the wing, the proper preflight, and the different methods of staging the wing for inflation by means of different layout techniques. The wing, and its performance, are critical to flight and safety; once again a thorough and systematic preflight procedure is essential.
Check the wind direction and manually point the cart directly into the wind. Many PPC pilots use a telescoping rod with a windsock or long strip of narrow rip-stop suspended from the top, displayed from their powered parachute trailer or vehicle to determine wind direction and wind speed. Some pilots prefer hand-held wind speed/direction devices. Most conventional airports have some sort of wind indicator (windsock, wind T, etc.) positioned in the segmented circle, as well as electronic weather indicators that accurately measure wind speed and direction at the field. Once the powered parachute engine starts it will be nearly impossible for the pilot to determine the direction of the wind without the aid of a wind direction indicator. [Figure 5-12]
Remove the wing bag from its stored position on the airframe, either on the rear or pilot’s seat or hanging from the airframe itself. It is critical that the bag not be twisted, rotated, or turned when removing it from its storage location, as doing so will twist and entangle the suspension lines. Another determining factor in keeping the suspension lines free is how you packed the wing away the last time it was flown; the proper procedure for re-bagging the PPC wing will be covered at the end of this chapter.
It is critical for the powered parachute pilot to be able to recognize when the suspension lines are twisted and to know how to untwist them. Most wing bags are clearly marked with an emblem or other marking to identify one side of the bag from the other. Keeping the marked side of the wing bag always facing in the same direction (either facing the cart or facing away from the cart) is a helpful reference to determine if you have twisted the suspension lines while moving the wing into place, either on or behind the cart. The key is to be consistent and methodical in whatever procedure you use. Your flight instructor will offer input on a practical procedure. The height and physical strength of the pilot will also be a factor in determining the best position on the cart to store the wing bag.
Place the wing bag on the ground directly behind the airframe as far back as the riser and support lines will allow, keeping the wing bag in the same configuration that it was removed from the cart. You will have to pull both line sleeves that hold the suspension lines out of
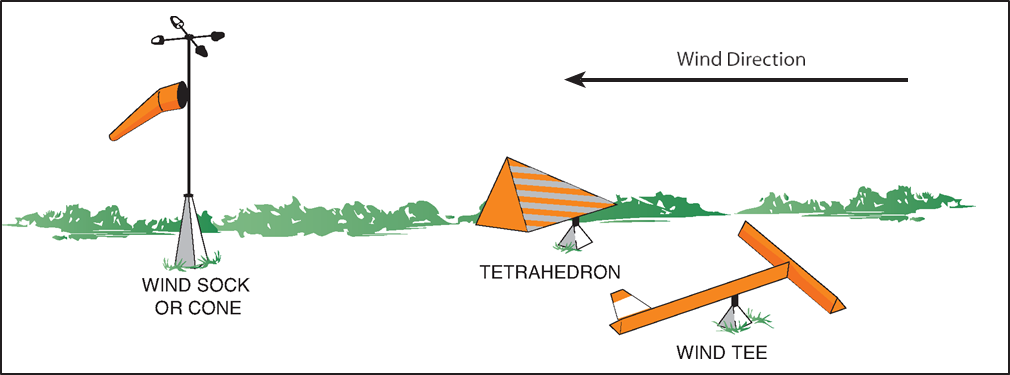
Figure 5-12. Wind direction indicators, used for positioning for takeoff.
the wing bag and one line sleeve up and around the cart to follow the bag; those lines should run straight from the attach points on the cart to the wing bag after the bag is in position behind the cart. Tilt the wing bag toward the cart to spill the folded wing out of the bag and onto the ground. [Figure 5-13]
With the wing folded behind the cart, you are ready to spread it out and in doing so begin to visually inspect the uninflated wing. Unfold the right side of the wing toward the right and repeat on the left side. As you unfold the wing, it should remain centered directly behind the cart. After the wing is completely unfolded, stand directly behind the cart and hold the leading edge of the wing up in front of you as you face the backside of the cart. You will see an “x” in the lines; this “x” should be positioned directly behind the centerline of the prop on the cart. [Figure 5-14] If it is not, physically pick up the center and drag it into the center position. Then go to the end of the side that will be bunched up and pull out the slack.
Remove the protective sleeves that cover the suspension lines and their components. The protective sleeves are referred to as line sleeves and there is a line sleeve on each set of lines (or two — the right and the left). [Figure 5-15]
While laying out the wing, check for tears in the fabric, torn or loose stitching, abrasions, and deterioration of the fabric from ultraviolet rays. The sun is one of the powered parachute wing’s worst enemies, next to the prop! Certain colors deteriorate faster than others, like red and orange, when exposed to ultraviolet rays from the sun. When the wing is not being used, you should always return it to its wing bag. Take this opportunity to check the wing cells for debris, such as stones, sticks, and bugs; lifting the wing by the trailing edge and gently shaking it will allow most captured debris to fall out of the ram-air openings on the leading edge of the wing.
With the wing centered behind the cart, it is time to start checking the suspension lines. At first glance, it may look difficult to sort out all of the lines from the cart to the wing. Most of the time, the lines will straighten out with just a light flick of the wrist. Make sure you have no twists or line-overs and your lines are straight. As long as the wing has not been physically removed, or disconnected from the cart, there should not be any permanent knots in the lines. In the event that you detect pressure knots during the line inspection, they are easily removed with minimal manipulation.
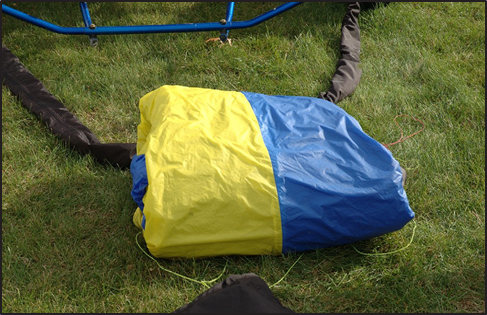
Figure 5-13. Wing removed from wing bag and folded behind the cart.
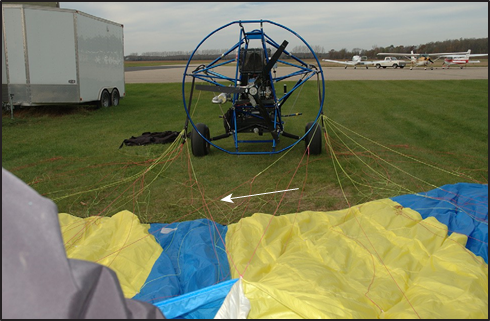
Figure 5-14. “X” in the suspension lines marks the exact center of the uninflated wing.
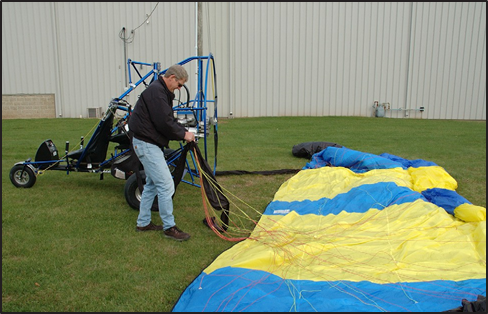
Figure 5-15. Removal of the line sleeve is an important step in the wing layout and inspection.
Small twigs, stems from weeds, and other debris can get caught in the lines to form pressure knots. Pres- sure knots are a concern because they are only “knots” when there is tension on the lines. That means they are only a problem when your wing is inflated. As soon as you land, the foreign object often shakes free and there is no knot. However, while you are flying, that pressure knot can cause the powered parachute to go into a steep turn. Make sure there is nothing around to catch into your line sets. The more organized the suspension lines are laid out during this preflight check, the more likely that the wing will kite evenly and without mishap. It may take a great deal of space to get all the cells open during the inflation of the wing. Aborting the takeoff to re-kite the wing is always an option, but it is not desirable. Preflight the wing correctly the first time.
If you put your wing away correctly and took it out as described, it should not have any twists in it. However, you still need to check. Start where the risers attach to the cart. Make sure they are not twisted around anything and trace each one back to the point where the wing risers are attached to the cart.
Check the steering lines on both sides of the cart; make sure the anchor point knots are secure and the lines flow freely through all guides and pulleys. Make sure the links on both sides of the aircraft are secure; it is recommended that the links are finger-tight plus one-quarter turn. Continue by checking that the riser cables are not twisted or damaged and they are free from tangles. At this time pull slack from the steering lines so the steering bars are fully retracted. Physically separating the steering lines from the suspension lines, pulling them out and away to the outer edge of the wingtips, enables you to visually see the steering lines are free from being tangled with the rest of the lines. [Figure 5-16]
Continue to check the suspension lines for tangles, knots, and wear and the attachment points for security and lack of fraying. [Figure 5-17] The A lines should be visually and physically separated from the B lines at the point where the lines are connected to the risers. Most newer wing lines are color-coded to make this process visually easier; the older wing styles will still be separated and configured the same way as the newer wings, however, all the lines will be the same color. The A lines will travel toward the leading edge of the wing and subdivide into the C lines. The B lines will travel toward the trailing edge of the wing and subdivide into the D lines. Make sure that the lines are all separated and not tangled. The A/C lines will be on top of the B/D lines when the lines are returned to the ground after the preflight of each section. Make sure there is no debris around to catch in the line sets during wing inflation; when the length of the line is altered it changes how the line holds the wing. The length of the lines are clearly defined by the manufacturers and should not be changed. The more organized
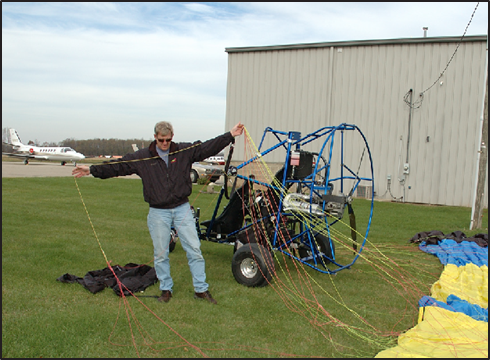
Figure 5-16. The pilot will physically pull the steering lines out and away from the bundle of suspension lines to ensure they are tangle free.
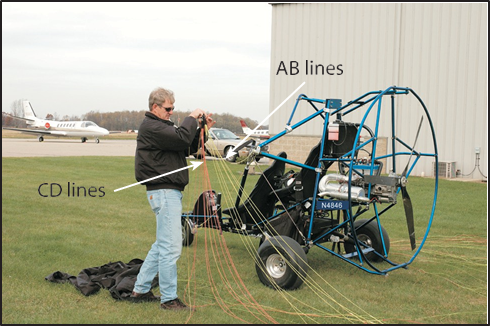
Figure 5-17. Check the suspension lines for tangles, knots, and wear.
the suspension lines are laid out during this preflight check, the more likely that the wing will kite evenly and without mishap; a lot of runways can be used up trying to get all the cells open during the inflation of the wing. Aborting the takeoff to re-kite the wing is always an option, but it is not desirable. Preflight the wing correctly the first time; taking your time will pay off in the end.
Line Tangles, Twists, and Line-Overs
Line tangles and twists can be frustrating if you do not understand how to solve them. The good news is that wing line problems are simple to understand, few in type, and easy to solve. They break down into line twists and line-overs. A definite advantage for the pilot is that both ends of the suspension lines are attached to either the risers or the wing. That means there are no loose ends to get twisted in and around each other. Any loops in the lines readily pull out if shaken a little; gently shaking all of the lines loose is an important step to get the wing laid out properly in preparation for flight.
A line twist is when all of the lines on both sides of the wing are spiraled together. Sometimes it will seem that all of the lines on one side are twisted around the steering line. That is actually the case. [Figure 5-18] Trying to fly the powered parachute with the suspension lines twisted is unsafe and the pilot should consider the wing unairworthy until the line twist is removed. Line twists most often occur because the pilot inadvertently flips, or turns, the wing over while moving it from the stowed position. This is why it is so important to put your wing away and take it out the same way each time. The suspension lines can also get twisted if the wing flies over the cart accidentally, or if the wing is incorrectly repositioned behind the cart when the wing settles to one side of the cart during an aborted takeoff or during landing.
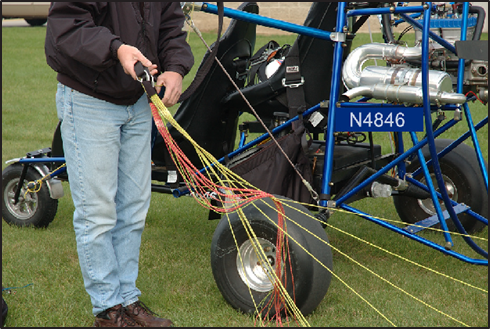
Figure 5-18. Line twist.
Unless someone has mistakenly twisted a single set of suspension lines while rigging the PPC wing to the cart at the attachment points, a line twist will happen to both sets of lines on both sides of the powered parachute at the same time. This stands to reason if you think of the entire configuration of the cart and attached wing as a continuous structure or a complete circle.
To get rid of a line twist, you do not have to pack the wing back into the wing bag and flip the whole bag in reverse, although this is an option. You can actually flip the wing while it is out of the bag.
With the wing laid out behind the cart, determine if the twist is clockwise or counterclockwise in configuration. If the twist in the line is traveling clockwise as you face the chute, the wing edge you are working with will have to travel counterclockwise back through the center of the two sets of lines (or through the center of the circle created by the cart/wing configuration) and under the twisted group of lines you are holding. A counterclockwise twist will require just the opposite movement. The wing edge will need to travel clockwise under the line set and then up and over the twist via the center of the circle. Remember to maintain the clockwise motion for the counterclockwise twist, and the counterclockwise motion for the clockwise twist.
Disconnecting the wing from the risers or the wing from the cart is not a safe practice; the flight instructor needs to explain this to the PPC student in detail. The risers are specific to each cart. Refer to the PPC manufacturer and the operating manual for information.
Starting at the riser cables, gather all the lines in the group and walk toward the wing keeping the lines gathered as you go. Once close to the wing, you can easily manipulate the edge of the wing and not tangle the lines any further. The key is to remember that the lines are twisted as a group—not tangled individually—therefore they must be untwisted as a group to prevent them from becoming tangled. [Figures 5-19 and 5-20]
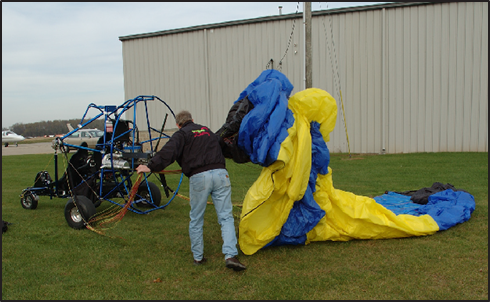
Figure 5-19. Undoing a line twist—beginning of the process
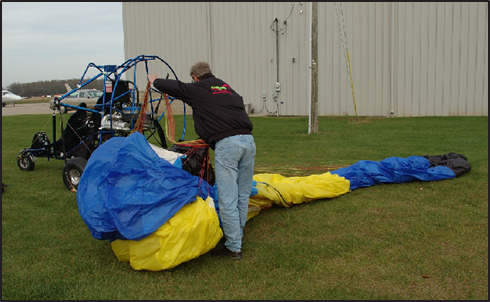
Figure 5-20. Pilot throwing the wing edge through to undo a line twist.
Lay out the half of the wing you just worked on. If that side looks good, it means you can do the same thing to the other side of the chute. The same sequence of checking for twist direction, gathering the lines and then twisting the wing edge in the opposite direction of the twisted lines is completed on the second set of lines. It stands to reason that the twist will be in the opposite direction than the twist on the other set of lines you just cleared.
There is a possibility that the side you are working on still doesn’t look right when you re-check it. If the lines still look twisted, then you probably flipped the wing the wrong way. The good news is that there are only two types of line twists, clockwise and counterclockwise—with a little practice you will be able to recognize the twist well before you start handling the wing.
The line-over is one of the most dangerous things that can happen to the powered parachute wing. A line-over is exactly what it sounds like. Instead of the wing line going straight from the wing to the riser system, it takes a trip over the top of the wing first. This means that when the wing inflates, the suspension line that is over the top of the wing will pinch the wing together and prevent the proper inflation of the wing to produce the airfoil necessary to achieve flight. If a line is over the top surface of the wing, the pilot risks serious injury or death if takeoff is attempted. To recognize a line-over before you take off, look for a line that is twisted with other lines on one or both sides of the wing. If you see that, your next step should be to inspect the leading edge and top of the wing closely. If you see a line wrapped over the top, you have found your problem.
Sometimes using the “stacked” method of laying out the wing during the final wing staging before flight versus the “inverted” method can inadvertently produce a line-over on the top side of the wing as it inflates. Also, “stuffing” the wing into the wing bag versus methodically folding the wing for storage can cause a line to become wrapped around the top of the wing mistakenly. [Figure 5-21]
To correct a line-over, pull the fabric of the wing through the loop made by the line-over. To know which side to pull the noncompliant suspension line to, trace the line to its home line group (left or right riser) before you start pulling things around. Sometimes- times the side will be easy to determine because the line-over is either close to the left or right edge of the
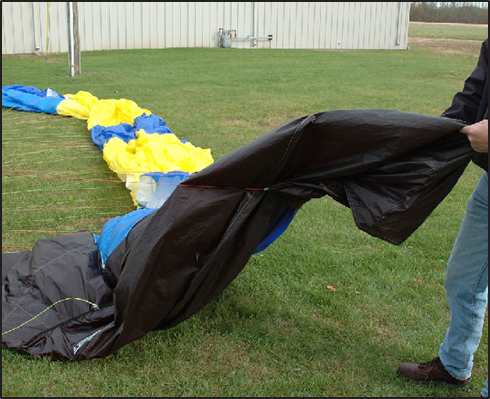
Figure 5-21. A simulated line-over.
wing. When it is not, tracing it is the best way to save time and to determine the correct way to pull the wing fabric.
Preparing for Takeoff
Wing inflation and kiting procedures are critical to a successful takeoff. Refer to Chapter 7 for information on how to lay out the wing, wing inflation, and kiting.
After Landing
It is imperative to evaluate the field in which you intend to land, particularly because of the unique nature of the powered parachute wing, and what happens to it prior to landing. If the field is being used by other aircraft, taxi the powered parachute off the “active” area or runway surface while the wing remains kited. Ground taxiing with the wing kited takes a little practice, but the flight instructor will make sure the student pilot has adequately mastered this skill prior to takeoff instruction.
After the powered parachute has touched down, re-lease the flare on the wing; this is done to prevent the aircraft from becoming airborne again. Not releasing the flare on landing is a critical and common mistake made by both new and seasoned PPC pilots. With the throttle at idle, the powered parachute begins to slow down to the point where the stream of air is not sufficient to maintain the wing’s pressurization. At this time, the engine must be shut down immediately; the consequences of not turning off the magnetos during the after-landing roll are detrimental to the well-being of the wing because the propeller will most likely chop the PPC lines. A turning propeller and the wing and its components do not mix. Once you turn off the magnetos, you will physically grab the steering lines from overhead and pull the wing to the ground to finish the deflation process. If the wing is allowed to “float” down on its own, a small gust of wind can force the suspension lines onto hot exhaust surfaces which can melt the lines, or even pick up the cart and instigate a landing roll.
Clearing the Runway
If a powered parachute lands on the center of a runway, it is considered good practice to taxi to the edge of or even off of the runway before collapsing the wing and stowing equipment. When doing that, it is important to keep the powered parachute moving after landing to keep the wing inflated. The safest and easiest method is to keep taxiing straight into the wind until you clear the runway or landing area and can collapse the parachute out of the way of other aircraft. If you determine that winds are too strong or gusty to taxi off of an active runway, an alternate landing area should be chosen.
Parking
Unless parking in a designated, supervised area, you should select a location that will prevent the propeller blast of other airplanes from striking the powered parachute broadside. The powered parachute engine is not enclosed in a cowling and engine surfaces will be extremely hot. Never assume a bystander will know this; even though the engine is not operating, it can still be dangerous.
Once out of the powered parachute, you should immediately pull the trailing edge of the wing forward toward the cart and roll the leading edge and cell openings under the wing surface; this will prevent gusts of air from grabbing the wing and pulling the cart backward. After the wing is totally disabled from becoming airborne, you can assist your passenger in disembarking from the cart.
Postflight
A flight is never complete until the engine is shut down and the aircraft is secure. A pilot should consider this an essential part of any flight.
After the engine shuts down and the passenger exits the cart, the pilot should accomplish a postflight inspection. This includes checking the general condition of the aircraft. For additional departures, the oil should be rechecked and fuel added if required. If the PPC is going to be inactive for a period of time, put the wing properly back in the bag to keep it out of the sun.
Packing the Wing
As discussed earlier in this chapter, packing the wing back into the wing bag at the end of the flight is a necessary task. The care and method the pilot employs for this critical task directly affect whether or not the wing is easy to unpack for the next flight. The process of folding the wing and returning it safely to its wing bag takes little time and the powered parachute passenger can lend a hand to the pilot in the process. If the pilot is flying solo the process will take a little longer, but the overall results will be the same and this gives the pilot an opportunity to do a thorough postflight inspection of both the wing itself and the suspension lines.
After disembarking from the cart, the wing should be repositioned in the inverted layout with the exception that the cart/prop hoop will be positioned very close to the trailing edge of the wing. At that time the line sleeves should both be replaced on each set of suspension lines. When the line sleeves are in place, the two bundles and any suspension lines left showing are placed on the exposed lower surface of the wing where they will be neatly packaged for storage during the folding process of the wing.
Starting with one outer trailing edge of the wing, draw the wing surface up and over the surface of the wing fabric to the very center of the wing. The same action will then be completed on the leading edge of the wing on the same side. The process is then completed two more times on the same side. Then the wing is folded from the other side three times in the same manner, resulting in a long rectangle of wing lying directly behind the prop line of the cart. This is one example; it is important for you to follow the manufacturer’s recommendations for your PPC.
The pilot then starts at the edge closest to the cart and folds the sides of the folded wing alternately in on each other, depressing the trapped air out of the fabric, all the way to the farthest area away from the cart. [Figure 5-22] Once this is complete, the wing pack-age size is established by taking the farthest edge and folding it toward the cart over and over until a neat square is obtained on the last fold.
After the wing is folded and lying on the ground behind the cart, the wing bag is placed on the ground next to the wing (on the side away from the cart). [Figure 5-23] It is advised to have a “marked” side of the bag and always keep the marked side facing up or in the same direction every time you load the wing into the bag and onto the cart. The wing is then neatly pulled into the bag. The pilot then picks the bag up on the end and gathers the line sleeves on top of the wing. [Figure 5-24] Refer to the manufacturer’s recommendations for loading the wing in its bag on the cart for taxi and storage.
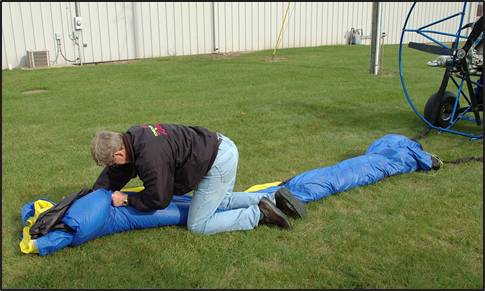
Figure 5-22. Squeeze out the air as you fold the wing for packing.
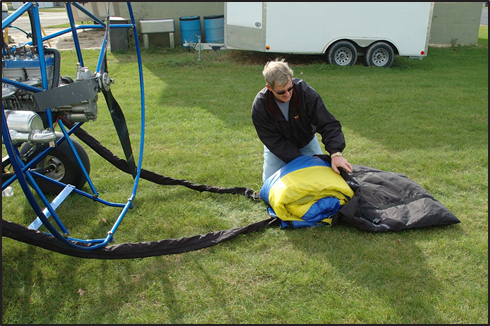
Figure 5-23. With the wing folded, you pull it into the bag.
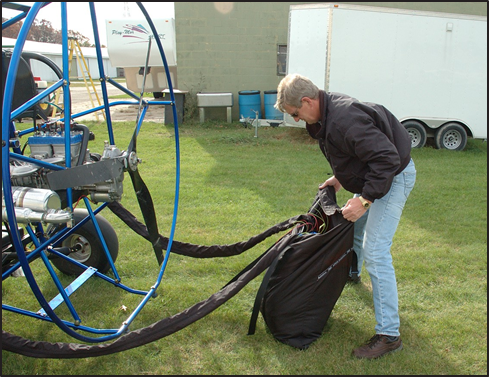
Figure 5-24. The line sleeve on the side of the cart where the bag will be stored can be placed on top of the folded wing, inside the bag; the other line sleeve will be used to store the bag on the cart.


