The information in this chapter is specific to the powered parachute land class. Refer to the Seaplane, Skiplane, and Float/Ski Equipped Helicopter Operations Handbook (FAA-8083-23) for information regarding the operation of a powered parachute category sea class (PPCS) aircraft, as appropriate.
Normal Approach and Landing
A normal approach and landing involves the use of procedures for what is considered a normal situation; that is, when engine power is available, the wind is light or the final approach is made directly into the wind, the final approach path has no obstacles, and the landing surface is firm, level and of ample length to gradually bring the powered parachute to a stop. The selected landing point should be beyond the runway’s approach threshold but within the first one-third portion of the landing area.
So you may better understand the factors that will influence judgment and procedures, the last part of the approach pattern and the actual landing will be divided into five phases: the base leg, the final approach, the roundout, the touchdown, and the after- landing roll.
The manufacturer’s recommended procedures,including powered parachute configuration, center of gravity, and other information relevant to approaches- es and landings in a specific make and model pow- ered parachute are contained in the Pilot’s Operating Handbook (POH) for that powered parachute. If any of the information in this chapter differs from the powered parachute manufacturer’s recommendations as contained in the POH, the powered parachute manufacturer’s recommendations take precedence.
Base Leg
The placement of the base leg is one of the more important judgments made by the pilot in any landing approach. [Figure 11-1] You must accurately judge the altitude and distance from which a gradual descent will result in landing at the desired spot. The distance will depend on the altitude of the base leg and the effect of wind. When there is a strong wind on final approach, the base leg must be positioned closer to the approach end of the runway than would be required with a light wind. You should strive to fly a constant ground track on base leg.
Drift correction should be established and maintained to follow a ground track perpendicular to the extension of the centerline of the runway on which the landing is to be made. Since the final approach and landing will normally be made into the wind, there may be somewhat of a crosswind during the base leg. This requires the powered parachute be angled sufficiently into the wind to prevent drifting farther away from the intended landing spot.
The base leg should be continued to the point where a medium to shallow-banked turn will align the powered parachute’s path directly with the centerline of the landing runway. This descending turn should be completed at a safe altitude that will be dependent upon the height of the terrain and any obstructions along the ground track. The turn to the final approach should also be sufficiently above the airport elevation to permit a final approach long enough for you to accurately estimate the resultant point of touchdown. This will require careful planning as to the starting point and the radius of the turn. Normally, it is recom- mended that the angle of bank not exceed a medium bank because the steeper the angle of bank, the faster the powered parachute descends. Since the base-to- final turn is often made at a relatively low altitude, it is important not to do radical turns at low altitude. If a significant bank is needed to prevent overshooting the proper final approach path, it is advisable to discontinue the approach, go around, and start the turn earlier on the next approach rather than risk a hazard- ous situation.
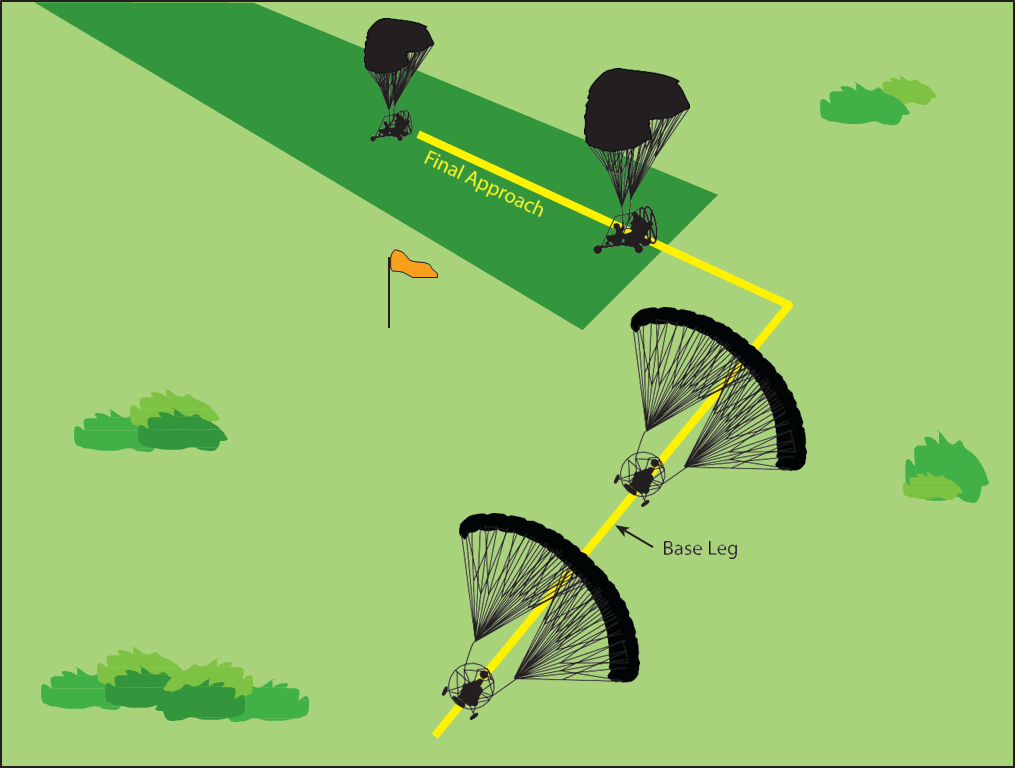
Figure 11-1. Base leg and final approach.
Final Approach
After the base-to-final approach turn is completed, the powered parachute should be aligned with the centerline of the runway or landing surface, so drift (if any) will be recognized immediately. On a normal approach, with no wind drift, keep the longitudinal axis aligned with the runway centerline throughout the approach and landing. (The proper way to correct for a crosswind will be explained under the section, “Crosswind Approach and Landing.” For now, only an approach and landing where the wind is straight down the landing area will be discussed.)
Focus directly down the centerline and steer right or left to remain on that centerline.
While aligning the powered parachute down the run- way centerline, or straight down your intended landing area, slight adjustments in power may be necessary to maintain the descent.
Control the descent angle throughout the approach so the powered parachute will land in the center of the first third of the runway. The descent angle is affected by the throttle. More throttle means lower descent rate, less throttle results in a higher descent rate. The wind also plays a prominent part in the gliding distance over the ground. [Figure 11-2] Naturally, you do not have control over the wind but may correct for its effect on the powered parachute’s descent by appropriate power adjustments: more throttle is required in a headwind and crosswind, less throttle is required with a tailwind.
The objective of a good final approach is to descend at an angle that will permit the powered parachute to reach the desired touchdown point. Since on a normal approach the power setting is not fixed as in a power-off approach, adjust the power as necessary, to control the descent angle, or to attain the desired altitudes along the approach path. This is one reason for performing approaches with partial power; if the approach is too high, merely reduce the power. When the approach is too low, add power.
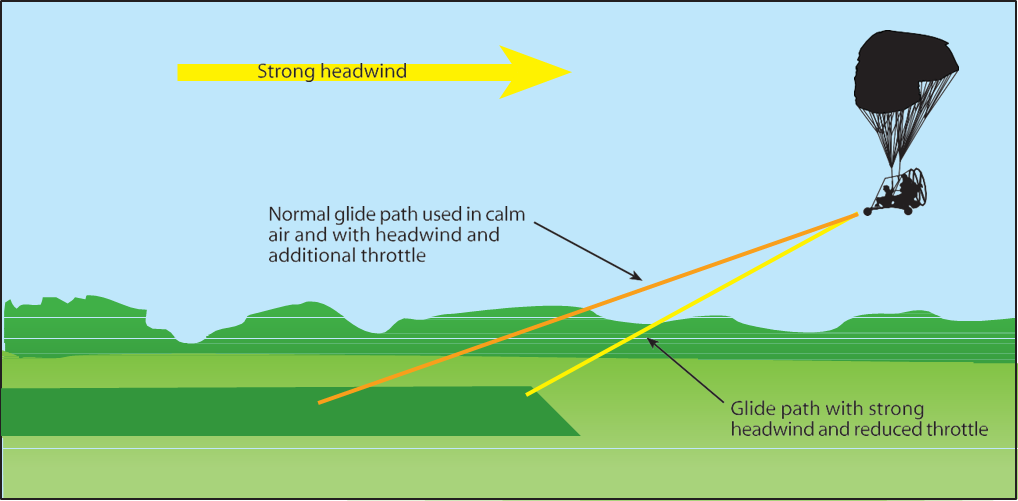
Figure 11-2. Effect of headwind on final approach.
Estimating Height and Movement
During the approach, roundout, and touchdown, vi- sion is of prime importance. To provide a wide scope of vision and to foster good judgment of height and movement, your head should assume a natural, straight-ahead position. Your visual focus should not be fixed on any one side or any one spot ahead of the powered parachute, but should be changing slowly from a point just over the powered parachute’s nosewheel to the desired touchdown zone and back again, while maintaining a deliberate awareness of distance from either side of the runway within your peripheral field of vision. Accurate estimation of distance is, besides being a matter of practice, dependent upon how clearly objects are seen; it requires that vision be focused properly for the important objects to stand out as clearly as possible.
Speed blurs objects at close range. For example, consider the view from an automobile moving at high speed. Nearby objects seem to merge together in a blur, while objects farther away stand out clearly. The driver subconsciously focuses the eyes sufficiently far ahead of the automobile to see objects distinctly. In the same way, the distance at which the powered parachute pilot’s vision is focused is normally adjusted automatically.
If you attempt to focus on a reference that is too close or look directly down, the reference will become blurred, and the reaction will be either too abrupt or too late. In this case, your tendency will be to overcontrol, round out high, and make drop-in landings. When you focus too far ahead, accuracy in judging the closeness of the ground is lost and the consequent reaction will be too slow since there will not appear to be a necessity for action. This will result in flying into the ground without flaring.
Roundout
The powered roundout is a slow, smooth transition from a normal approach descent rate to a landing de- scent rate, gradually rounding out the flightpath to one that is parallel with, and within a very few inches above the runway. When the powered parachute is in a normal descent, within what appears to be 10 to 20 feet above the ground, the powered roundout should be started. Once started, it should be a continuous pro- cess until the powered parachute touches down on the ground.
As the powered parachute reaches a height above the ground where a timely change can be made into the proper landing descent, power should be gradu- ally applied to slowly decrease the rate of descent. [Figure 11-3]
The rate at which the roundout is executed depends on the powered parachute’s height above the ground and the rate of descent. A roundout started excessively high must be executed more slowly than one from a lower height to allow the powered parachute to descend to the ground. The rate of rounding out must also be proportionate to the rate of closure with the ground. When the powered parachute appears to be descending very slowly, no increase in power settings is called for.
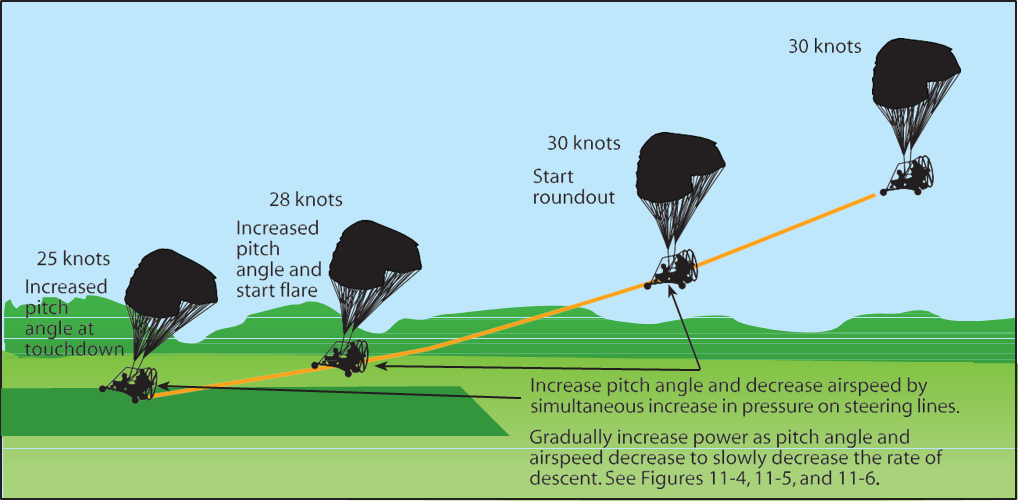
Figure 11-3. Changing pitch angle and decreasing airspeed during roundout.
Visual cues are important in rounding out at the prop- er altitude and maintaining the wheels a few inches above the surface until eventual touchdown. Visual cues are primarily dependent on the angle at which your central vision intersects the ground (or runway) ahead and slightly to the side. Proper depth perception is a factor in a successful flare, but the visual cues used most are those related to changes in runway or ter- rain perspective and to changes in the size of familiar objects near the landing area such as fences, bushes, trees, hangars, and even sod or runway texture. You should direct central vision at a shallow downward angle of from 10° to 15° toward the runway as the roundout is initiated.
Maintaining the same viewing angle causes the point of visual interception with the runway to move progressively rearward toward you as the powered parachute loses altitude. This is an important visual cue in assessing the rate of altitude loss. Conversely, for- ward movement of the visual interception point will indicate an increase in altitude, and would mean that power was increased too rapidly, resulting in floating. In most powered parachutes, the front wheel can easily be seen and can be used as an indicator of how far the main wheels are above the runway.
In some cases, it may be necessary to advance the throttle slightly to prevent an excessive rate of sink which would result in a hard, drop-in type landing. You should keep one hand on the throttle throughout the approach and landing, in case a sudden and un- expected hazardous situation requires an immediate application of power.
Wing Control
The measured input of the flare is directly related to the leg extension of the pilot. For one-third flare, simultaneously push the steering controls out approximately one-third of your leg length. During a fullflare, you would be fully extending your legs to apply input to the steering controls; one-half flare, you would be pushing the controls out half of your full leg extension, and so on. [Figure 11-4]
For landings, the amount of flare needed is directly related to the descent rate. The steeper and faster the descent, the more flare input is required for a smooth landing. [Figure 11-5] Keep in mind the flare is converting forward momentum into lift. So, if the pilot is landing with a very slow descent rate, then the pilot would only need to apply one-third flare during the landing. Use full-flare during an engine-out descent, which is the steepest descent of a PPC, for landing.
A flare should be applied in a single 1-2-3 motion. Apply the flare smoothly, in a rhythmic, even, “1-2- 3” motion.

Figure 11-4. Flare is measured relative to the pilot’s leg length.
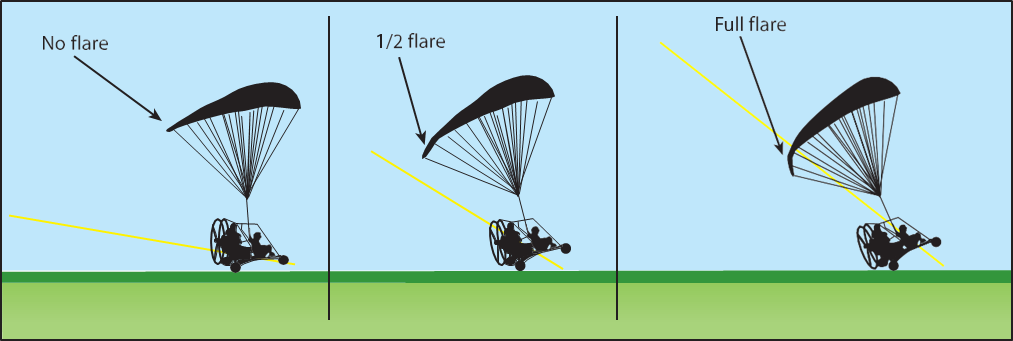
Figure 11-5. The steeper the descent rate, the greater the need for flare.
Touchdown
The touchdown is the gentle settling of the powered parachute onto the landing surface. The roundout and touchdown should be made with the engine slightly below level flight power levels. As the powered parachute settles, the parachute is flared to smooth out the landing.
Some pilots may try to force or fly the powered parachute onto the ground without flaring. It is paradoxical that the way to make an ideal landing is to try to hold the powered parachute’s wheels a few inches off the ground as long as possible. In most cases, when the wheels are within a foot or less off the ground, the powered parachute will still be settling too fast for a gentle touchdown; therefore, this rate of descent must be retarded by the use of flare. [Figure 11-6]
Flare is accomplished by pushing both steering bar tubes simultaneously. That pulls the entire trailing edge of the parachute down. That increases drag, lowers the forward speed, and most importantly (for landing) increases the lift of the parachute. The amount of flare needed depends on the rate of descent right before landing. If the rate of descent is very gradual, very little flare is needed. Conversely, in an engineout situation a lot of flare is required. Accurately determining how much flare is needed for a given situation is developed with practice. A general rule is to begin the flare one second before you would otherwise touch the ground. Flare is used rather than engine power because the wing is much more responsive in controlling descent and pitch than engine power. When you add flare, the drag on the wing increases and the wing quickly responds by rotating backwards and increasing its pitch angle. In order to achieve the same effect with engine power, you add throttle, the propeller speeds up, and the thrust pushes the cart (which is much heavier than a parachute) forward of the wing. It is easier to change the inertia and positioning of a 25-pound wing than a 500+ pound cart-engine-pilot-fuel assembly.
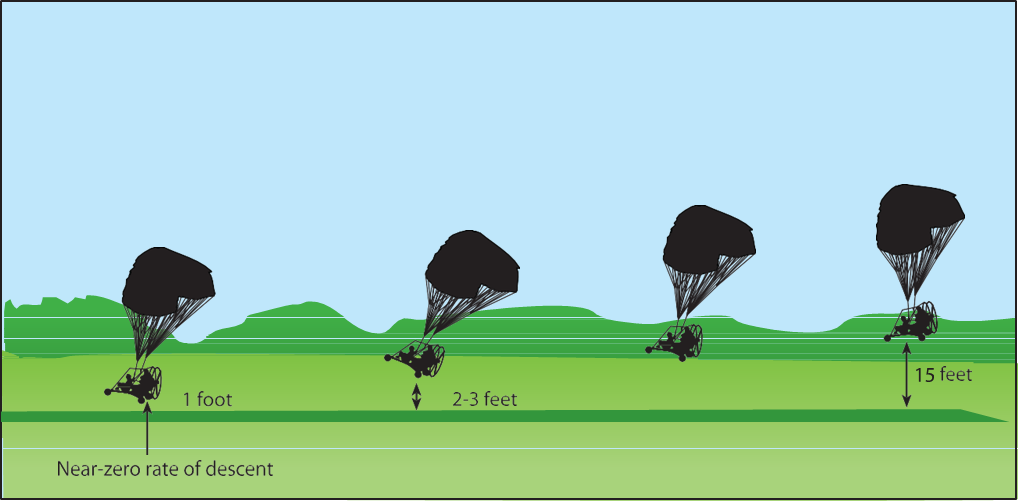
Figure 11-6. A well executed roundout results in attaining the proper landing attitude.
It is extremely important the touchdown occur with the powered parachute’s longitudinal axis exactly parallel to the direction in which the PPC is moving along the surface. Failure to accomplish this imposes side loads on the landing gear. To avoid these side stresses, you should try to not allow the PPC to touch down while drifting.
After-Landing Roll
The landing process must never be considered complete until the powered parachute has been brought to a complete stop, the engine shut down, and the wing collapsed and on the ground. Many accidents have oc- curred as a result of pilots abandoning their vigilance and positive control after getting the powered parachute on the ground. Some have damaged their parachute by failing to stop the engine before the wing falls into the moving propeller. Other incidents have occurred where the wind has caught a still-inflated wing and rolled the powered parachute over.
Normally as soon as you have landed, you should do
four things in this order:
- Release any flare that was used during landing. Once the flare is released, the wing will rotate forward relative to the cart. That decreases both the angle of attack and lift that the landing flare generated. With the flare released, there will be more load put on the front landing gear, which in turn makes the powered parachute easier to ground handle.
- Unless you have the intention to taxi the powered parachute with the parachute inflated, close the throttle.
- Shut down the ignition system. Normally, powered parachutes have two toggle ignition switches. Both toggle switches must be turned off to shut down the engine.
- The parachute needs to be collapsed and grounded. This is done by tugging on the parachute steering lines. One long pull will generally not be adequate. Three or four quick tugs will normally be enough. The wing rotating and collapsing behind the cart will also act as
- a brake for the powered parachute, much like a drogue chute. [Figure 11-7]
- Landings should always be planned to be done di- rectly into the wind. However, if you must land in a crosswind, you may be able to land but you will not be able to takeoff. You can land on higher crosswinds than you can take off.
- A wide runway may allow you the capability to land across the runway. However, a narrow runway would not allow this. Therefore, if you must land in a cross- wind, during final approach, crab into the wind and line up on the runway centerline. Approach with this crab and flare as you normally would. Reduce power as your back wheels touch. When your back wheels touch, your front wheel will swing around, straight down the runway. However your wing will still be headed into the wind. Shut the engine down and continue pulling the steering lines to get the canopy down on the ground immediately since you can not taxi in a crosswind.
Figure 11-7. Collapsing the parachute.
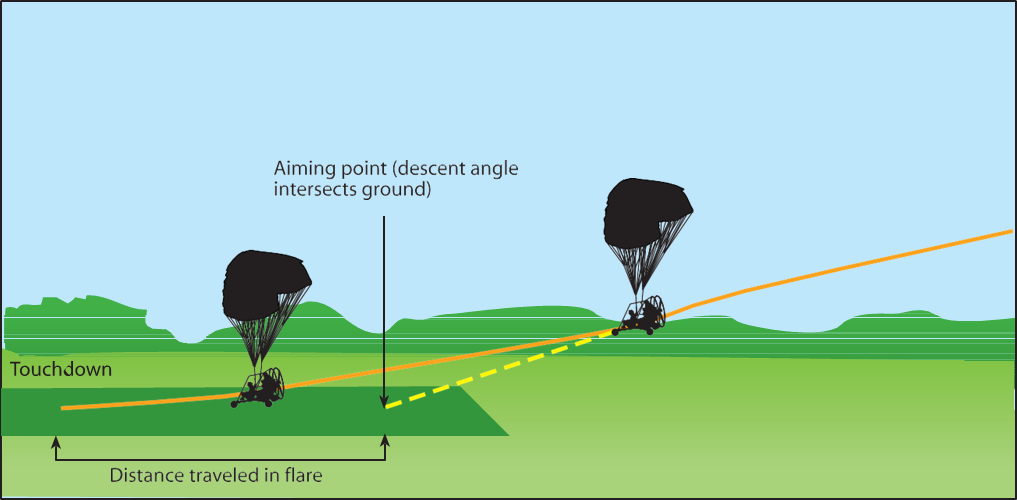
Figure 11-8. Stablized approach.
Stabilized Approach Concept
A stabilized approach is one in which the pilot establishes and maintains a constant angle glide path to- wards a predetermined point on the landing runway. It is based on the pilot’s judgment of certain visual clues, and depends on the maintenance of a constant final approach.
A powered parachute descending on final approach at a constant rate will be traveling in a straight line to- ward a spot on the ground ahead. This spot will not be the spot on which the powered parachute will touch down, because some float will inevitably occur during the powered roundout and flare.
The point toward which the powered parachute is progressing is termed the “aiming point.” [Figure 11-8] It is the point on the ground at which, if the powered parachute maintains a constant glidepath, and was not rounded out or flared for landing, it would strike the ground. To a pilot moving straight ahead toward an object, it appears to be stationary. It does not “move.” This is how the aiming point can be distinguished—it does not move. However, objects in front of and beyond the aiming point do appear to move as the distance is closed, and they appear to move in opposite directions. During instruction in landings, one of the most important skills a student pilot must acquire is how to use visual cues to accurately determine the true aiming point from any distance out on final approach. From this, the pilot will not only be able to determine if the glidepath will result in an undershoot or over- shoot, but, taking into account float during roundout, the pilot will be able to predict the touchdown point to within a very few feet.
For a constant angle glidepath, the distance between the horizon and the aiming point will remain constant. If a final approach descent has been established but the distance between the perceived aiming point and the horizon appears to increase (aiming point moving down away from the horizon), then the true aiming point, and subsequent touchdown point, is farther down the runway. If the distance between the perceived aiming point and the horizon decreases (aiming point moving up toward the horizon), the true aiming point is closer than perceived.
When the powered parachute is established on final approach, the shape of the runway image also presents clues as to what must be done to maintain a stabilized approach to a safe landing.
The objective of a stabilized approach is to select an appropriate touchdown point on the runway, and adjust the glidepath so the true aiming point and the desired touchdown point basically coincide. Immediately after rolling out on final approach, you should adjust the power so the powered parachute is descending directly toward the aiming point. With the approach set up in this manner, you will be free to devote full attention toward outside references. You should not stare at any one place, but rather scan from one point to another, such as from the aiming point to the horizon, to the trees and bushes along the runway, to an area well short of the runway, and back to the aiming point. In this way, you will be more apt to perceive a deviation from the desired glidepath, and whether or not the powered parachute is proceeding directly toward the aiming point.
If the aiming point on the runway is not where you want it, adjust the glidepath. This in turn will move the aiming point. For instance, if you perceive the aiming point is short of the desired touchdown point and will result in an undershoot, increase the engine power. The power change must be made smoothly. This will result in a shallower glidepath with the resultant aiming point moving towards the desired touchdown point. Conversely, if the aiming point is farther down the runway than the desired touchdown point and you suspect it will result in an overshoot, steepen the glidepath by decreasing power.
The closer the powered parachute gets to the runway, the larger (and possibly more frequent) the required corrections may become, resulting in an unstabilized approach.
Common errors in the performance of normal ap-
proaches and landings are:
- Inadequate wind drift correction on the base leg.
- Overshooting or undershooting the turn onto final approach resulting in too steep or too shallow a turn onto final approach.
- Unstabilized approach.
- Focusing too close to the powered parachute resulting in a too high roundout.
- Focusing too far from the powered parachute resulting in a too low roundout.
- Flaring the parachute too early before touchdown.
- Touching down prior to attaining proper landing attitude.
- Failure to release the flare after touchdown.
Go-Arounds (Rejected Landings)
Whenever landing conditions are not satisfactory, a go-around is warranted. There are many factors that can contribute to unsatisfactory landing conditions. Situations such as air traffic control requirements, un- expected appearance of hazards on the runway, over- taking another powered parachute, wind shear, wake turbulence, mechanical failure and/or an unstabilized approach are all examples of reasons to discontinue a landing approach and make another approach un- der more favorable conditions. The assumption that an aborted landing is invariably the consequence of a poor approach, which in turn is due to insufficient experience or skill, is a fallacy. The go-around is not strictly an emergency procedure. It is a normal maneuver that may at times be used for normal situations. It does not need to be an emergency to do a go-around. Like any other normal maneuver, the go- around must be practiced and perfected. The flight instructor should emphasize early on, and the student pilot should understand, that the go-around maneuver is an alternative to any approach and/or landing.
Although the need to discontinue a landing may arise at any point in the landing process, the most critical go-around will be one started when very close to the ground. Therefore, the earlier a condition that warrants a go-around is recognized, the safer the go-around/ rejected landing will be. The go-around maneuver is not inherently dangerous in itself. It becomes dangerous only when delayed unduly or executed improperly.
Delay in initiating the go-around normally stems from two sources: (1) landing expectancy, or set—the anticipatory belief that conditions are not as threatening as they are and that the approach will surely be terminated with a safe landing, and (2) pride—the mistaken belief that the act of going around is an admission of failure—failure to execute the approach properly. The improper execution of the go-around maneuver stems from a lack of familiarity with the three cardinal principles of the procedure: power, power, and power.
Power is your first concern. The instant you decide to go around, full power must be applied smoothly and without hesitation, and held until the powered parachute climbs back to pattern altitude. Applying only partial power in a go-around is never appropriate. You must be aware of the degree of inertia that must be overcome, before a powered parachute that is settling towards the ground can become capable of turning safely or climbing. The application of power should be smooth as well as positive. Abrupt movements of the throttle in some powered parachutes will cause the engine to falter.
Common errors in the performance of go-arounds (re-
jected landings) are:
- Failure to recognize a condition that warrants a
- Indecision.
- Delay in initiating a go-around.
- Failure to apply maximum allowable power in a timely manner.
- Abrupt power application.
- Failure to adequately compensate for torque/ P-factor.
Turbulent Air Approach and Landing
Powered parachute flying is a low-wind sport. It is important PPC pilots evaluate the upper-air winds to ensure the wind is within the limitations for that aircraft, accounting for wind shear and wind gust possibilities at pattern altitude.
For flying in more turbulent air on final approach, maintain power throughout the approach to reduce your descent rate in case you do experience a down gust. This will alleviate the possibility of an excessive descent rate.
Emergency Approaches and Landings (Simulated)
From time to time on dual flights, the instructor should give simulated emergency landings by retarding the throttle and calling “simulated emergency landing.”
The objective of these simulated emergency landings is to develop the pilot’s accuracy, judgment, planning, procedures, and confidence when little or no power is available.
A simulated emergency landing may be given at any time. When the instructor calls “simulated emergency landing,” the pilot should consider the many variables, such as altitude, obstruction, wind direction, landing direction, landing surface and gradient, and landing distance requirements. Risk management must be exercised to determine the best outcome for the given set of circumstances. The higher the altitude, the more time the pilot has to make the decision of where to land.
Using any combination of normal gliding maneuvers, from wing level to turns, the pilot should eventually arrive at the normal key position at a normal traffic pattern altitude for the selected landing area. From this point on, the approach will be as nearly as possible a normal power-off approach. [Figure 11-9]
All pilots should learn to determine the wind direction and estimate its speed. This can be done by observing the windsock at the airport, smoke from factories or houses, dust, brush fires, and windmills.
Once a field has been selected, the student pilot should always be required to indicate it to the instructor. Normally, the student should be required to plan and fly a pattern for landing on the field elected until the instructor terminates the simulated emergency landing. This will give the instructor an opportunity to explain and correct any errors; it will also give the student an opportunity to see the results of the errors.
However, if the student realizes during the approach that a poor field has been selected—one that would obviously result in disaster if a landing were to be made—and there is a more advantageous field within gliding distance, a change to the better field should be permitted. The hazards involved in these last-minute decisions, such as excessive maneuvering at very low altitudes, should be thoroughly explained by the instructor.
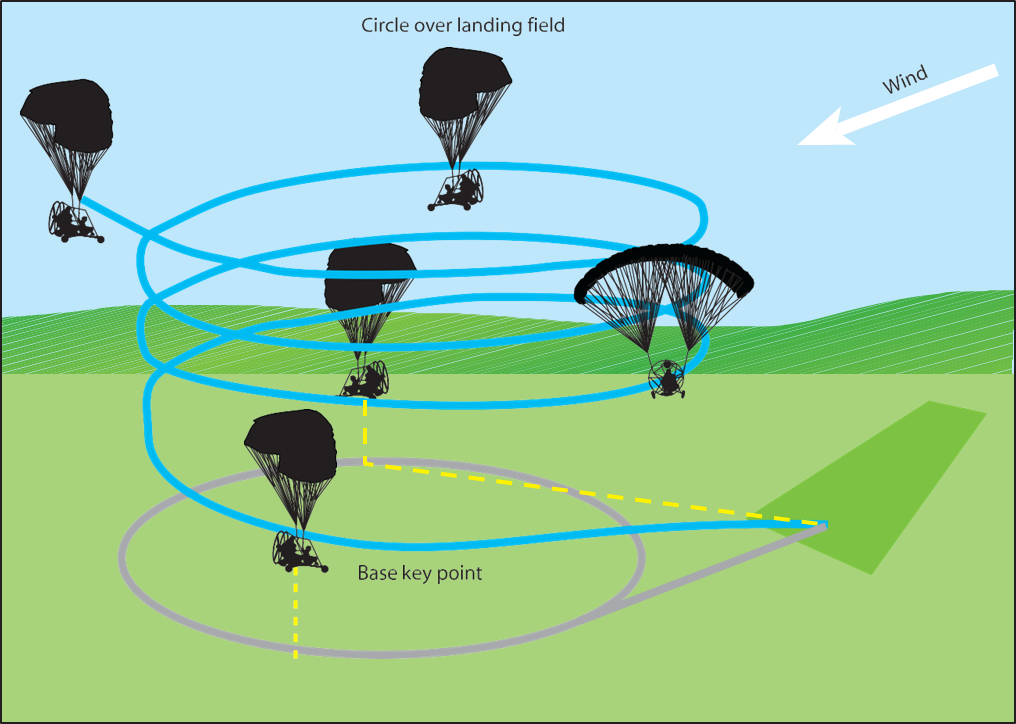
Figure 11-9. Remain over intended landing area; once selected, never have the landing zone behind the pilot/aircraft.
During all simulated emergency landings, the engine should be kept warm and cleared. During a simulated emergency landing, either the instructor or the student should have complete control of the throttle. There should be no doubt as to who has control since many near accidents have occurred from such misunderstandings.
Every simulated emergency landing approach should be terminated as soon as it can be determined whether a safe landing could have been made. In no circumstances should you violate the altitude restrictions detailed in 14 CFR part 91 or any local nonaviation regulations in force. It is also important to be courteous to anyone on the ground. In no case should it be continued to a point where it creates a hazard or an annoyance to persons or property on the ground.
In addition to flying the powered parachute from the point of simulated engine failure to where a reasonable safe landing could be made, the pilot should also learn certain emergency cockpit procedures. The habit of performing these cockpit procedures should be developed to such an extent that, when an engine failure actually occurs, the pilot will check the critical items that would be necessary to get the engine operating again after selecting a field and planning an approach. Accomplishing emergency procedures and executing the approach may be difficult for the pilot during the early training in emergency landings.
There are definite steps and procedures to follow in a simulated emergency landing. They should be learned thoroughly by the student, and each step called out to the instructor. The use of a checklist is strongly recommended. Most powered parachute manufacturers provide a checklist of the appropriate items. [Figure 11-10]
Critical items to be checked should include the quantity of fuel in the tank and the position of the ignition switches. Many actual emergency landings could have been prevented if the pilots had developed the habit of checking these critical items during flight training to the extent that it carried over into later flying.
Instruction in emergency procedures should not be limited to simulated emergency landings caused by power failures. Other emergencies associated with the operation of the powered parachute should be explained, demonstrated, and practiced if practicable. Among these emergencies are such occurrences as fire in flight, electrical system malfunctions, unexpected severe weather conditions, engine overheating, imminent fuel exhaustion, and the emergency operation of powered parachute systems and equipment.
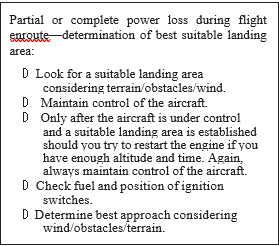
Figure 11-10. Sample emergency checklist.
Faulty Approaches and Landings
When the base leg is too low, insufficient power is used or the velocity of the wind is misjudged, sufficient altitude may be lost, which will cause the powered parachute to be well below the proper final approach path. In such a situation, you would have to apply considerable power to fly the powered parachute (at an excessively low altitude) up to the runway threshold.
When it is realized the runway will not be reached unless appropriate action is taken, power must be applied immediately to stop the descent. When the proper approach path has been intercepted, the correct approach attitude should be re-established and the power reduced and a stabilized approach maintained. [Figure 11-11] If there is any doubt about the approach being safely completed, it is advisable to EXECUTE AN IMMEDIATE GO-AROUND.
High Final ApproachWhen the final approach is too high, reduce power as required. [Figure 11-12] When the proper approach path has been intercepted, adjust the power as required to maintain a stabilized approach. When steep- ening the approach path, however, care must be taken that the descent does not result in an excessively high sink rate. If a high sink rate is continued close to the surface, it may be difficult to slow to a proper rate prior to ground contact. Any sink rate in excess of 800 –1,000 feet per minute is considered excessive. A go-around should be initiated if the sink rate becomes excessive.
Power can be used effectively during the approach and roundout to compensate for errors in judgment. Power can be added to slow the descent rate to an acceptable rate. Some pilots use power rather than wing flare to land smoothly. After the powered parachute has touched down, it will be necessary to close the throttle so the additional thrust and lift will be removed and the powered parachute will stay on the ground.
It is possible to flare for landing too high above the ground. [Figure 11-13] If this happens, efforts need to be made to prevent the wing from surging forward. The power should not be reduced and the flare should only be reduced slightly or the wing could surge forward as the pendulum starts swinging back. Some pilots try to correct this situation by reducing the throttle too much and letting off the flare completely in order to land closer to their chosen landing point. This invariably results in the cart rotating back under the forward surging wing and diving towards the ground because lift has been dramatically reduced. Any surging forward of the wing above the cart should be slowed by increased flare. If the flare is performed too high off the ground, a go-around can be accomplished.
It is recommended that a go-around be executed any time it appears that there may not be enough runway to safely land the powered parachute or if the landing is in any other way uncertain.
When the powered parachute contacts the ground with a sharp impact as the result of an excessive sink rate, the cart tends to bounce back into the air.
The corrective action for a bounce when it is very slight is to make a follow-up landing by applying sufficient power to cushion the subsequent touchdown and by adding flare as needed.
When a bounce is severe, the safest procedure is to EXECUTE A GO-AROUND IMMEDIATELY. No
attempt to salvage the landing should be made. Apply full power and check the wing is LOC (lines free, cells open, wing centered) since a hard landing can collapse a ram-air wing. It would be extremely fool- ish to attempt a landing from a bad bounce since the skill set that would allow a student to make a severe bounce would not be up to the task of salvaging a bad landing.
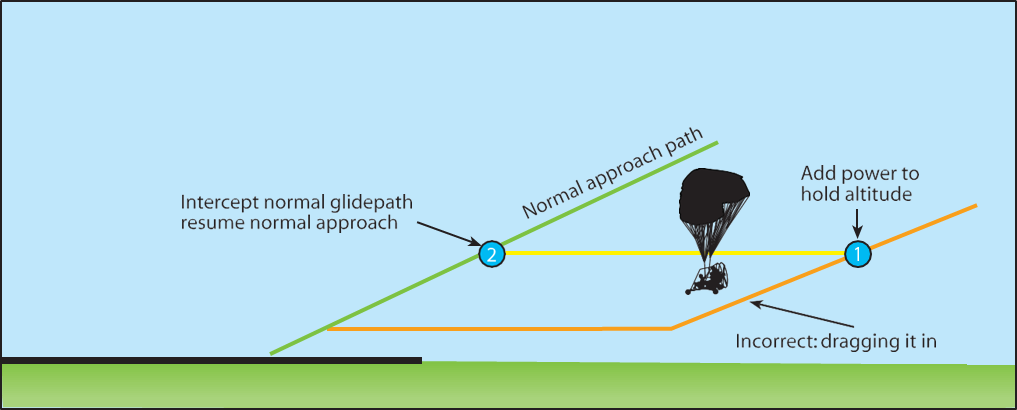
Figure 11-11. Right and wrong methods to correct a low final approach.
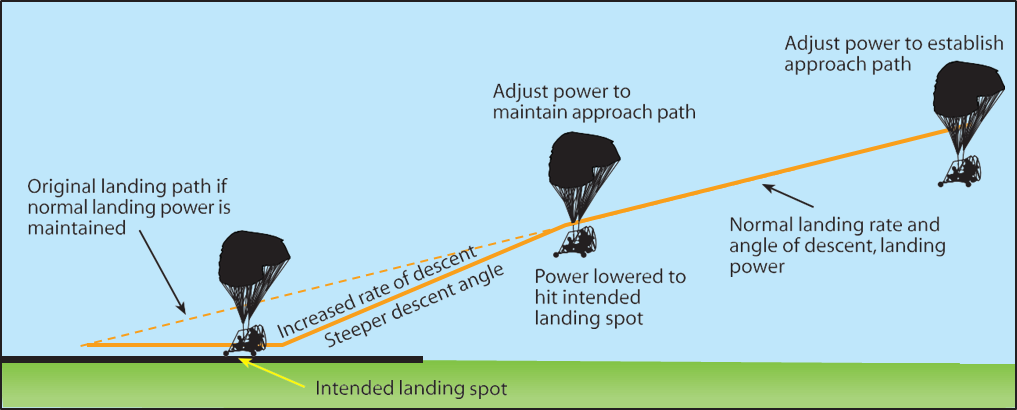
Figure 11-12. Change in glidepath and increase in descent for high final approach.
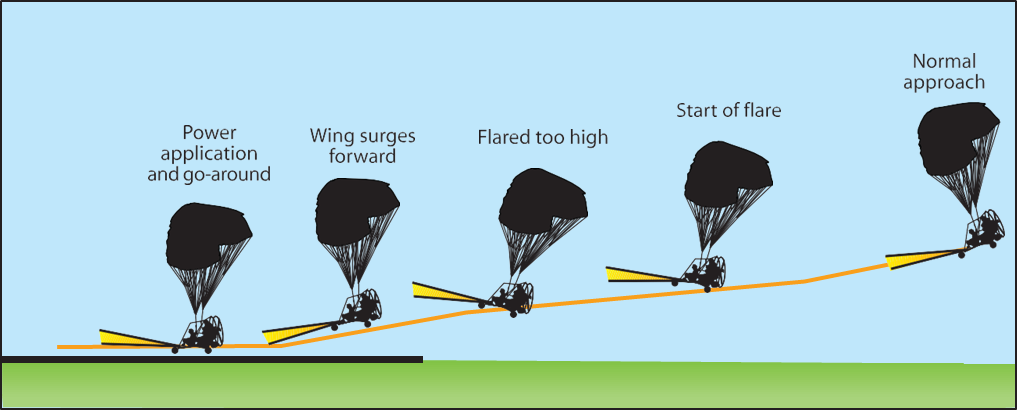
Figure 11-13. Rounding out too high.
Hard Landing
When the powered parachute contacts the ground during landings, its vertical speed is instantly reduced to zero. Unless provisions are made to slow this vertical speed and cushion the impact of touchdown, the force of contact with the ground may be so great it could cause structural damage to the powered parachute. Reductions in rapid descent rates are made through throttle increases. Closer to the ground, additional flare is applied before touchdown.
The purpose of pneumatic tires, shock absorbing landing gears, and other devices is to cushion the impact and to increase the time in which the powered para- chute’s vertical descent is stopped. Within a fraction of a second, the powered parachute must be slowed from a high rate of vertical descent to zero, without damage.
During this time, the landing gear together with some aid from the lift of the ram-air wing must supply whatever force is needed to counteract the force of the powered parachute’s inertia and weight. The lift decreases rapidly as the powered parachute’s for- ward speed is decreased, and the force on the landing gear increases by the impact of touchdown. When the descent stops, the lift will be zero, leaving the landing gear alone to carry both the powered parachute’s weight and inertia force. Any time you have a hard landing, inspect your landing gear, tires, and structure to make sure there is no structural damage.
Wing Blowing Over After Touchdown
When landing in a crosswind, there is a concern that the wing will blow downwind during the after-land- ing roll. This is due to the fact that the wing is flexibly attached to the cart.
Anytime a powered parachute is rolling on the ground in a crosswind condition, the upwind side of the parachute is receiving a force that wants to push it downwind.If no correction is applied, it is possible that the upwind side of the parachute will rise sufficiently to cause the downwind side of the parachute to strike the ground. If the wind and/or the forward motion of the powered parachute is great enough, a rollover may result. It is important for a pilot to remember that the parachute should be flown or pulled to the ground right after landing the cart. The cart and the parachute’s movements should be controlled together on the ground.


