The maneuvers presented in this chapter require more finesse and understanding of the helicopter and the surrounding environment. When performing these maneuvers, you will probably be taking your helicopter to the edge of the safe operating envelope. Therefore, if you are ever in doubt about the outcome of the maneuver, you should abort the mission entirely or wait for more favorable conditions.
Reconnaissance procedures
Anytime you are planning to land or takeoff at an unfamiliar site, you should gather as much information as you can about the area. Reconnaissance techniques are ways of gathering this information.
HIGH RECONNAISSANCE
The purpose of a high reconnaissance is to determine the wind direction and speed, a point for touchdown, the suitability of the landing area, the approach and departure axes, obstacles and their effect on wind pat- terns, and the most suitable flight paths into and out of the area. When conducting a high reconnaissance, give particular consideration to forced landing areas in case of an emergency.
Altitude, airspeed, and flight pattern for a high recon- naissance are governed by wind and terrain features. You must strike a balance between a reconnaissance conducted too high and one too low. It should not be flown so low that you have to divide your attention between studying the area and avoiding obstructions to flight. A high reconnaissance should be flown at an alti- tude of 300 to 500 feet above the surface. A general rule to follow is to ensure that sufficient altitude is available at all times to land into the wind in case of engine fail- ure. In addition, a 45° angle of observation generally allows the best estimate of the height of barriers, the presence of obstacles, the size of the area, and the slope of the terrain. Always maintain safe altitudes and air- speeds, and keep a forced landing area within reach whenever possible.
LOW RECONNAISSANCE
A low reconnaissance is accomplished during the approach to the landing area. When flying the approach, verify what was observed in the high recon- naissance, and check for anything new that may have been missed at a higher altitude, such as wires, slopes,and small crevices. If everything is alright, you can complete the approach to a landing. However, you must make the decision to land or go-around before effective translational lift is lost.
If a decision is made to complete the approach, terminate it in a hover, so you can carefully check the landing point before lowering the helicopter to the surface. Under certain conditions, it may be desirable to continue the approach to the surface. Once the helicopter is on the ground, maintain operating r.p.m. until you have checked the stability of the helicopter to be sure it is in a secure and safe position.
GROUND RECONNAISSANCE
Prior to departing an unfamiliar location, make a detailed analysis of the area. There are several factors to consider during this evaluation. Besides determining the best departure path, you must select a route that will get your helicopter from its present position to the take- off point.
Some things to consider while formulating a takeoff plan are the aircraft load, height of obstacles, the shape of the area, and direction of the wind. If the helicopter is heavily loaded, you must determine if there is sufficient power to clear the obstacles. Sometimes it is better to pick a path over shorter obstacles than to take off directly into the wind. You should also evaluate the shape of the area so that you can pick a path that will give you the most room to maneuver and abort the take- off if necessary. Wind analysis also helps determine the route of takeoff. The prevailing wind can be altered by obstructions on the departure path, and can significantly affect aircraft performance. One way to determine the wind direction is to drop some dust or grass, and observe which way it is blowing. Keep in mind that if the main rotor is turning, you will need to be a sufficient distance from the helicopter to ensure that the down- wash of the blades does not give you a false indication.
If possible, you should walk the route from the helicopter to the takeoff position. Evaluate obstacles that could be hazardous and ensure that you will have adequate rotor clearance. Once at the downwind end of the avail- able area, mark a position for takeoff so that the tail and main rotors have sufficient clearance from any obstructions behind the helicopter. Use a sturdy marker, such as a heavy stone or log, so it does not blow away.
Maximum performance takeoff
A maximum performance takeoff is used to climb at a steep angle to clear barriers in the flight path. It can be used when taking off from small areas surrounded by high obstacles. Before attempting a maximum performance takeoff, you must know thoroughly the capabilities and limitations of your equipment. You must also consider the wind velocity, temperature, alti- tude, gross weight, center-of-gravity location, and other factors affecting your technique and the perform- ance of the helicopter.
To safely accomplish this type of takeoff, there must be enough power to hover, in order to prevent the helicop- ter from sinking back to the surface after becoming airborne. This hover power check can be used to deter- mine if there is sufficient power available to accomplish this maneuver.
The angle of climb for a maximum performance take- off depends on existing conditions. The more critical the conditions, such as high density altitudes, calm winds, and high gross weights, the shallower the angle of climb. In light or no wind conditions, it might be necessary to operate in the crosshatched or shaded areas of the height/velocity diagram during the begin- ning of this maneuver. Therefore, be aware of the calculated risk when operating in these areas. An engine failure at a low altitude and airspeed could place the helicopter in a dangerous position, requiring a high degree of skill in making a safe autorotative landing.
TECHNIQUE
Before attempting a maximum performance takeoff, bring the helicopter to a hover, and determine the excess power available by noting the difference between the power available and that required to hover. You should also perform a balance and flight control check and note the position of the cyclic. Then position the helicopter into the wind and return the helicopter to the surface. Normally, this maneuver is initiated from the surface. After checking the area for obstacles and other aircraft, select reference points along the takeoff
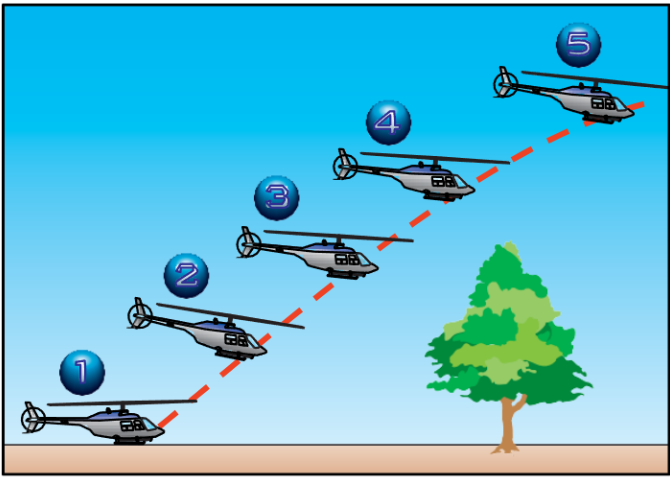
Figure 10-1. Maximum performance takeoff.
path to maintain ground track. You should also consider alternate routes in case you are not able to complete the maneuver. [Figure 10-1]
Begin the takeoff by getting the helicopter light on the skids (position 1). Pause and neutralize all aircraft move- ment. Slowly increase the collective and position the cyclic so as to break ground in a 40 knot attitude. This is approximately the same attitude as when the helicopter is light on the skids. Continue to slowly increase the collec- tive until the maximum power available is reached. This large collective movement requires a substantial increase in pedal pressure to maintain heading (position 2). Use the cyclic, as necessary, to control movement toward the desired flight path and, therefore, climb angle during the maneuver (position 3). Maintain rotor r.p.m. at its maxi- mum, and do not allow it to decrease since you would probably have to lower the collective to regain it. Maintain these inputs until the helicopter clears the obstacle, or until reaching 50 feet for demonstration purposes (position 4). Then, establish a normal climb attitude and reduce power (position 5). As in any maximum performance maneuver, the techniques you use affect the actual results. Smooth, coordinated inputs coupled with precise control allow the helicopter to attain its maximum performance.
COMMON ERRORS
- Failure to consider performance data, including height/velocity diagram.
- Nose too low initially, causing horizontal flight rather than more vertical flight.
- Failure to maintain maximum permissible r.p.m.
- Abrupt control movements.
- Failure to resume normal climb power and air- speed after clearing the obstacle.
Running/rolling takeoff
A running takeoff in a skid-type helicopter or a rolling takeoff in a wheeled helicopter is sometimes used when conditions of load and/or density altitude prevent a sustained hover at normal hovering altitude. However, you should not attempt this maneuver if you do not have sufficient power to hover, at least momentarily. If the helicopter cannot be hovered, its performance is unpredictable. If the helicopter cannot be raised off the surface at all, sufficient power might not be available to safely accomplish the maneuver. If you cannot momentarily hover the helicopter, you must wait for conditions to improve or off-load some of the weight.
To accomplish a safe running or rolling takeoff, the sur- face area must be of sufficient length and smoothness, and there cannot be any barriers in the flight path to interfere with a shallow climb. For wheeled helicopters, a rolling takeoff is sometimes used to minimize the downwash created during a take- off from a hover.
TECHNIQUE
Refer to figure 10-2. To begin the maneuver, first align the helicopter to the takeoff path. Next, increase the throttle to obtain takeoff r.p.m., and increase the collective smoothly until the helicopter becomes light on the skids or landing gear (position 1). Then, move the cyclic slightly forward of the neutral hovering position, and apply additional collective to start the forward movement (position 2). To simulate a reduced power condition during practice, use one to two inches less manifold pressure, or three to five percent less torque, than that required to hover.
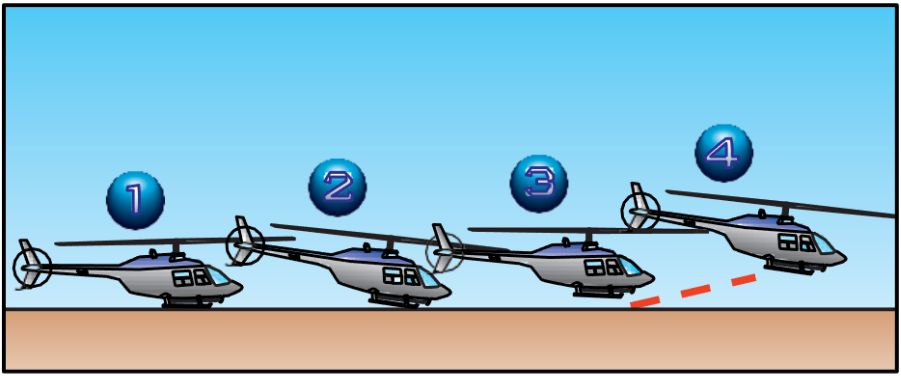
Figure 10-2. Running/rolling takeoff.
Maintain a straight ground track with lateral cyclic and heading with antitorque pedals until a climb is established. As effective translational lift is gained, the helicopter becomes airborne in a fairly level attitude with little or no pitching (position 3). Maintain an altitude to take advan- tage of ground effect, and allow the airspeed to increase toward normal climb speed. Then, follow a climb profile that takes you through the clear area of the height/velocity diagram (position 4). During practice maneuvers, after you have climbed to an altitude of 50 feet, establish the normal climb power setting and attitude.
COMMON ERRORS
- Failing to align heading and ground track to keep surface friction to a minimum.
- Attempting to become airborne before obtaining effective translational lift.
- Using too much forward cyclic during the surface run.
- Lowering the nose too much after becoming air- borne, resulting in the helicopter settling back to the surface.
- Failing to remain below the recommended altitude until airspeed approaches normal climb speed.
Rapid deceleration (quick stop)
In normal operations, use the rapid deceleration or quick stop maneuver to slow the helicopter rapidly and bring it to a stationary hover. The maneuver requires a high degree of coordination of all controls. It is practiced at an altitude that permits a safe clearance between the tail rotor and the surface throughout the maneuver, especially at the point where the pitch attitude is highest. The altitude at completion should be no higher than the maximum safe hovering altitude prescribed by the manufacturer. In selecting an altitude at which to begin the maneuver, you should take into account the overall length of the helicopter and the height/velocity diagram. Even though the maneuver is called a rapid deceleration or quick stop, it is performed slowly and smoothly with the primary emphasis on coordination.
TECHNIQUE
During training always perform this maneuver into the wind. [Figure 10-3, position 1] After leveling off at an altitude between 25 and 40 feet, depending on the manufacturer’s recommendations, accelerate to the desired entry speed, which is approximately 45 knots for most training helicopters (position 2). The altitude you choose should be high enough to avoid danger to the tail rotor during the flare, but low enough to stay out of the crosshatched or shaded areas of the height/velocity diagram throughout the maneuver. In addition, this altitude should be low enough that you can bring the helicopter to a hover during the recovery.
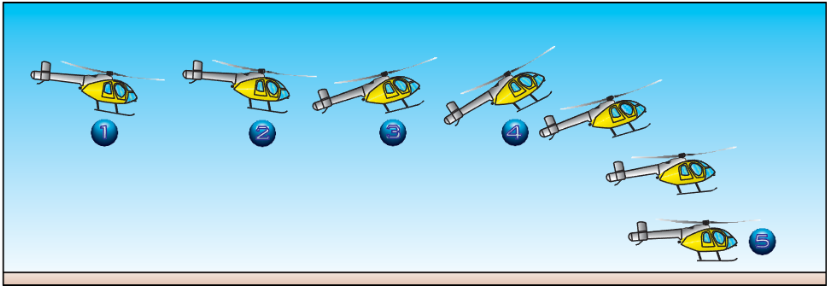
Figure 10-3. Rapid deceleration or quick stop.
At position 3, initiate the deceleration by applying aft cyclic to reduce forward speed. Simultaneously, lower the collective, as necessary, to counteract any climbing tendency. The timing must be exact. If you apply too little down collective for the amount of aft cyclic applied, a climb results. If you apply too much down collective, a descent results. A rapid application of aft cyclic requires an equally rapid application of down collective. As collective pitch is lowered, apply proper antitorque pedal pressure to maintain heading, and adjust the throttle to maintain r.p.m.
After attaining the desired speed (position 4), initiate the recovery by lowering the nose and allowing the helicopter to descend to a normal hovering altitude in level flight and zero groundspeed (position 5). During the recovery, increase collective pitch, as necessary, to stop the helicopter at normal hovering altitude, adjust the throttle to maintain r.p.m., and apply proper pedal pressure, as necessary, to maintain heading.
COMMON ERRORS
- Initiating the maneuver by applying down collective.
- Initially applying aft cyclic stick too rapidly, causing the helicopter to balloon.
- Failing to effectively control the rate of decelera- tion to accomplish the desired results.
- Allowing the helicopter to stop forward motion in a tail-low attitude.
- Failing to maintain proper r.p.m.
- Waiting too long to apply collective pitch (power) during the recovery, resulting in excessive mani- fold pressure or an over-torque situation when collective pitch is applied rapidly.
- Failing to maintain a safe clearance over the terrain.
- Improper use of antitorque pedals resulting in erratic heading changes.
Steep approach to a hover
A steep approach is used primarily when there are obstacles in the approach path that are too high to allow a normal approach. A steep approach permits entry into
Balloon—Gaining an excessive amount of altitude as a result of an abrupt flare.
most confined areas and is sometimes used to avoid areas of turbulence around a pinnacle. An approach angle of approximately 15° is considered a steep approach. [Figure 10-4]
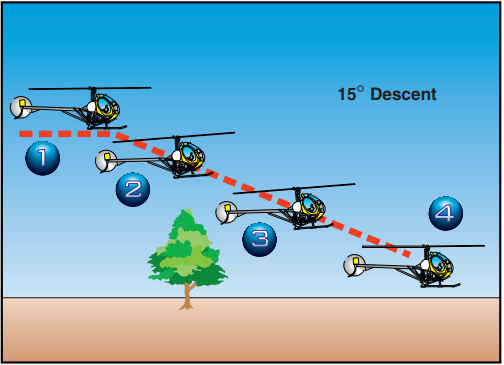
Figure 10-4. Steep approach to a hover.
TECHNIQUE
On final approach, head your helicopter into the wind and align it with the intended touchdown point at the recommended approach airspeed (position 1). When you intercept an approach angle of 15°, begin the approach by lowering the collective sufficiently to start the helicopter descending down the approach path and decelerating (position 2). Use the proper antitorque pedal for trim. Since this angle is steeper than a normal approach angle, you need to reduce the collective more than that required for a normal approach. Continue to decelerate with slight aft cyclic, and smoothly lower the collective to maintain the approach angle. As in a normal approach, reference the touchdown point on the windshield to determine changes in approach angle. This point is in a lower position than a normal approach. Aft cyclic is required to decelerate sooner than a normal approach, and the rate of closure becomes apparent at a higher altitude. Maintain the approach angle and rate of descent with the collective, rate of closure with the cyclic, and trim with antitorque pedals. Use a crab above 50 feet and a slip below 50 feet for any cross- wind that might be present.
Loss of effective translational lift occurs higher in a steep approach (position 3), requiring an increase in the collective to prevent settling, and more forward cyclic to achieve the proper rate of closure. Terminate the approach at hovering altitude above the intended landing point with zero groundspeed (position 4). If power has been properly applied during the final portion of the approach, very little additional power is required in the hover.
COMMON ERRORS
- Failing to maintain proper r.p.m. during the entire approach.
- Improper use of collective in maintaining the selected angle of descent.
- Failing to make antitorque pedal corrections to compensate for collective pitch changes during the approach.
- Slowing airspeed excessively in order to remain on the proper angle of descent.
- Inability to determine when effective transla- tional lift is lost.
- Failing to arrive at hovering altitude and attitude, and zero groundspeed almost simultaneously.
- Low r.p.m. in transition to the hover at the end of the approach.
- Using too much aft cyclic close to the surface, which may result in the tail rotor striking the surface.
Shallow approach and running/roll-on landing
Use a shallow approach and running landing when a high-density altitude or a high gross weight condition, or some combination thereof, is such that a normal or steep approach cannot be made because of insufficient power to hover. [Figure 10-5] To compensate for this lack of power, a shallow approach and running landing makes use of translational lift until surface contact is made. If flying a wheeled helicopter, you can also use a roll-on landing to minimize the effect of downwash. The glide angle for a shallow approach is approximately 5°. Since the helicopter will be sliding or rolling to a stop during this maneuver, the landing area must be smooth and long enough to accomplish this task.
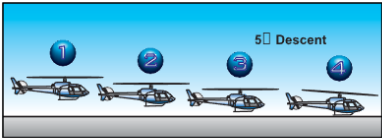
Figure 10-5. Shallow approach and running landing.
TECHNIQUE
A shallow approach is initiated in the same manner as the normal approach except that a shallower angle of descent is maintained. The power reduction to initiate the desired angle of descent is less than that for a normal approach since the angle of descent is less (position 1).
As you lower the collective, maintain heading with proper antitorque pedal pressure, and r.p.m. with the throttle. Maintain approach airspeed until the apparent rate of closure appears to be increasing. Then, begin to slow the helicopter with aft cyclic (position 2).
As in normal and steep approaches, the primary control for the angle and rate of descent is the collective, while the cyclic primarily controls the groundspeed. However, there must be a coordination of all the con- trols for the maneuver to be accomplished successfully. The helicopter should arrive at the point of touchdown at or slightly above effective translational lift. Since translational lift diminishes rapidly at slow airspeeds, the deceleration must be smoothly coordinated, at the same time keeping enough lift to prevent the helicopter from settling abruptly.
Just prior to touchdown, place the helicopter in a level attitude with the cyclic, and maintain heading with the antitorque pedals. Use the cyclic to keep the heading and ground track identical (position 3). Allow the helicopter to descend gently to the surface in a straight- and-level attitude, cushioning the landing with the collective. After surface contact, move the cyclic slightly forward to ensure clearance between the tailboom and the rotor disc. You should also use the cyclic to maintain the surface track. (position 4). You normally hold the collective stationary until the heli- copter stops; however, if you want more braking action, you can lower the collective slightly. Keep in mind that due to the increased ground friction when you lower the collective, the helicopter’s nose might pitch forward. Exercise caution not to correct this pitching movement with aft cyclic since this movement could result in the rotor making contact with the tailboom. During the landing, maintain normal r.p.m. with the throttle and directional control with the antitorque pedals.
For wheeled helicopters, use the same technique except after landing, lower the collective, neutralize the controls, and apply the brakes, as necessary, to slow the helicopter. Do not use aft cyclic when bringing the helicopter to a stop.
COMMON ERRORS
- Assuming excessive nose-high attitude to slow the helicopter near the surface.
- Insufficient collective and throttle to cushion landing.
- Failing to add proper antitorque pedal as collec- tive is added to cushion landing, resulting in a touchdown while the helicopter is moving side- ward.
- Failing to maintain a speed that takes advantage of effective translational lift.
- Touching down at an excessive groundspeed for the existing conditions. (Some helicopters have maximum touchdown groundspeeds.)
- Failing to touch down in a level attitude.
- Failing to maintain proper r.p.m. during and after touchdown.
- Poor directional control during touchdown.
Slope operations
Prior to conducting any slope operations, you should be thoroughly familiar with the characteristics of dynamic rollover and mast bumping, which are dis- cussed in Chapter 11—Helicopter Emergencies. The approach to a slope is similar to the approach to any other landing area. During slope operations, make allowances for wind, barriers, and forced landing sites in case of engine failure. Since the slope may constitute an obstruction to wind passage, you should anticipate turbulence and downdrafts.
SLOPE LANDING
You usually land a helicopter across the slope rather than with the slope. Landing with the helicopter facing down the slope or downhill is not recommended because of the possibility of striking the tail rotor on the surface.
TECHNIQUE
Refer to figure 10-6. At the termination of the approach, move the helicopter slowly toward the slope, being careful not to turn the tail upslope. Position the helicopter across the slope at a stabilized hover headed into the wind over the spot of intended landing (frame 1). Downward pressure on the collective starts the helicopter descending. As the upslope skid touches the ground, hesitate momentarily in a level attitude, then apply lateral cyclic in the direction of the slope (frame 2). This holds the skid against the slope while you continue lowering the downslope skid with the collective. As you lower the collective, continue to move the cyclic toward the slope to maintain a fixed position (frame 3). The slope must be shallow enough so you can hold the helicopter against it with the cyclic during the entire landing. A slope of 5° is considered maxi- mum for normal operation of most helicopters.
You should be aware of any abnormal vibration or mast bumping that signals maximum cyclic deflection. If this occurs, abandon the landing because the slope is too steep. In most helicopters with a counterclockwise rotor system, landings can be made on steeper slopes when you are holding the cyclic to the right. When landing on slopes using left cyclic, some cyclic input must be used to overcome the translating tendency. If wind is not a factor, you should consider the drifting tendency when determining landing direction.
After the downslope skid is on the surface, reduce the collective to full down, and neutralize the cyclic and pedals (frame 4). Normal operating r.p.m. should be maintained until the full weight of the helicopter is on the landing gear. This ensures adequate r.p.m. for immediate takeoff in case the helicopter starts sliding down the slope. Use antitorque pedals as necessary throughout the landing for heading control. Before reducing the r.p.m., move the cyclic control as neces- sary to check that the helicopter is firmly on the ground.
COMMON ERRORS
- Failure to consider wind effects during the approach and landing.
- Failure to maintain proper r.p.m. throughout the entire maneuver.
- Turning the tail of the helicopter into the slope.
- Lowering the downslope skid or wheel too rapidly.
- Applying excessive cyclic control into the slope, causing mast bumping.
SLOPE TAKEOFF
A slope takeoff is basically the reverse of a slope land-ng. [Figure 10-7] Conditions that may be associated with the slope, such as turbulence and obstacles, must
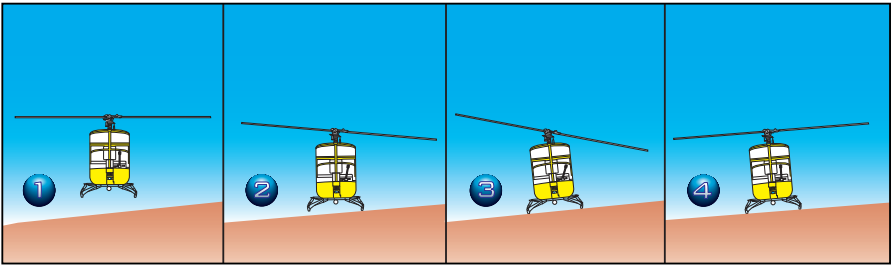
Figure 10-6. Slope landing.
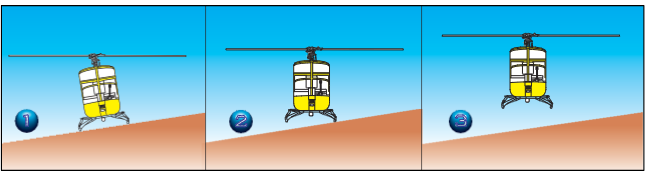
Figure 10-7. Slope takeoff.
be considered during the takeoff. Planning should include suitable forced landing areas.
TECHNIQUE
Begin the takeoff by increasing r.p.m. to the normal range with the collective full down. Then, move the cyclic toward the slope (frame 1). Holding cyclic toward the slope causes the downslope skid to rise as you slowly raise the collective (frame 2). As the skid comes up, move the cyclic toward the neutral position. If properly coordinated, the helicopter should attain a level attitude as the cyclic reaches the neutral position. At the same time, use antitorque pedal pressure to maintain heading and throttle to maintain r.p.m. With the helicopter level and the cyclic centered, pause momentarily to verify everything is correct, and then gradually raise the collective to complete the liftoff (frame 3).
After reaching a hover, take care to avoid hitting the ground with the tail rotor. If an upslope wind exists, execute a crosswind takeoff and then make a turn into the wind after clearing the ground with the tail rotor.
COMMON ERRORS
- Failure to adjust cyclic control to keep the heli- copter from sliding downslope.
- Failure to maintain proper r.p.m.
- Holding excessive cyclic into the slope as the downslope skid is raised.
- Turning the tail of the helicopter into the slope during takeoff.
Confined area operations
A confined area is an area where the flight of the helicopter is limited in some direction by terrain or the presence of obstructions, natural or manmade. For example, a clearing in the woods, a city street, a road, a building roof, etc., can each be regarded as a confined area. Generally, takeoffs and landings should be made into the wind to obtain maximum airspeed with mini- mum groundspeed.
There are several things to consider when operating in confined areas. One of the most important is maintaining a clearance between the rotors and obstacles forming the confined area. The tail rotor deserves special considera- tion because, in some helicopters, you cannot always see it from the cabin. This not only applies while making the approach, but while hovering as well. Another consideration is that wires are especially difficult to see; however, their supporting devices, such as poles or towers, serve as an indication of their presence and approximate height. If any wind is present, you should also expect some turbulence. [Figure 10-8]
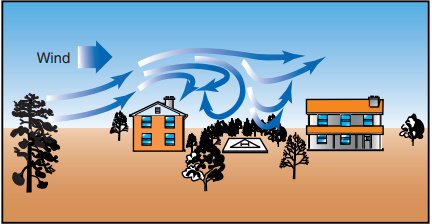
Figure 10-8. If the wind velocity is 10 knots or greater, you should expect updrafts on the windward side and downdrafts on the lee side of obstacles. You should plan the approach with these factors in mind, but be ready to alter your plans if the wind speed or direction changes.
Something else for you to consider is the availability of forced landing areas during the planned approach. You should think about the possibility of flying from one alternate landing area to another throughout the approach, while avoiding unfavorable areas. Always leave yourself a way out in case the landing cannot be completed or a go-around is necessary.
APPROACH
A high reconnaissance should be completed before initiating the confined area approach. Start the approach phase using the wind and speed to the best possible advantage. Keep in mind areas suitable for forced landing. It may be necessary to choose between an approach that is crosswind, but over an open area, and one directly into the wind, but over heavily wooded or extremely rough terrain where a safe forced landing would be impossible. If these conditions exist, consider the possibility of making the initial phase of the approach crosswind over the open area and then turn- ing into the wind for the final portion of the approach.
Always operate the helicopter as close to its normal capabilities as possible, taking into consideration the situation at hand. In all confined area operations, with the exception of the pinnacle operation, the angle of descent should be no steeper than necessary to clear any barrier in the approach path and still land on the selected spot. The angle of climb on takeoff should be normal, or not steeper than necessary to clear any bar- rier. Clearing a barrier by a few feet and maintaining normal operating r.p.m., with perhaps a reserve of power, is better than clearing a barrier by a wide mar- gin but with a dangerously low r.p.m. and no power reserve.
Always make the landing to a specific point and not to some general area. This point should be located well forward, away from the approach end of the area. The more confined the area, the more essential it is that you land the helicopter precisely at a definite point. Keep this point in sight during the entire final approach.
When flying a helicopter near obstructions, always consider the tail rotor. A safe angle of descent over bar- riers must be established to ensure tail rotor clearance of all obstructions. After coming to a hover, take care to avoid turning the tail into obstructions.
TAKEOFF
A confined area takeoff is considered an altitude over airspeed maneuver. Before takeoff, make a ground reconnaissance to determine the type of takeoff to be performed, to determine the point from which the take- off should be initiated to ensure the maximum amount of available area, and finally, how to best maneuver the helicopter from the landing point to the proposed take- off position.
If wind conditions and available area permit, the heli- copter should be brought to a hover, turned around, and hovered forward from the landing position to the take- off position. Under certain conditions, sideward flight to the takeoff position may be necessary. If rearward
Altitude over Airspeed—In this type of maneuver, it is more important to gain altitude than airspeed. However, unless operational considerations dictate otherwise, the crosshatched or shaded areas of the height/velocity diagram should be avoided.
flight is required to reach the takeoff position, place reference markers in front of the helicopter in such a way that a ground track can be safely followed to the takeoff position. In addition, the takeoff marker should be located so that it can be seen without hovering beyond it.
When planning the takeoff, consider the direction of the wind, obstructions, and forced landing areas. To help you fly up and over an obstacle, you should form an imaginary line from a point on the leading edge of the helicopter to the highest obstacle to be cleared. Fly this line of ascent with enough power to clear the obstacle by a safe distance. After clearing the obstacle, maintain the power setting and accelerate to the normal climb speed. Then, reduce power to the normal climb power setting.
COMMON ERRORS
- Failure to perform, or improper performance of, a high or low reconnaissance.
- Flying the approach angle at too steep or too shal- low an approach for the existing conditions.
- Failing to maintain proper r.p.m.
- Failure to consider emergency landing areas.
- Failure to select a specific landing spot.
- Failure to consider how wind and turbulence could affect the approach.
- Improper takeoff and climb technique for exist- ing conditions.
Pinnacle and ridgeline operations
A pinnacle is an area from which the surface drops away steeply on all sides. A ridgeline is a long area from which the surface drops away steeply on one or two sides, such as a bluff or precipice. The absence of obstacles does not necessarily lessen the difficulty of pinnacle or ridgeline operations. Updrafts, downdrafts, and turbulence, together with unsuitable terrain in which to make a forced landing, may still present extreme hazards.
APPROACH AND LANDING
If you need to climb to a pinnacle or ridgeline, do it on the upwind side, when practicable, to take advantage of any updrafts. The approach flight path should be paral- lel to the ridgeline and into the wind as much as possi- ble. [Figure 10-9]
Load, altitude, wind conditions, and terrain features determine the angle to use in the final part of an approach. As a general rule, the greater the winds, the steeper the approach needs to be to avoid turbulent air and downdrafts. Groundspeed during the approach is
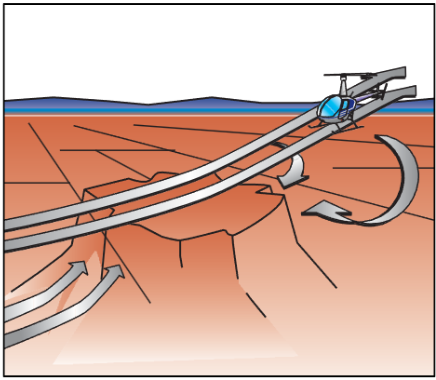
Figure 10-9. When flying an approach to a pinnacle or ridge- line, avoid the areas where downdrafts are present, espe- cially when excess power is limited. If you encounter downdrafts, it may become necessary to make an immediate turn away from the pinnacle to avoid being forced into the rising terrain.
more difficult to judge because visual references are farther away than during approaches over trees or flat terrain. If a crosswind exists, remain clear of down- drafts on the leeward or downwind side of the ridgeline. If the wind velocity makes the crosswind landing hazardous, you may be able to make a low, coordinated turn into the wind just prior to terminating the approach. When making an approach to a pinnacle, avoid leeward turbulence and keep the helicopter within reach of a forced landing area as long as possible.
On landing, take advantage of the long axis of the area when wind conditions permit. Touchdown should be made in the forward portion of the area. Always per- form a stability check, prior to reducing r.p.m., to ensure the landing gear is on firm terrain that can safely support the weight of the helicopter.
TAKEOFF
A pinnacle takeoff is an airspeed over altitude maneu- ver made from the ground or from a hover. Since pinnacles and ridgelines are generally higher than the immediate surrounding terrain, gaining airspeed on the takeoff is more important than gaining altitude. The higher the airspeed, the more rapid the departure from slopes of the pinnacle. In addition to covering unfavor- able terrain rapidly, a higher airspeed affords a more favorable glide angle and thus contributes to the chances of reaching a safe area in the event of a forced landing. If a suitable forced landing area is not avail- able, a higher airspeed also permits a more effective flare prior to making an autorotative landing.
On takeoff, as the helicopter moves out of ground effect, maintain altitude and accelerate to normal climb airspeed. When normal climb speed is attained, estab- lish a normal climb attitude. Never dive the helicopter down the slope after clearing the pinnacle.
COMMON ERRORS
- Failure to perform, or improper performance of, a high or low reconnaissance.
- Flying the approach angle at too steep or too shal- low an approach for the existing conditions.
- Failure to maintain proper r.p.m.
- Failure to consider emergency landing areas.
- Failure to consider how wind and turbulence could affect the approach and takeoff.
Airspeed over Altitude—This means that in this maneuver, obstacles are not a factor, and it is more important to gain airspeed than altitude.


