From the previous chapters, it should be apparent that no two helicopters perform the same way. Even when flying the same model of helicopter, wind, temperature, humidity, weight, and equipment make it difficult to predict just how the helicopter will perform. Therefore, this chapter presents the basic flight maneuvers in a way that would apply to a majority of the helicopters. In most cases, the techniques described apply to small training helicopters with:
- A single, main rotor rotating in a counter clock- wise direction (looking downward on the rotor).
- An antitorque system.
Where a technique differs, it will be noted. For example, a power increase on a helicopter with a clockwise rotor system requires right antitorque pedal pressure instead of left pedal pressure. In many cases, the terminology “apply proper pedal pressure” is used to indicate both types of rotor systems. However, when discussing throttle coordination to maintain proper r.p.m., there will be no differentiation between those helicopters with a governor and those without. In a sense, the governor is doing the work for you. In addition, instead of using the terms collective pitch control and the cyclic pitch control throughout the chapter, these controls are referred to as just collective and cyclic.
Because helicopter performance varies with different weather conditions and aircraft loading, specific nose attitudes and power settings will not be discussed. In addition, this chapter does not detail each and every attitude of a helicopter in the various flight maneuvers, nor each and every move you must make in order to perform a given maneuver.
When a maneuver is presented, there will be a brief description, followed by the technique to accomplish the maneuver. In most cases, there is a list of common errors at the end of the discussion.
Preflight
Before any flight, you must ensure the helicopter is airworthy by inspecting it according to the rotorcraft flight manual, pilot’s operating handbook, or other information supplied either by the operator or the manufacturer. Remember that as pilot in command, it is your responsibility to ensure the aircraft is in an air- worthy condition.
In preparation for flight, the use of a checklist is important so that no item is overlooked. Follow the manufacturer’s suggested outline for both the inside and outside inspection. This ensures that all the items the manufacturer feels are important are checked. Obviously, if there are other items you feel might need attention, inspect them as well.
MINIMUM EQUIPMENT LISTS (MELS) AND OPERATIONS WITH INOPERATIVE EQUIPMENT
The Code of Federal Regulations (CFRs) requires that all aircraft instruments and installed equipment be operative prior to each departure. However, when the FAA adopted the minimum equipment list (MEL) concept for 14 CFR part 91 operations, flights were allowed with inoperative items, as long as the inoperative items were determined to be nonessential for safe flight. At the same time, it allowed part 91 operators, without an MEL, to defer repairs on nonessential equipment within the guidelines of part 91.
There are two primary methods of deferring maintenance on rotorcraft operating under part 91. They are the deferral provision of 14 CFR part 91, section 91.213(d) and an FAA-approved MEL.
The deferral provision of section 91.213(d) is widely used by most pilot/operators. Its popularity is due to simplicity and minimal paperwork. When inoperative equipment is found during preflight or prior to departure, the decision should be to cancel the flight, obtain maintenance prior to flight, or to defer the item or equipment.
Maintenance deferrals are not used for in-flight discrepancies. The manufacturer’s RFM/POH procedures are to be used in those situations. The discussion that
Minimum Equipment List (MEL)—An inventory of instruments and equipment that may legally be inoperative, with the specific conditions under which an aircraft may be flown with such items inoperative.
follows assumes that the pilot wishes to defer mainte- nance that would ordinarily be required prior to flight.
Using the deferral provision of section 91.213(d), the pilot determines whether the inoperative equipment is required by type design, the CFRs, or ADs. If the inoperative item is not required, and the helicopter can be safely operated without it, the deferral may be made. The inoperative item shall be deactivated or removed and an INOPERATIVE placard placed near the appropriate switch, control, or indicator. If deactivation or removal involves maintenance (removal always will), it must be accomplished by certificated maintenance personnel.
For example, if the position lights (installed equipment) were discovered to be inoperative prior to a daytime flight, the pilot would follow the requirements of section 91.213(d).
The deactivation may be a process as simple as the pilot positioning a circuit breaker to the OFF position, or as complex as rendering instruments or equipment totally inoperable. Complex maintenance tasks require a certificated and appropriately rated maintenance person to perform the deactivation. In all cases, the item or equipment must be placarded INOPERATIVE.
All rotorcraft operated under part 91 are eligible to use the maintenance deferral provisions of section 91.213(d). However, once an operator requests an MEL, and a Letter of Authorization (LOA) is issued by the FAA, then the use of the MEL becomes mandatory for that helicopter. All maintenance deferrals must be accomplished in accordance with the terms and conditions of the MEL and the operator-generated procedures document.
The use of an MEL for rotorcraft operated under part 91 also allows for the deferral of inoperative items or equipment. The primary guidance becomes the FAA- approved MEL issued to that specific operator and N-numbered helicopter.
The FAA has developed master minimum equipment lists (MMELs) for rotorcraft in current use. Upon writ- ten request by a rotorcraft operator, the local FAA Flight Standards District Office (FSDO) may issue the appropriate make and model MMEL, along with an LOA, and the preamble. The operator then develops operations and maintenance (O&M) procedures from the MMEL. This MMEL with O&M procedures now becomes the operator’s MEL. The MEL, LOA, preamble, and procedures document developed by the operator must be on board the helicopter when it is operated.
The FAA considers an approved MEL to be a supple- mental type certificate (STC) issued to an aircraft by serial number and registration number. It therefore becomes the authority to operate that aircraft in a condition other than originally type certificated.
With an approved MEL, if the position lights were dis- covered inoperative prior to a daytime flight, the pilot would make an entry in the maintenance record or discrepancy record provided for that purpose. The item is then either repaired or deferred in accordance with the MEL. Upon confirming that daytime flight with inoperative position lights is acceptable in accordance with the provisions of the MEL, the pilot would leave the position lights switch OFF, open the circuit breaker (or whatever action is called for in the procedures document), and placard the position light switch as INOPERATIVE.
There are exceptions to the use of the MEL for deferral. For example, should a component fail that is not listed in the MEL as deferrable (the rotor tachometer, engine tachometer, or cyclic trim, for example), then repairs are required to be performed prior to departure. If maintenance or parts are not readily available at that location, a special flight permit can be obtained from the nearest FSDO. This permit allows the helicopter to be flown to another location for maintenance. This allows an aircraft that may not currently meet applicable airworthiness requirements, but is capable of safe flight, to be operated under the restrictive special terms and conditions attached to the special flight permit.
Deferral of maintenance is not to be taken lightly, and due consideration should be given to the effect an inoperative component may have on the operation of a helicopter, particularly if other items are inoperative. Further information regarding MELs and operations with inoperative equipment can be found in AC 91-67, Minimum Equipment Requirements for General Aviation Operations Under FAR Part 91.
Engine start
AND ROTOR ENGAGEMENT
During the engine start, rotor engagement, and systems ground check, use the manufacturer’s checklists. If a problem arises, have it checked before continuing. Prior to performing these tasks, however, make sure the area near the helicopter is clear of personnel and equipment. Helicopters are safe and efficient flying machines as long as they are operated within the parameters established by the manufacturer.
ROTOR SAFETY CONSIDERATIONS
The exposed nature of the main and tail rotors deserve special caution. You must exercise extreme care when taxiing near hangars or obstructions since the distance between the rotor blade tips and obstructions is very difficult to judge. [Figure 9-1] In addition, you cannot see the tail rotor of some helicopters from the cabin. Therefore, when hovering backwards or turning in those helicopters, allow plenty of room for tail rotor clearance. It is a good practice to glance over your shoulder to maintain this clearance.
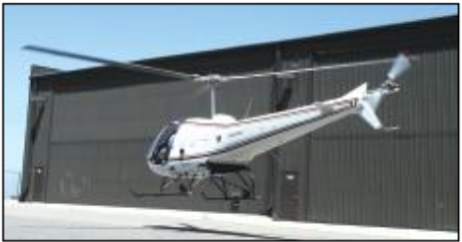
Figure 9-1. Exercise extreme caution when hovering near buildings or other aircraft.
Another rotor safety consideration is the thrust a helicopter generates. The main rotor system is capable of blowing sand, dust, snow, ice, and water at high velocities for a significant distance causing injury to nearby people and damage to buildings, automobiles, and other aircraft. Loose snow, can severely reduce visibility and obscure outside visual references. Any airborne debris near the helicopter can be ingested into the engine air intake or struck by the main and tail rotor blades.
SAFETY IN AND AROUND HELICOPTERS
People have been injured, some fatally, in helicopter accidents that would not have occurred had they been informed of the proper method of boarding or deplaning. A properly briefed passenger should never be endangered by a spinning rotor. The simplest method of avoiding accidents of this sort is to stop the rotors before passengers are boarded or allowed to depart. Because this action is not always practicable, and to realize the vast and unique capabilities of the helicopter, it is often necessary to take on passengers or to deplane them while the engine and rotors are turning. To avoid accidents, it is essential that all persons associated with helicopter operations, including passengers, be made aware of all possible hazards and instructed as to how they can be avoided.
Persons directly involved with boarding or deplaning passengers, aircraft servicing, rigging, or hooking up external loads, etc., should be instructed as to their duties. It would be difficult, if not impossible, to cover each and every type of operation related to helicopters. A few of the more obvious and common ones are covered below.
RAMP ATTENDANTS AND AIRCRAFT SERVIC-
ING PERSONNEL—These personnel should be instructed as to their specific duties, and the proper method of fulfilling them. In addition, the ramp attendant should be taught to:
1. keep passengers and unauthorized persons out of the helicopter landing and takeoff area.
2. brief passengers on the best way to approach and board a helicopter with its rotors turning.
AIRCRAFT SERVICING—The helicopter rotor blades should be stopped, and both the aircraft and the refueling unit properly grounded prior to any refueling operation. You, as the pilot, should ensure that the proper grade of fuel and the proper additives, when required, are being dispensed.
Refueling the aircraft, while the blades are turning, known as “hot refueling,” may be practical for certain types of operation. However, this can be hazardous if not properly conducted. Pilots should remain at the flight controls; and refueling personnel should be knowledgeable about the proper refueling procedures and properly briefed for specific helicopter makes and models.
Refueling units should be positioned to ensure adequate rotor blade clearance. Persons not involved with the refueling operation should keep clear of the area.
Smoking must be prohibited in and around the aircraft during all refueling operations.
EXTERNAL-LOAD RIGGERS—Rigger training is possibly one of the most difficult and continually changing problems of the helicopter external-load operator. A poorly rigged cargo net, light standard, or load pallet could result in a serious and costly accident. It is imperative that all riggers be thoroughly trained to meet the needs of each individual external-load operation. Since rigging requirements may vary several times in a single day, proper training is of the utmost importance to safe operations.
PILOT AT THE FLIGHT CONTROLS—Many helicopter operators have been lured into a “quick turn- around” ground operation to avoid delays at airport terminals and to minimize stop/start cycles of the engine. As part of this quick turnaround, the pilot might leave the cockpit with the engine and rotors turning. Such an operation can be extremely hazardous if a gust of wind disturbs the rotor disc, or the collective flight control moves causing lift to be generated by the rotor system. Either occurrence may cause the helicopter to roll or pitch, resulting in a rotor blade striking the tail- boom or the ground. Good operating procedures dictate that pilots remain at the flight controls whenever the engine is running and the rotors are turning.
EXTERNAL-LOAD HOOKUP PERSONNEL—There are several areas in which these personnel should be knowledgeable. First, they should know the lifting capability of the helicopters involved. Since some operators have helicopter models with almost identical physical characteristics but different lifting capabilities, this knowledge is essential. For example, a hookup person may be working with a turbocharged helicopter on a high altitude project when a non-turbocharged helicopter, which looks exactly the same to the ground crew, comes to pick up a load. If the hookup person attaches a load greater than the non-turbocharged helicopter can handle, a potentially dangerous situation could exist.
Second, know the pilots. The safest plan is to standardize all pilots in the manner in which sling loads are picked up and released. Without pilot standardization, the operation could be hazardous. The operator should standardize the pilots on operations while personnel are beneath the helicopter.
Third, know the cargo. Many items carried via sling are very fragile, others can take a beating. The hookup per- son should always know when a hazardous article is involved and the nature of the hazard, such as explosives, radioactive materials, and toxic chemicals. In addition to knowing this, the hookup person should be familiar with the types of protective gear or clothing and the actions necessary to protect their own safety and that of the operation.
Fourth, know appropriate hand signals. When direct radio communications between ground and flight personnel are not used, the specific meaning of hand signals should be coordinated prior to operations.
Fifth, know emergency procedures. Ground and flight personnel should fully agree to and understand the actions to be taken by all participants in the event of emergencies. This prior planning is essential to avoid injuries to all concerned.
PASSENGERS—All persons who board a helicopter while its rotors are turning should be instructed in the safest means of doing so. Naturally, if you are at the controls, you may not be able to conduct a boarding briefing. Therefore, the individual who arranged for the passengers’ flight or is assigned as the ramp attendant should accomplish this task. The exact procedures may vary slightly from one helicopter model to another, but in general the following should suffice.
When boarding—
- carry tools horizontally, below waist level, never upright or over the shoulder.
- stay away from the rear of the helicopter.
- approach or leave the helicopter in a crouching manner.
- approach from the side or front, but never out of the pilot’s line of vision.
- hold firmly to hats and loose articles.
- never reach up or dart after a hat or other object that might be blown off or away.
- protect eyes by shielding them with a hand or by squinting.
- if suddenly blinded by dust or a blowing object, stop and crouch lower; or better yet, sit down and wait for help.
- never grope or feel your way toward or away from the helicopter.
Since few helicopters carry cabin attendants, you, as the pilot, will have to conduct the pre-takeoff and pre- landing briefings. The type of operation dictates what sort of briefing is necessary. All briefings should include the following:
- The use and operation of seatbelts for takeoff, en route, and landing.
- For overwater flights, the location and use of flotation gear and other survival equipment that might be on board. You should also include how and when to abandon the helicopter should a ditching be necessary.
- For flights over rough or isolated terrain, all occupants should be told where maps and survival gear are located.
- Passengers should be instructed as to what actions and precautions to take in the event of an emergency, such as the body position for best spinal protection against a high vertical impact landing (erect with back firmly against the seat back); and when and how to exit after landing. Ensure that passengers are aware of the location of the fire extinguisher and survival equipment.
- Smoking should not be permitted within 50 feet of an aircraft on the ground. Smoking could be permitted, at the discretion of the pilot, except under the following conditions:
- during all ground operations.
- during, takeoff or landing.
- when carrying flammable or hazardous materials.
When passengers are approaching or leaving a helicopter that is sitting on a slope with the rotors turning, they should approach and depart downhill. This affords the greatest distance between the rotor blades and the ground. If this involves walking around the helicopter, they should always go around the front, never the rear.
Vertical takeoff to a hover
A vertical takeoff, or takeoff to a hover, is a maneuver in which the helicopter is raised vertically from the sur- face to the normal hovering altitude (2 to 5 feet) with a minimum of lateral or longitudinal movement.
TECHNIQUE
Prior to any takeoff or maneuver, you should ensure that the area is clear of other traffic. Then, head the helicopter into the wind, if possible. Place the cyclic in the neutral position, with the collective in the full down position. Increase the throttle smoothly to obtain and maintain proper r.p.m., then raise the collective. Use smooth, continuous movement, coordinating the throttle to maintain proper r.p.m. As you increase the collective, the helicopter becomes light on the skids, and torque tends to cause the nose to swing or yaw to the right unless sufficient left antitorque pedal is used to maintain the heading. (On helicopters with a clockwise main rotor system, the yaw is to the left and right pedal must be applied.)
As the helicopter becomes light on the skids, make necessary cyclic pitch control adjustments to maintain a level attitude. When airborne, use the antitorque pedals to maintain heading and the collective to ensure continuous vertical assent to the normal hovering altitude. When hovering altitude is reached, use the throttle and collective to control altitude, and the cyclic to maintain a stationary hover. Use the antitorque pedals to maintain heading. When a stabilized hover is achieved, check the engine instruments and note the power required to hover. You should also note the position of the cyclic. Cyclic position varies with wind and the amount and distribution of the load.
Excessive movement of any flight control requires a change in the other flight controls. For example, if while hovering, you drift to one side, you naturally move the cyclic in the opposite direction. When you do this, part of the vertical thrust is diverted, resulting in a loss of altitude. To maintain altitude, you must increase the collective. This increases drag on the blades and tends to slow them down. To counteract the drag and maintain r.p.m., you need to increase the throttle. Increased throttle means increased torque, so you must add more pedal pressure to maintain the heading. This can easily lead to overcontrolling the helicopter. However, as your level of proficiency increases, problems associated with overcontrolling decrease.
COMMON ERRORS
- Failing to ascend vertically as the helicopter becomes airborne.
- Pulling through on the collective after becoming airborne, causing the helicopter to gain too much altitude.
- Overcontrolling the antitorque pedals, which not only changes the handling of the helicopter, but also changes the r.p.m.
- Reducing throttle rapidly in situations where proper r.p.m. has been exceeded. This usually results in exaggerated heading changes and loss of lift, resulting in loss of altitude.
Hovering
Hovering is a maneuver in which the helicopter is maintained in a nearly motionless flight over a reference point at a constant altitude and on a constant heading. The maneuver requires a high degree of concentration and coordination.
TECHNIQUE
To maintain a hover over a point, you should look for small changes in the helicopter’s attitude and altitude. When you note these changes, make the necessary con- trol inputs before the helicopter starts to move from the point. To detect small variations in altitude or position, your main area of visual attention needs to be some distance from the aircraft, using various points on the helicopter or the tip-path plane as a reference. Looking too close or looking down leads to overcontrolling. Obviously, in order to remain over a certain point, you should know where the point is, but your attention should not be focused there.
As with a takeoff, you control altitude with the collective and maintain a constant r.p.m. with the throttle. Use the cyclic to maintain the helicopter’s position and the pedals to control heading. To maintain the helicopter in a stabilized hover, make small, smooth, coordinated corrections. As the desired effect occurs, remove the correction in order to stop the helicopter’s movement. For example, if the helicopter begins to move rearward, you need to apply a small amount of forward cyclic pressure. However, neutralize this pressure just before the helicopter comes to a stop, or it will begin to move forward.
After you gain experience, you will develop a certain “feel” for the helicopter. You will feel and see small deviations, so you can make the corrections before the helicopter actually moves. A certain relaxed looseness develops, and controlling the helicopter becomes second nature, rather than a mechanical response.
COMMON ERRORS
- Tenseness and slow reactions to movements of the helicopter.
- Failure to allow for lag in cyclic and collective pitch, which leads to overcontrolling.
- Confusing attitude changes for altitude changes, which result in improper use of the controls.
- Hovering too high, creating a hazardous flight condition.
- Hovering too low, resulting in occasional touch- down.
Hovering turn
A hovering turn is a maneuver performed at hovering altitude in which the nose of the helicopter is rotated either left or right while maintaining position over a reference point on the surface. The maneuver requires the coordination of all flight controls and demands precise control near the surface. You should maintain a constant altitude, rate of turn, and r.p.m.
TECHNIQUE
Initiate the turn in either direction by applying anti- torque pedal pressure toward the desired direction. It should be noted that during a turn to the left, you need to add more power because left pedal pressure increases the pitch angle of the tail rotor, which, in turn, requires additional power from the engine. A turn to the right requires less power. (On helicopters with a clock- wise rotating main rotor, right pedal increases the pitch angle and, therefore, requires more power.)
As the turn begins, use the cyclic as necessary (usually into the wind) to keep the helicopter over the desired spot. To continue the turn, you need to add more and more pedal pressure as the helicopter turns to the cross- wind position. This is because the wind is striking the tail surface and tail rotor area, making it more difficult for the tail to turn into the wind. As pedal pressures increase due to crosswind forces, you must increase the cyclic pressure into the wind to maintain position. Use the collective with the throttle to maintain a constant altitude and r.p.m. [Figure 9-2]
After the 90° portion of the turn, you need to decrease pedal pressure slightly to maintain the same rate of turn. Approaching the 180°, or downwind, portion, you need to anticipate opposite pedal pressure due to the tail moving from an upwind position to a down- wind position. At this point, the rate of turn has a tendency to increase at a rapid rate due to the weather vaning tendency of the tail surfaces. Because of the tailwind condition, you need to hold rearward cyclic pressure to keep the helicopter over the same spot.
Because of the helicopter’s tendency to weathervane, maintaining the same rate of turn from the 180° position actually requires some pedal pressure opposite the direction of turn. If you do not apply opposite pedal pressure, the helicopter tends to turn at a faster rate. The amount of pedal pressure and cyclic deflection throughout the turn depends on the wind velocity. As you finish the turn on the upwind heading, apply opposite pedal pressure to stop the turn. Gradually apply forward cyclic pressure to keep the helicopter from drifting.

Figure 9-2. Left turns in helicopters with a counterclockwise rotating main rotor are more difficult to execute because the tail rotor demands more power. This requires that you compensate with additional collective pitch and increased throttle. You might want to refer to this graphic throughout the remainder of the discussion on a hovering turn to the left.
Control pressures and direction of application change continuously throughout the turn. The most dramatic change is the pedal pressure (and corresponding power requirement) necessary to control the rate of turn as the helicopter moves through the downwind portion of the maneuver.
Turns can be made in either direction; however, in a high wind condition, the tail rotor may not be able to produce enough thrust, which means you will not be able to control a turn to the right in a counterclockwise rotor system. Therefore, if control is ever question- able, you should first attempt to make a 90° turn to the left. If sufficient tail rotor thrust exists to turn the helicopter crosswind in a left turn, a right turn can be successfully controlled. The opposite applies to helicopters with clockwise rotor systems. In this case, you should start your turn to the right. Hovering turns should be avoided in winds strong enough to preclude sufficient aft cyclic control to maintain the helicopter on the selected surface reference point when headed downwind. Check the flight manual for the manufacturer’s recommendations for this limitation.
COMMON ERRORS
- Failing to maintain a slow, constant rate of turn.
- Failing to maintain position over the reference point.
- Failing to maintain r.p.m. within normal range.
- Failing to maintain constant altitude.
- Failing to use the antitorque pedals properly.
Hovering—forward flight
You normally use forward hovering flight to move a helicopter to a specific location, and it is usually begun from a stationary hover. During the maneuver, constant groundspeed, altitude, and heading should be maintained.
TECHNIQUE
Before starting, pick out two references directly in front and in line with the helicopter. These reference points should be kept in line throughout the maneuver. [Figure 9-3]
Begin the maneuver from a normal hovering altitude by applying forward pressure on the cyclic. As movement begins, return the cyclic toward the neutral position to keep the groundspeed at a slow rate—no faster than a brisk walk. Throughout the maneuver, maintain a constant groundspeed and path over the ground with the cyclic, a constant heading with the antitorque
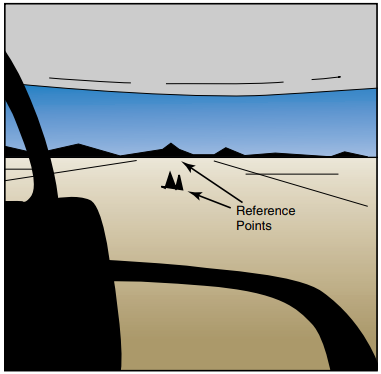
Figure 9-3. To maintain a straight ground track, use two reference points in line and at some distance in front of the helicopter.
pedals, altitude with the collective, and the proper
r.p.m. with the throttle.
To stop the forward movement, apply reward cyclic pressure until the helicopter stops. As forward motion stops, return the cyclic to the neutral position to pre- vent rearward movement. Forward movement can also be stopped by simply applying rearward pressure to level the helicopter and let it drift to a stop.
COMMON ERRORS
- Exaggerated movement of the cyclic, resulting in erratic movement over the surface.
- Failure to use the antitorque pedals properly, resulting is excessive heading changes.
- Failure to maintain desired hovering altitude.
- Failure to maintain proper r.p.m.
Hovering—sideward flight
Sideward hovering flight may be necessary to move the helicopter to a specific area when conditions make it impossible to use forward flight. During the maneuver, a constant groundspeed, altitude, and heading should be maintained.
TECHNIQUE
Before starting sideward hovering flight, make sure the area you are going to hover into is clear. Then pick two points of reference in a line in the direction of sideward hovering flight to help you maintain the proper ground
track. These reference points should be kept in line throughout the maneuver. [Figure 9-4]
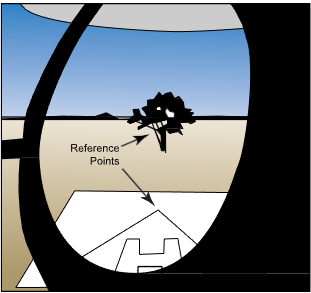
Figure 9-4. The key to hovering sideward is establishing at least two reference points that help you maintain a straight track over the ground while keeping a constant heading.
Begin the maneuver from a normal hovering altitude by applying cyclic toward the side in which the movement is desired. As the movement begins, return the cyclic toward the neutral position to keep the groundspeed at a slow rate—no faster than a brisk walk. Throughout the maneuver, maintain a constant groundspeed and ground track with cyclic. Maintain heading, which in this maneuver is perpendicular to the ground track, with the antitorque pedals, and a constant altitude with the collective. Use the throttle to maintain the proper operating r.p.m.
To stop the sideward movement, apply cyclic pressure in the direction opposite to that of movement and hold it until the helicopter stops. As motion stops, return the cyclic to the neutral position to prevent movement in the opposite direction. Applying sufficient opposite cyclic pressure to level the helicopter may also stop sideward movement. The helicopter then drifts to a stop.
COMMON ERRORS
- Exaggerated movement of the cyclic, resulting in overcontrolling and erratic movement over the surface.
- Failure to use proper antitorque pedal control, resulting in excessive heading change.
- Failure to maintain desired hovering altitude.
- Failure to maintain proper r.p.m.
- Failure to make sure the area is clear prior to starting the maneuver.
Hovering—rearward flight
Rearward hovering flight may be necessary to move the helicopter to a specific area when the situation is such that forward or sideward hovering flight cannot be used. During the maneuver, maintain a constant groundspeed, altitude, and heading. Due to the limited visibility behind a helicopter, it is important that you make sure that the area behind the helicopter is cleared before beginning the maneuver. Use of ground personnel is recommended.
TECHNIQUE
Before starting rearward hovering flight, pick out two reference points in front of, and in line with the helicopter just like you would if you were hovering for- ward. [Figure 9-3] The movement of the helicopter should be such that these points remain in line.
Begin the maneuver from a normal hovering altitude by applying rearward pressure on the cyclic. After the movement has begun, position the cyclic to maintain a slow groundspeed (no faster than a brisk walk). Throughout the maneuver, maintain constant ground- speed and ground track with the cyclic, a constant heading with the antitorque pedals, constant altitude with the collective, and the proper r.p.m. with the throttle.
To stop the rearward movement, apply forward cyclic and hold it until the helicopter stops. As the motion stops, return the cyclic to the neutral position. Also, as in the case of forward and sideward hovering flight, opposite cyclic can be used to level the helicopter and let it drift to a stop.
COMMON ERRORS
- Exaggerated movement of the cyclic resulting in overcontrolling and an uneven movement over the surface.
- Failure to use the antitorque pedals properly, resulting in excessive heading change.
- Failure to maintain desired hovering altitude.
- Failure to maintain proper r.p.m.
- Failure to make sure the area is clear prior to starting the maneuver.
Taxiing
Taxiing refers to operations on, or near the surface of taxiways or other prescribed routes. In helicopters, there are three different types of taxiing.
HOVER TAXI
A “hover taxi” is used when operating below 25 feet AGL. [Figure 9-5] Since hover taxi is just like forward, sideward, or rearward hovering flight, the technique to perform it will not be presented here.
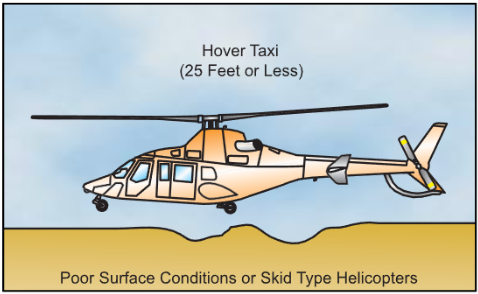
Figure 9-5. Hover taxi.
AIR TAXI
An “air taxi” is preferred when movements require greater distances within an airport or heliport bound- ary. [Figure 9-6] In this case, you basically fly to your new location; however, you are expected to remain below 100 feet AGL, and to avoid overflight of other aircraft, vehicles, and personnel.
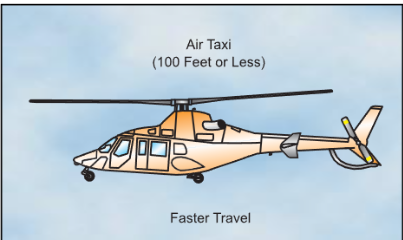
Figure 9-6. Air taxi.
TECHNIQUE
Before starting, determine the appropriate airspeed and altitude combination to remain out of the cross-hatched or shaded areas of the height-velocity diagram. Additionally, be aware of crosswind conditions that could lead to loss of tail rotor effectiveness. Pick out two references directly in front of the helicopter for the ground path desired. These reference points should be kept in line throughout the maneuver.
Begin the maneuver from a normal hovering altitude by applying forward pressure on the cyclic. As movement begins, attain the desired airspeed with the cyclic. Control the desired altitude with the collective, and r.p.m. with the throttle. Throughout the maneuver, maintain a desired groundspeed and ground track with the cyclic, a constant heading with antitorque pedals, the desired altitude with the collective, and proper operating r.p.m. with the throttle.
To stop the forward movement, apply aft cyclic pressure to reduce forward speed. Simultaneously lower the collective to initiate a descent to hover altitude. As forward motion stops, return the cyclic to the neutral position to prevent rearward movement. When at the proper hover altitude, increase the collective as necessary.
COMMON ERRORS
- Erratic movement of the cyclic, resulting in improper airspeed control and erratic movement over the surface.
- Failure to use antitorque pedals properly, resulting in excessive heading changes.
- Failure to maintain desired altitude.
- Failure to maintain proper r.p.m.
- Overflying parked aircraft causing possible dam- age from rotor downwash.
- Flying in the cross-hatched or shaded area of the height-velocity diagram.
- Flying in a crosswind that could lead to loss of tail rotor effectiveness.
SURFACE TAXI
A “surface taxi,” for those helicopters with wheels, is used whenever you wish to minimize the effects of rotor downwash. [Figure 9-7]
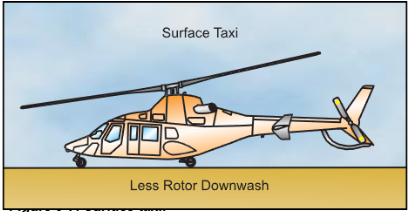
Figure 9-7. Surface taxi.
TECHNIQUE
The helicopter should be in a stationary position on the surface with the collective full down and the r.p.m. the same as that used for a hover. This r.p.m. should be maintained throughout the maneuver. Then, move the cyclic slightly forward and apply gradual upward pressure on the collective to move the helicopter forward along the surface. Use the antitorque pedals to maintain heading and the cyclic to maintain ground track. The collective controls starting, stopping, and speed while taxiing. The higher the collective pitch, the faster the taxi speed; however, you should not taxi faster than a brisk walk. If your helicopter is equipped with brakes, use them to help you slow down. Do not use the cyclic to control groundspeed.
During a crosswind taxi, hold the cyclic into the wind a sufficient amount to eliminate any drifting movement.
COMMON ERRORS
- Improper use of cyclic.
- Failure to use antitorque pedals for heading control.
- Improper use of the controls during crosswind operations.
- Failure to maintain proper r.p.m.
Normal takeoff from a hover
A normal takeoff from a hover is an orderly transition to forward flight and is executed to increase altitude safely and expeditiously. During the takeoff, fly a pro- file that avoids the cross-hatched or shaded areas of the height-velocity diagram.
TECHNIQUE
Refer to figure 9-8 (position 1). Bring the helicopter to a hover and make a performance check, which includes power, balance, and flight controls. The power check should include an evaluation of the amount of excess power available; that is, the difference between the power being used to hover and the power available at the existing altitude and temperature conditions. The balance condition of the helicopter is indicated by the position of the cyclic when maintaining a stationary hover. Wind will necessitate some cyclic deflection, but there should not be an extreme deviation from neutral. Flight controls must move freely, and the helicopter should respond normally. Then visually clear the area all around.
Start the helicopter moving by smoothly and slowly easing the cyclic forward (position 2). As the helicopter starts to move forward, increase the collective, as necessary, to prevent the helicopter from sinking and adjust the throttle to maintain r.p.m. The increase in power requires an increase in the proper antitorque pedal to maintain heading. Maintain a straight takeoff path throughout the takeoff. As you accelerate through effective translational lift (position 3), the helicopter begins to climb and the nose tends to rise due to increased lift. At this point adjust the collective to obtain normal climb power and apply enough forward cyclic to overcome the tendency of the nose to rise. At position 4, hold an attitude that allows a smooth acceleration toward climbing airspeed and a commensurate gain in altitude so that the takeoff profile does not take you through any of the cross-hatched or shaded areas of the height-velocity diagram. As airspeed increases (position 5), the stream- lining of the fuselage reduces engine torque effect, requiring a gradual reduction of antitorque pedal pressure. As the helicopter continues to climb and accelerate to best rate of climb, apply aft cyclic pressure to raise the nose smoothly to the normal climb attitude.
COMMON ERRORS
- Failing to use sufficient collective pitch to pre- vent loss of altitude prior to attaining translational lift.
- Adding power too rapidly at the beginning of the transition from hovering to forward flight without forward cyclic compensation, causing the helicopter to gain excessive altitude before acquiring airspeed.
- Assuming an extreme nose-down attitude near the surface in the transition from hovering to forward flight.
- Failing to maintain a straight flight path over the surface (ground track).
- Failing to maintain proper airspeed during the climb.
- Failing to adjust the throttle to maintain proper r.p.m.
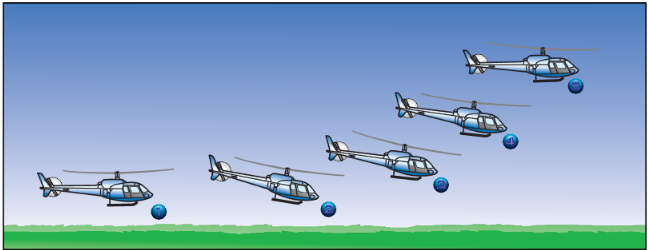
Figure 9-8. The helicopter takes several positions during a normal takeoff from a hover. The numbered positions in the text refer to the numbers in this illustration.
Normal takeoff from the surface
Normal takeoff from the surface is used to move the helicopter from a position on the surface into effective translational lift and a normal climb using a minimum amount of power. If the surface is dusty or covered with loose snow, this technique provides the most favorable visibility conditions and reduces the possibility of debris being ingested by the engine.
TECHNIQUE
Place the helicopter in a stationary position on the sur- face. Lower the collective to the full down position, and reduce the r.p.m. below operating r.p.m. Visually clear the area and select terrain features, or other objects, to aid in maintaining the desired track during takeoff and climb out. Increase the throttle to the proper r.p.m. and raise the collective slowly until the helicopter is light on the skids. Hesitate momentarily and adjust the cyclic and antitorque pedals, as necessary, to prevent any surface movement. Continue to apply upward collective and, as the helicopter breaks ground, use the cyclic, as necessary, to begin forward movement as altitude is gained. Continue to accelerate, and as effective translational lift is attained, the helicopter begins to climb. Adjust attitude and power, if necessary, to climb in the same manner as a takeoff from a hover.
COMMOM ERRORS
- Departing the surface in an attitude that is too nose-low. This situation requires the use of exces- sive power to initiate a climb.
- Using excessive power combined with a level attitude, which causes a vertical climb.
- Too abrupt application of the collective when departing the surface, causing r.p.m. and heading control errors.
CROSSWIND CONSIDERATIONS DURING TAKEOFFS
If the takeoff is made during crosswind conditions, the helicopter is flown in a slip during the early stages of the maneuver. [Figure 9-9] The cyclic is held into the wind a sufficient amount to maintain the desired ground track for the takeoff. The heading is maintained with the use of the antitorque pedals. In other words, the rotor is tilted into the wind so that the sideward movement of the helicopter is just enough to counter- act the crosswind effect. To prevent the nose from turning in the direction of the rotor tilt, it is necessary to increase the antitorque pedal pressure on the side opposite the rotor tilt.
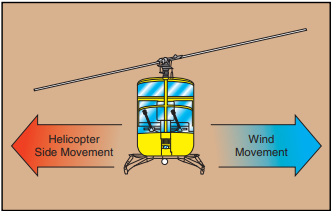
Figure 9-9. During a slip, the rotor disc is tilted into the wind.
After approximately 50 feet of altitude is gained, make a coordinated turn into the wind to maintain the desired ground track. This is called crabbing into the wind. The stronger the crosswind, the more you have to turn the helicopter into the wind to maintain the desired ground track. [Figure 9-10]
Figure 9-10. To compensate for wind drift at altitude, crab the helicopter into the wind.
Straight-and-level flight
Straight-and-level flight is flight in which a constant altitude and heading are maintained. The attitude of the helicopter determines the airspeed and is controlled by the cyclic. Altitude is primarily controlled by use of the collective.
TECHNIQUE
To maintain forward flight, the rotor tip-path plane must be tilted forward to obtain the necessary horizontal thrust component from the main rotor. This generally results in a nose-low attitude. The lower the nose, the greater the power required to maintain altitude, and the higher the resulting airspeed. Conversely, the greater the power used, the lower the nose must be to maintain altitude. [Figure 9-11]
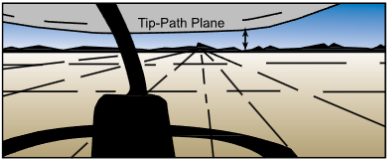
Figure 9-11. You can maintain a straight-and-level attitude by keeping the tip-path plane parallel to and a constant distance above or below the natural horizon. For any given airspeed, this distance remains the same as long as you sit in the same position in the same type of aircraft.
When in straight-and-level flight, any increase in the collective, while holding airspeed constant, causes the helicopter to climb. A decrease in the collective, while holding airspeed constant, causes the helicopter to descend. A change in the collective requires a coordi- nated change of the throttle to maintain a constant
r.p.m. Additionally, the antitorque pedals need to be adjusted to maintain heading and to keep the helicopter in longitudinal trim.
To increase airspeed in straight-and-level flight, apply forward pressure on the cyclic and raise the collective as necessary to maintain altitude. To decrease airspeed, apply rearward pressure on the cyclic and lower the collective, as necessary, to maintain altitude.
Although the cyclic is sensitive, there is a slight delay in control reaction, and it will be necessary to anticipate actual movement of the helicopter. When making cyclic inputs to control the altitude or airspeed of a helicopter, take care not to overcontrol. If the nose of the helicopter rises above the level-flight attitude, apply forward pressure to the cyclic to bring the nose down. If this correction is held too long, the nose drops too low. Since the helicopter continues to change attitude momentarily after the controls reach neutral, return the cyclic to neutral slightly before the desired attitude is reached. This principal holds true for any cyclic input.
Since helicopters are inherently unstable, if a gust or turbulence causes the nose to drop, the nose tends to continue to drop instead of returning to a straight-and- level attitude as would a fixed-wing aircraft. Therefore, you must remain alert and FLY the helicopter at all times.
COMMON ERRORS
- Failure to properly trim the helicopter, tending to hold antitorque pedal pressure and opposite cyclic. This is commonly called cross-controlling.
- Failure to maintain desired airspeed.
- Failure to hold proper control position to maintain desired ground track.
Turns
A turn is a maneuver used to change the heading of the helicopter. The aerodynamics of a turn were previously discussed in Chapter 3—Aerodynamics of Flight.
TECHNIQUE
Before beginning any turn, the area in the direction of the turn must be cleared not only at the helicopter’s alti- tude, but also above and below. To enter a turn from straight-and-level flight, apply sideward pressure on the cyclic in the direction the turn is to be made. This is the only control movement needed to start the turn. Do not use the pedals to assist the turn. Use the pedals only to compensate for torque to keep the helicopter in lon- gitudinal trim. [Figure 9-12]
How fast the helicopter banks depends on how much lateral cyclic pressure you apply. How far the helicopter banks (the steepness of the bank) depends on how long you displace the cyclic. After establishing the proper bank angle, return the cyclic toward the neutral position. Increase the collective and throttle to main-
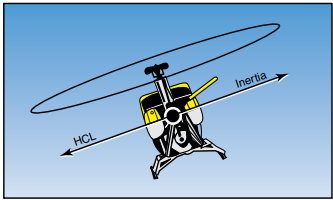
Figure 9-12. During a level, coordinated turn, the rate of turn is commensurate with the angle of bank used, and inertia and horizontal component of lift (HCL) are equal.
tain altitude and r.p.m. As the torque increases, increase the proper antitorque pedal pressure to maintain longi- tudinal trim. Depending on the degree of bank, addi- tional forward cyclic pressure may be required to maintain airspeed.
Rolling out of the turn to straight-and-level flight is the same as the entry into the turn except that pressure on the cyclic is applied in the opposite direction. Since the helicopter continues to turn as long as there is any bank, start the rollout before reaching the desired heading.
The discussion on level turns is equally applicable to making turns while climbing or descending. The only difference being that the helicopter is in a climbing or descending attitude rather than that of level flight. If a simultaneous entry is desired, merely combine the techniques of both maneuvers—climb or descent entry and turn entry. When recovering from a climbing or descending turn, the desired heading and altitude are rarely reached at the same time. If the heading is reached first, stop the turn and maintain the climb or descent until reaching the desired altitude. On the other hand, if the altitude is reached first, establish the level flight attitude and continue the turn to the desired heading.
SLIPS
A slip occurs when the helicopter slides sideways toward the center of the turn. [Figure 9-13] It is caused by an insufficient amount of antitorque pedal in the direction of the turn, or too much in the direction oppo- site the turn, in relation to the amount of power used. In other words, if you hold improper antitorque pedal pressure, which keeps the nose from following the turn, the helicopter slips sideways toward the center of the turn.

Figure 9-13. During a slip, the rate of turn is too slow for the angle of bank used, and the horizontal component of lift (HCL) exceeds inertia.
SKIDS
A skid occurs when the helicopter slides sideways away from the center of the turn. [Figure 9-14] It is caused by too much antitorque pedal pressure in the direction of the turn, or by too little in the direction opposite the turn in relation to the amount of power used. If the helicopter is forced to turn faster with increased pedal pressure instead of by increasing the degree of the bank, it skids sideways away from the center of the turn instead of flying in its normal curved pattern.
In summary, a skid occurs when the rate of turn is too fast for the amount of bank being used, and a slip occurs when the rate of turn is too slow for the amount of bank being used.
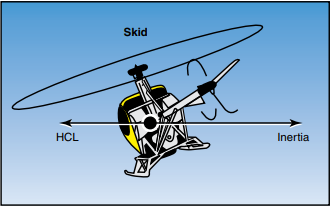
Figure 9-14. During a skid, the rate of turn is too fast for the angle of bank used, and inertia exceeds the horizontal com- ponent of lift (HCL).
COMMON ERRORS
- Using antitorque pedal pressures for turns. This is usually not necessary for small helicopters.
- Slipping or skidding in the turn.
Normal climb
The entry into a climb from a hover has already been discussed under “Normal Takeoff from a Hover;” there- fore, this discussion is limited to a climb entry from cruising flight.
TECHNIQUE
To enter a climb from cruising flight, apply aft cyclic to obtain the approximate climb attitude. Simultaneously increase the collective and throttle to obtain climb power and maintain r.p.m. In a counterclockwise rotor system, increase the left antitorque pedal pressure to compensate for the increased torque. As the airspeed approaches normal climb airspeed, adjust the cyclic to hold this airspeed. Throughout the maneuver, maintain climb attitude, heading, and airspeed with the cyclic; climb power and r.p.m. with the collective and throttle; and longitudinal trim with the antitorque pedals.
To level off from a climb, start adjusting the attitude to the level flight attitude a few feet prior to reaching the desired altitude. The amount of lead depends on the rate of climb at the time of level-off (the higher the rate of climb, the more the lead). Generally, the lead is 10 percent of the climb rate. For example, if your climb rate is 500 feet per minute, you should lead the level-off by 50 feet.
To begin the level-off, apply forward cyclic to adjust and maintain a level flight attitude, which is slightly nose low. You should maintain climb power until the airspeed approaches the desired cruising airspeed, then lower the collective to obtain cruising power and adjust the throttle to obtain and maintain cruising r.p.m. Throughout the level-off, maintain longitudinal trim and heading with the antitorque pedals.
COMMON ERRORS
- Failure to maintain proper power and airspeed.
- Holding too much or too little antitorque pedal.
- In the level-off, decreasing power before lowering the nose to cruising attitude.
Normal descent
A normal descent is a maneuver in which the helicop- ter loses altitude at a controlled rate in a controlled attitude.
TECHNIQUE
To establish a normal descent from straight-and-level flight at cruising airspeed, lower the collective to obtain proper power, adjust the throttle to maintain r.p.m., and increase right antitorque pedal pressure to maintain heading in a counterclockwise rotor system, or left pedal pressure in a clockwise system. If cruising airspeed is the same as, or slightly above descending air- speed, simultaneously apply the necessary cyclic pressure to obtain the approximate descending attitude. If cruising speed is well above descending airspeed, you can maintain a level flight attitude until the airspeed approaches the descending airspeed, then lower the nose to the descending attitude. Throughout the maneu- ver, maintain descending attitude and airspeed with the cyclic; descending power and r.p.m. with the collective and throttle; and heading with the antitorque pedals.
To level off from the descent, lead the desired altitude by approximately 10 percent of the rate of descent. For example, a 500 feet per minute rate of descent would require a 50 foot lead. At this point, increase the collective to obtain cruising power, adjust the throttle to maintain r.p.m., and increase left antitorque pedal pressure to maintain heading (right pedal pressure in a clockwise rotor system). Adjust the cyclic to obtain cruising airspeed and a level flight attitude as the desired altitude is reached.
COMMON ERRORS
- Failure to maintain constant angle of decent during training.
- Failure to lead the level-off sufficiently, which results in recovery below the desired altitude.
- Failure to adjust antitorque pedal pressures for changes in power.
Ground reference maneuvers
Ground reference maneuvers are training exercises flown to help you develop a division of attention between the flight path and ground references, while controlling the helicopter and watching for other air- craft in the vicinity. Prior to each maneuver, a clearing turn should be accomplished to ensure the practice area is free of conflicting traffic.
RECTANGULAR COURSE
The rectangular course is a training maneuver in which the ground track of the helicopter is equidistant from all sides of a selected rectangular area on the ground. While performing the maneuver, the altitude and air- speed should be held constant. The rectangular course helps you to develop a recognition of a drift toward or away from a line parallel to the intended ground track. This is helpful in recognizing drift toward or from an airport runway during the various legs of the airport traffic pattern.
For this maneuver, pick a square or rectangular field, or an area bounded on four sides by section lines or roads, where the sides are approximately a mile in length. The area selected should be well away from other air traffic. Fly the maneuver approximately 600 to 1,000 feet above the ground, which is the altitude usually required for an airport traffic pattern. You should fly the helicopter parallel to and at a uniform distance, about one-fourth to one-half mile, from the field boundaries, not above the boundaries. For best results, position your flight path outside the field boundaries just far enough away that they may be easily observed from either pilot seat by looking out the side of the helicopter. If an attempt is made to fly directly above the edges of the field, you will have no usable reference points to start and complete the turns. In addition, the closer the track of the helicopter is to the field boundaries, the steeper the bank necessary at the turning points. Also, you should be able to see the edges of the selected field while seated in a normal position and looking out the side of the helicopter during either a left-hand or right-hand course. The distance of the ground track from the edges of the field should be the same regardless of whether the course is flown to the left or right. All turns should be started when your helicopter is abeam the corners of the field boundaries. The bank normally should not exceed 30°.
Although the rectangular course may be entered from any direction, this discussion assumes entry on a
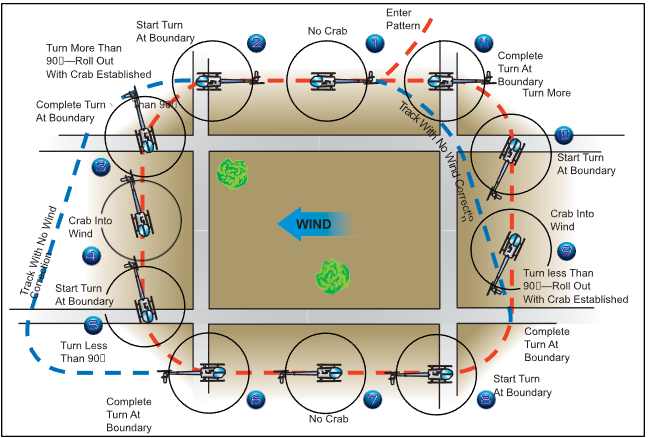
Figure 9-15. Rectangular course. The numbered positions in the text refer to the numbers in this illustration.
downwind heading. [Figure 9-15] As you approach the field boundary on the downwind leg, you should begin planning for your turn to the crosswind leg. Since you have a tailwind on the downwind leg, the helicopter’s groundspeed is increased (position 1). During the turn onto the crosswind leg, which is the equivalent of the base leg in a traffic pattern, the wind causes the heli- copter to drift away from the field. To counteract this effect, the roll-in should be made at a fairly fast rate with a relatively steep bank (position 2).
As the turn progresses, the tailwind component decreases, which decreases the groundspeed. Consequently, the bank angle and rate of turn must be reduced gradually to ensure that upon completion of the turn, the crosswind ground track continues to be the same distance from the edge of the field. Upon completion of the turn, the helicopter should be level and aligned with the downwind corner of the field. However, since the crosswind is now pushing you away from the field, you must establish the proper drift correction by flying slightly into the wind. Therefore, the turn to crosswind should be greater than a 90° change in heading (position 3). If the turn has been made properly, the field boundary again appears to be one-fourth to one-half mile away. While on the cross- wind leg, the wind correction should be adjusted, as necessary, to maintain a uniform distance from the field boundary (position 4).
As the next field boundary is being approached (posi- tion 5), plan the turn onto the upwind leg. Since a wind correction angle is being held into the wind and toward the field while on the crosswind leg, this next turn requires a turn of less than 90°. Since the crosswind becomes a headwind, causing the groundspeed to decrease during this turn, the bank initially must be medium and progressively decreased as the turn pro- ceeds. To complete the turn, time the rollout so that the helicopter becomes level at a point aligned with the corner of the field just as the longitudinal axis of the helicopter again becomes parallel to the field boundary (position 6). The distance from the field boundary should be the same as on the other sides of the field.
On the upwind leg, the wind is a headwind, which results in an decreased groundspeed (position 7). Consequently, enter the turn onto the next leg with a fairly slow rate of roll-in, and a relatively shallow bank (position 8). As the turn progresses, gradually increase the bank angle because the headwind component is diminishing, resulting in an increasing groundspeed. During and after the turn onto this leg, the wind tends to drift the helicopter toward the field boundary. To compensate for the drift, the amount of turn must be less than 90° (position 9).
Again, the rollout from this turn must be such that as the helicopter becomes level, the nose of the helicopter is turned slightly away the field and into the wind to correct for drift. The helicopter should again be the same distance from the field boundary and at the same altitude, as on other legs. Continue the crosswind leg until the downwind leg boundary is approached (posi- tion 10). Once more you should anticipate drift and turning radius. Since drift correction was held on the crosswind leg, it is necessary to turn greater than 90° to align the helicopter parallel to the downwind leg boundary. Start this turn with a medium bank angle, gradually increasing it to a steeper bank as the turn pro- gresses. Time the rollout to assure paralleling the boundary of the field as the helicopter becomes level (position 11).
If you have a direct headwind or tailwind on the upwind and downwind leg, drift should not be encoun- tered. However, it may be difficult to find a situation where the wind is blowing exactly parallel to the field boundaries. This makes it necessary to use a slight wind correction angle on all the legs. It is important to anticipate the turns to compensate for groundspeed, drift, and turning radius. When the wind is behind the helicopter, the turn is faster and steeper; when it is ahead of the helicopter, the turn is slower and shallower. These same techniques apply while flying in an airport traffic pattern.
S-TURNS
Another training maneuver you might use is the S-turn, which helps you correct for wind drift in turns. This maneuver requires turns to the left and right. The refer- ence line used, whether a road, railroad, or fence, should be straight for a considerable distance and should extend as nearly perpendicular to the wind as possible.
The object of S-turns is to fly a pattern of two half cir- cles of equal size on opposite sides of the reference line. [Figure 9-16] The maneuver should be performed at a constant altitude between 600 and 1,000 feet above the terrain. S-turns may be started at any point; however, during early training it may be beneficial to start on a downwind heading. Entering downwind permits the immediate selection of the steepest bank that is desired throughout the maneuver. The discussion that follows is based on choosing a reference line that is perpendicular to the wind and starting the maneuver on a downwind heading.
As the helicopter crosses the reference line, immediately establish a bank. This initial bank is the steepest used throughout the maneuver since the helicopter is headed directly downwind and the groundspeed is at its
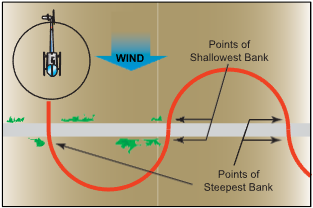
Figure 9-16. S-turns across a road.
highest. Gradually reduce the bank, as necessary, to describe a ground track of a half circle. Time the turn so that as the rollout is completed, the helicopter is crossing the reference line perpendicular to it and head- ing directly upwind. Immediately enter a bank in the opposite direction to begin the second half of the “S.” Since the helicopter is now on an upwind heading, this bank (and the one just completed before crossing the reference line) is the shallowest in the maneuver. Gradually increase the bank, as necessary, to describe a ground track that is a half circle identical in size to the one previously completed on the other side of the refer- ence line. The steepest bank in this turn should be attained just prior to rollout when the helicopter is approaching the reference line nearest the downwind heading. Time the turn so that as the rollout is com- plete, the helicopter is perpendicular to the reference line and is again heading directly downwind.
In summary, the angle of bank required at any given point in the maneuver is dependent on the ground- speed. The faster the groundspeed, the steeper the bank; the slower the groundspeed, the shallower the bank. To express it another way, the more nearly the helicopter is to a downwind heading, the steeper the bank; the more nearly it is to an upwind heading, the shallower the bank. In addition to varying the angle of bank to correct for drift in order to maintain the proper radius of turn, the helicopter must also be flown with a drift correction angle (crab) in relation to its ground track; except of course, when it is on direct upwind or downwind headings or there is no wind. One would normally think of the fore and aft axis of the helicopter as being tangent to the ground track pattern at each point. However, this is not the case. During the turn on the upwind side of the reference line (side from which the wind is blowing), crab the nose of the helicopter toward the outside of the circle. During the turn on the downwind side of the reference line (side of the reference line opposite to the direction from which the wind is blowing), crab the nose of the helicopter toward the inside of the circle. In either case, it is obvious that the helicopter is being crabbed into the wind just as it is when trying to maintain a straight ground track. The amount of crab depends upon the wind velocity and how nearly the helicopter is to a crosswind position. The stronger the wind, the greater the crab angle at any given position for a turn of a given radius. The more nearly the helicopter is to a crosswind position, the greater the crab angle. The maximum crab angle should be at the point of each half circle farthest from the reference line.
A standard radius for S-turns cannot be specified, since the radius depends on the airspeed of the helicopter, the velocity of the wind, and the initial bank chosen for entry.
TURNS AROUND A POINT
This training maneuver requires you to fly constant radius turns around a preselected point on the ground using a bank of approximately 30°, while maintaining a constant altitude. [Figure 9-17] Your objective, as in other ground reference maneuvers, is to develop the ability to subconsciously control the helicopter while dividing attention between the flight path and ground references, while still watching for other air traffic in the vicinity.

Figure 9-17. Turns around a point.
The factors and principles of drift correction that are involved in S-turns are also applicable in this maneuver. As in other ground track maneuvers, a constant radius around a point will, if any wind exists, require a constantly changing angle of bank and angles of wind correction. The closer the helicopter is to a direct downwind heading where the groundspeed is greatest, the steeper the bank, and the faster the rate of turn required to establish the proper wind correc- tion angle. The more nearly it is to a direct upwind heading where the groundspeed is least, the shallower the bank, and the slower the rate of turn required to establish the proper wind correction angle. It follows, then, that throughout the maneuver, the bank and rate of turn must be gradually varied in proportion to the groundspeed.
The point selected for turns around a point should be prominent and easily distinguishable, yet small enough to present a precise reference. Isolated trees, crossroads, or other similar small landmarks are usually suitable. The point should be in an area away from communities, livestock, or groups of people on the ground to prevent possible annoyance or hazard to others. Since the maneuver is performed between 600 and 1,000 feet AGL, the area selected should also afford an opportu- nity for a safe emergency autorotation in the event it becomes necessary.
To enter turns around a point, fly the helicopter on a downwind heading to one side of the selected point at a distance equal to the desired radius of turn. When any significant wind exists, it is necessary to roll into the initial bank at a rapid rate so that the steepest bank is attained abeam the point when the helicopter is headed directly downwind. By entering the maneu- ver while heading directly downwind, the steepest bank can be attained immediately. Thus, if a bank of 30° is desired, the initial bank is 30° if the helicopter is at the correct distance from the point. Thereafter, the bank is gradually shallowed until the point is reached where the helicopter is headed directly upwind. At this point, the bank is gradually steepened until the steepest bank is again attained when head- ing downwind at the initial point of entry.
Just as S-turns require that the helicopter be turned into the wind in addition to varying the bank, so do turns around a point. During the downwind half of the circle, the helicopter’s nose must be progressively turned toward the inside of the circle; during the upwind half, the nose must be progressively turned toward the outside. The downwind half of the turn around the point may be compared to the downwind side of the S-turn, while the upwind half of the turn around a point may be compared to the upwind side of the S-turn.
As you become experienced in performing turns around a point and have a good understanding of the effects of wind drift and varying of the bank angle and wind correction angle as required, entry into the maneuver may be from any point. When entering this maneuver at any point, the radius of the turn must be carefully selected, taking into account the wind velocity and groundspeed so that an excessive bank is not required later on to maintain the proper ground track.
COMMON ERRORS DURING GROUND REFERENCE MANEUVERS
- Faulty entry technique.
- Poor planning, orientation, or division of attention.
- Uncoordinated flight control application.
- Improper correction for wind drift.
- An unsymmetrical ground track during S-Turns Across a Road.
- Failure to maintain selected altitude or airspeed.
- Selection of a ground reference where there is no suitable emergency landing area within gliding distance.
Traffic patterns
A traffic pattern is useful to control the flow of traffic, par- ticularly at airports without operating control towers. It affords a measure of safety, separation, protection, and administrative control over arriving, departing, and circling aircraft. Due to specialized operating character- istics, airplanes and helicopters do not mix well in the same traffic environment. At multiple-use airports, you routinely must avoid the flow of fixed-wing traf- fic. To do this, you need to be familiar with the patterns typically flown by airplanes. In addition, you should learn how to fly these patterns in case air traf- fic control (ATC) requests that you fly a fixed-wing traffic pattern.
A normal traffic pattern is rectangular, has five named legs, and a designated altitude, usually 600 to 1,000 feet AGL. A pattern in which all turns are to the left is called a standard pattern. [Figure 9-18] The takeoff leg (item 1) normally consists of the aircraft’s flight path after takeoff. This leg is also called the upwind leg. You should turn to the crosswind leg (item 2), after passing the departure end of the runway when you are at a safe altitude. Fly the downwind leg (item 3) parallel to the runway at the designated traffic pattern altitude and distance from the runway. Begin the base leg (item 4) at a point selected according to other traffic and wind conditions. If the wind is very strong, begin the turn sooner than normal. If the wind is light, delay the turn to base. The final approach (item 5) is the path the air- craft flies immediately prior to touchdown.
You may find variations at different localities and at airports with operating control towers. For example, a right-hand pattern may be designated to expedite the

Figure 9-18. A standard traffic pattern has turns to left and five designated legs.
flow of traffic when obstacles or highly populated areas make the use of a left-hand pattern undesirable.
When approaching an airport with an operating control tower in a helicopter, it is possible to expedite traffic by stating your intentions, for example:
- (Call sign of helicopter) Robinson 8340J.
- (Position) 10 miles west.
- (Request) for landing and hover to…
In order to avoid the flow of fixed-wing traffic, the tower will often clear you direct to an approach point or to a particular runway intersection nearest your destination point. At uncontrolled airports, if at all possible, you should adhere to standard practices and patterns.
Traffic pattern entry procedures at airports with an operating control tower are specified by the controller. At uncontrolled airports, traffic pattern altitudes and entry procedures may vary according to established local procedures. The general procedure is for you to enter the pattern at a 45° angle to the downwind leg abeam the midpoint of the runway. For information concerning traffic pattern and landing direction, you should utilize airport advisory service or UNICOM, when available.
The standard departure procedure when using the fixed-wing traffic pattern is usually straight-out, down- wind, or a right-hand departure. When a control tower is in operation, you can request the type of departure you desire. In most cases, helicopter departures are made into the wind unless obstacles or traffic dictate otherwise. At airports without an operating control tower, you must comply with the departure procedures established for that airport.
Approaches
An approach is the transition from traffic pattern alti- tude to either a hover or to the surface. The approach should terminate at the hover altitude with the rate of descent and groundspeed reaching zero at the same time. Approaches are categorized according to the angle of descent as normal, steep, or shallow. In this chapter we will concentrate on the normal approach. Steep and shallow approaches are discussed in the next chapter.
You should use the type of approach best suited to the existing conditions. These conditions may include obstacles, size and surface of the landing area, density altitude, wind direction and speed, and weight. Regardless of the type of approach, it should always be made to a specific, predetermined landing spot.
NORMAL APPROACH TO A HOVER
A normal approach uses a descent profile of between 8° and 12° starting at approximately 300 feet AGL.
TECHNIQUE
On final approach, at the recommended approach airspeed and at approximately 300 feet AGL, align the helicopter with the point of intended touchdown. [Figure 9-19] After intercepting an approach angle of 8° to 12°, begin the approach by lowering the collective sufficiently to get the helicopter decelerating and descending down the approach angle. With the decrease in the collective, the nose tends to pitch down, requiring aft cyclic to maintain the recommended approach air- speed attitude. Adjust antitorque pedals, as necessary, to maintain longitudinal trim. You can determine the proper approach angle by relating the point of intended touchdown to a point on the helicopter windshield. The collective controls the angle of approach. If the touch- down point seems to be moving up on the windshield, the angle is becoming shallower, necessitating a slight increase in collective. If the touchdown point moves down on the windshield, the approach angle is becoming steeper, requiring a slight decrease in collective. Use the cyclic to control the rate of closure or how fast your are moving toward the touchdown point. Maintain entry airspeed until the apparent groundspeed and rate of closure appear to be increasing. At this point, slowly begin decelerating with slight aft cyclic, and smoothly lower the collective to maintain approach angle. Use the cyclic to maintain a rate of closure equivalent to a brisk walk.
At approximately 25 to 40 feet AGL, depending on wind, the helicopter begins to lose effective translational lift. To compensate for loss of effective translational lift, you must increase the collective to maintain the approach angle, while maintaining the proper r.p.m. The increase of collective pitch tends to make the nose rise, requiring forward cyclic to maintain the proper rate of closure.
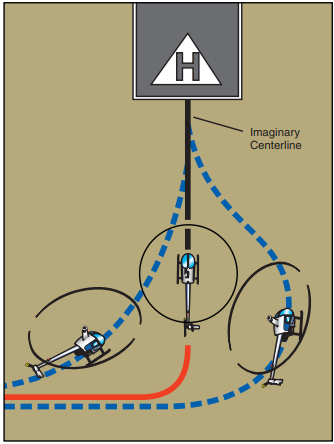
Figure 9-19. Plan the turn to final so the helicopter rolls out on an imaginary extension of the centerline for the final approach path. This path should neither angle to the landing area, as shown by the helicopter on the left, nor require an S-turn, as shown by the helicopter on the right.
As the helicopter approaches the recommended hover altitude, you need to increase the collective sufficiently to maintain the hover. At the same time you need to apply aft cyclic to stop any forward movement, while controlling the heading with antitorque pedals.
COMMON ERRORS
- Failing to maintain proper r.p.m. during the entire approach.
- Improper use of the collective in controlling the angle of descent.
- Failing to make antitorque pedal corrections to compensate for collective changes during the approach.
- Failing to simultaneously arrive at hovering alti- tude and attitude with zero groundspeed.
- Low r.p.m. in transition to the hover at the end of the approach.
- Using too much aft cyclic close to the surface, which may result in tail rotor strikes.
NORMAL APPROACH TO THE SURFACE
A normal approach to the surface or a no-hover landing is used if loose snow or dusty surface conditions exist. These situations could cause severely restricted visibility, or the engine could possibly ingest debris when the helicopter comes to a hover. The approach is the same as the normal approach to a hover; however, instead of terminating at a hover, continue the approach to touchdown. Touchdown should occur with the skids level, zero groundspeed, and a rate of descent approaching zero.
TECHNIQUE:
As the helicopter nears the surface, increase the collec- tive, as necessary, to cushion the landing on the sur- face, terminate in a skids-level attitude with no forward movement.
COMMON ERRORS
- Terminating at a hover, then making a vertical landing.
- Touching down with forward movement.
- Approaching too slow, requiring the use of exces- sive power during the termination.
- Approaching too fast, causing a hard landing.
CROSSWIND DURING APPROACHES
During a crosswind approach, you should crab into the wind. At approximately 50 feet of altitude, use a slip to align the fuselage with the ground track. The rotor is tilted into the wind with cyclic pressure so that the sideward movement of the helicopter and wind drift counteract each other. Maintain the heading and ground track with the antitorque pedals. This technique should be used on any type of crosswind approach, whether it is a shallow, normal, or steep approach.
Go-around
A go-around is a procedure for remaining airborne after an intended landing is discontinued. A go-around may be necessary when:
- Instructed by the control tower.
- Traffic conflict occurs.
A good rule of thumb to use during an approach is to make a go-around if the helicopter is in a position from which it is not safe to continue the approach. Anytime you feel an approach is uncomfortable, incorrect, or potentially dangerous, abandon the approach. The deci- sion to make a go-around should be positive and initiated before a critical situation develops. When the decision is made, carry it out without hesitation. In most cases, when you initiate the go-around, power is at a low setting. Therefore, your first response is to increase collective to takeoff power. This movement is coordinated with the throttle to maintain r.p.m., and the proper antitorque pedal to control heading. Then, establish a climb attitude and maintain climb speed to go around for another approach.
After landing and securing
When the flight is terminated, park the helicopter where it will not interfere with other aircraft and not be a hazard to people during shutdown. Rotor down- wash can cause damage to other aircraft in close proximity, and spectators may not realize the danger or see the rotors turning. Passengers should remain in the helicopter with their seats belts secured until the rotors have stopped turning. During the shutdown and postflight inspection, follow the manufacturer’s checklist. Any discrepancies found should be noted and, if necessary, reported to maintenance personnel.
Noise abatement procedures
The FAA, in conjunction with airport operators and community leaders, is now using noise abatement procedures to reduce the level of noise generated by aircraft departing over neighborhoods that are near airports. The airport authority may simply request that you use a designated runway, wind permitting. You also may be asked to restrict some of your operations, such as practicing landings, during certain time periods. There are three ways to determine the noise abatement procedure at an airport. First, if there is a control tower on the field, they will assign the preferred noise abatement runway or takeoff direction to you. Second, you can check the Airport/Facility Directory for information on local procedures. Third, there may be information for you to read in the pilot’s lounge, or even signs posted next to a runway that will advise you on local procedures.


