Introduction
This chapter introduces inflation and launch of the balloon. It also provides useful information on checklists, crew and crew management, false lift, and landowner relations.
Preflight Operations
The preflight, as an aeronautical term, is generally agreed to be the airworthiness check of an aircraft immediately before flight. In the broadest sense, preflight is everything accomplished in preparation for a flight. In this chapter, preflight operations occur at the balloon launch site, up to and including the preflight inspection.
Checklists
The value of using a checklist is well known to the airlines and the military. Regulations require air carrier pilots and military pilots to use checklists. Also, Federal Aviation Administration (FAA) practical tests require pilot certificate applicants to use checklists. Checklists are effective and contribute to safe flying because routine and familiarity breed complacency. Like military and airline pilots, balloonists who fly every day need a checklist to ensure nothing is omitted. For example, professional balloon ride operators are subject to distractions and interruptions during their preflight, layout, assembly, and inspection. Infrequent balloon flyers, which include most balloonists, need checklists because long periods of inactivity create memory lapses. A typical balloonist may make only 25 to 30 flights per year or less. A checklist does not replace proficiency, but it helps. [Figure 6-1]

Figure 6-1. Using a checklist.
A checklist can also save time. By arranging the layout, assembly, and inspection in a logical order, and accomplishing more than one task at a time, duplication and wasted time is minimized. For instance, a properly arranged preflight checklist includes many tasks that are performed while the fan is running, so people are not just standing around waiting for the envelope to inflate. Also, a checklist eliminates needless walking. Students and new pilots need checklists because they are forming habit patterns, and need prompting to reinforce training and confirm good habits.
There are two theories regarding checklists. One popular procedure is the “call-and-response” method. One person reads the checklist, and the pilot responds that the item is in the proper configuration. This is rather time consuming, and probably not appropriate for ballooning activities. At the other extreme are large groupings of components and items to check with a casual glance to confirm that those items look correct. Perhaps the best methodology suited for ballooning is smaller groupings (i.e., basket, burner and fuel system, instruments, envelope security) and using the checklist as an outline to ensure that each item is checked. It may be appropriate to create a habit pattern of physically touching particular items to ensure security and proper operation. Pilots are cautioned that a checklist is not necessarily a “to- do” list. Flight training should emphasize proper procedures and habits, with a checklist used to confirm that tasks have been completed.
Preflight Inspection Checklist
Title 14 of the Code of Federal Regulations (14 CFR) and the practical test standards (PTS) for balloon pilot certification require the pilot to inspect the balloon by systematically utilizing an appropriate checklist prior to each flight. Most balloon manufacturers include a preflight inspection checklist in the flight manual. This may be used as the basis for a personalized preflight checklist. Each balloon manufacturer lists maximum allowable damage with which a balloon may fly and still be considered airworthy. Balloon pilots should be familiar with the manufacturer’s maximum allowable damage rules for their balloon and abide by them.
Using a written checklist, the pilot should make certain that the balloon is correctly laid out for inflation, all control lines are attached, the fuel system is operating correctly, maximum allowable damage limits are not exceeded, and all components are ready for flight. The pilot is responsible for all aspects of flight, including preflight operations.
The best checklist is one each pilot develops for his or her individual balloon. A good source for checklist items is the manufacturer of the balloon. Also, checklists from other pilots and manufacturers may be incorporated into a personal checklist. Remember, a checklist is a living document that changes when modifications or additions are appropriate.
Emergency Checklist
Carefully study and memorize emergency checklists. Do not try to read a checklist during an emergency; that is for an aircraft with two- or three-person crews and at high altitude. During an emergency, take prompt action to resolve the problem, and when the situation permits, refer to the balloon’s flight manual to ensure all necessary items have been accomplished. The single most important action in an emergency is to continue to fly the balloon and regain control of the situation. Appendix C contains sample checklists that may be used or modified to meet specific requirements for a particular balloon system or flight operation.
Weather Brief
As previously discussed, a weather brief must be obtained prior to flight; as a procedural matter, the information from the briefing sets the parameters for the flight (launch site, flight track, and potential landing areas).
All electronic sites and briefings represent the starting point for how weather affects the flight. A balloon pilot should not make the mistake of gathering weather data, getting a forecast, deciding to fly, and then paying less attention to actual weather cues. Weather monitoring is an ongoing process that starts on the drive to the launch field and continues until the balloon is packed after landing. Continue gathering weather data for the flight until safely back on the ground.
Despite using the most current and complete electronic weather data available to consider before driving out for the flight, each pilot must never lose sight of the fact that hot air balloons are visual flight rules (VFR) aircraft. Many pilots lose all access to unlimited or even selected electronic weather information en route to or at the launch site. Unless the launch site is a reporting station for any weather service, a pilot is required to visually interpret and evaluate weather data specific to the launch site. Local surface conditions— particularly winds below 500’–800’—show the greatest variability of both speed and direction. These winds are perhaps of greatest importance in determining the conditions and risks for launch and landing. A number of simple observations enable the balloon pilot to gather this data at the launch site, as well as during the flight. [Figure 6-2]
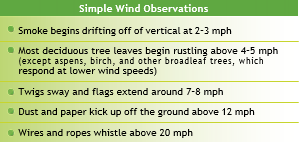
Figure 6-2. Simple wind observations.
The balloon can sometimes provide valuable weather information provided the pilot knows what to look for. Fabrics on a laid-out envelope begin rippling around eight miles per hour (mph), while 10–12 mph sends small bubbles of air past a closed throat and up along the load tapes. Such information, perhaps unavailable or inaccurate elsewhere, can prove invaluable, especially during the initial phase of flight.
Each pilot must sharpen his or her ability to read and interpret local surface conditions for one primary reason: up to 1 hour may elapse between gathering weather data online and laying out at the launch site. Weather patterns can change in far less time than this, and local conditions can change almost instantly.
Some pilots choose to rely on a portable weather station or handheld wind meter to monitor local conditions at the launch site. Cost, size, portability, and features vary among brands, but each can provide useful information on wind speed/direction, maximum gusts, and other weather data. These can range from a small $100 handheld wind meter to a $500 weather station with 15″ mast and dashboard data display. [Figure 6-3]

Figure 6-3. Checking wind velocity with a handheld wind meter.
Perhaps the cheapest yet most valuable launch site weather aid is the pibal or pilot balloon, a 10–14″ helium-filled balloon released at the launch site for visual weather cues and forecast confirmation. Some pibal actions clearly mean cancel the flight: rolling along the ground, not clearing obstacles, climbing then diving, or dramatic speed/direction changes (which indicate wind shears). To read and confirm winds at different altitudes, release several pibals at 10–20 second intervals. Fill the first with 100 percent helium, the second with mostly helium and a breath of air from your mouth, and the third with helium and two breaths. This creates different rates of ascent which helps gain a better perspective of the low level winds. Every pilot benefits from having pibals in their vehicle and using them before launch. Appendix D lists various rates of climb for different sizes of pibals; using this knowledge, the pilot can determine the altitudes at which the winds change.
Every pilot and crewmember can build a mental database of visual cues that report weather data. More important than pre- launch weather is inflight weather, which is further removed in time from forecast conditions (electronic or briefings) but can change just as fast and dramatically. Wind speed or direction changes can signal developing rain or frontal movement. Radar returns require human interpretation and can miss developing conditions or provide false echoes off birds or buildings. Weather-savvy pilots and crew gather weather information from whatever source is available to them anywhere, at any time.
Performance Planning/Fuel Planning
The good balloon pilot checks the balloon’s performance charts, considering that day’s conditions, and comes to a reasonable conclusion regarding the limitations of the balloon for that particular flight. Prior to flight (and perhaps even prior to layout), fuel gauges should be checked to ensure there is sufficient fuel on board to conduct the planned flight.
The Chase Crew
Generally, there are two different areas of responsibility for a crew: inflation/launch and chase/recovery. Both are usually referred to as ground crew. Passengers often serve as inflation crew, become passengers for the flight, and crew again after the balloon has landed. Before the noise and activity make discussion difficult, the pilot should give the crew briefing and discuss any requirements before inflation.
Number of Crewmembers
The number of crewmembers is a matter of individual preference and depends upon the size of the balloon, purpose of the flight, terrain, and other factors. When using a small balloon for instruction, a crew of three people, including the instructor, student, and one crew, may be sufficient. For passenger flights in large balloons, a larger number of crewmembers are generally required. Having too many people in the chase vehicle may be a distraction for the driver. The recommended minimum crew for the vehicle is two: one person to drive and the other to navigate and serve as a balloon “spotter.” This is perhaps the safest method.
The optimum size inflation crew for a sport balloon is four people—the pilot operating the burner, two people holding the mouth open, and one person on the crown line. Some pilots opt to have a fifth person serve as a fan operator; this is a matter of technique and personal preference. Many pilots prefer a larger number of crewmembers; however, it is important to be aware that too many crewmembers may often be working against each other due to lack of coordination. In windy or crowded situations, it is important to have a person holding the crown line. If inflation requires more crew than usual, due to the windy conditions, consideration should be given to canceling the flight. Although the balloon may get airborne, chances are that flying out of one’s comfort zone and having to prepare for a very windy landing may impair concentration. The distraction may hinder safe, enjoyable flying.
Clothing
Crewmembers, as well as the pilot, should be clothed for safety and comfort. Cover or restrain long hair. Scarves, hanging jewelry, or loose eyeglasses can interfere with smooth setup, and can potentially be very dangerous, particularly near the inflation fan. Long sleeves and long trousers made of cotton instead of synthetic material are recommended. Try to wear clothes in layers since temperatures can change quite a bit from before sunrise to the recovery. Proper clothing protects participants from burns, poison oak/ivy, and other harmful plants.
All crewmembers should wear gloves, preferably smooth leather, loose fitting, and easy to remove. Wear comfortable and protective footwear. If it becomes necessary to walk or hike from a landing site inaccessible by the chase vehicle, proper clothing and footwear make the task easier and less hazardous.
Types of Flight
Knowing the function or purpose of a flight is important to the crew, so they know the goals of the operation; possible time aloft; probable direction(s) of flight; probable altitudes; communications, if any, to be used; and useful maps or charts. Balloon flights can be classified into several different types: paid passenger, instruction, race, rally, advertising/ promotion, and fun. Many commercial balloon pilots defray the cost of the sport by offering paid passenger rides. The crew should know that these passengers are paying for the privilege, and may have been promised a certain type and length of flight. Instructional flights require the crew follow the direction of the instructor, so the student may see and participate as much as possible. The crew should work closely with the instructor and student and not take over any portion of the operation, thus denying the student the opportunity to learn. For competitions, crew responsibilities may be different. The pilot may have only a single goal in mind and focus on that goal. The crew’s job is always to help the pilot, but in the case of the competition flight, the crew should try to relieve the pilot of some of the routine tasks so he or she may concentrate on the goals. Regardless of the type of flight, the crew is there to support the pilot in conducting a safe and successful flight operation.
Direction of Flight
The first element of the flight the chase crew must know is the direction the balloon is going. It is important to understand that the balloon’s direction is very difficult to detect from a moving vehicle. Many pilots recommend the chase crew drive the chase vehicle away from the launch site only far enough to get the vehicle out of the way of the balloon (and other balloons) and to be clear of any possible spectator crowds. As soon as the crew is sure they are clear of other traffic, they should park in a suitable place with a good view of the balloon, and determine the balloon’s direction of flight. There is no point in rushing after the balloon until the direction it is going is known. The balloon changes direction shortly after launch if the winds aloft are different from the surface winds.
After a while, the crew should proceed to a point estimated to be in the balloon’s path. In other words, get in front of the balloon so it flies over the chase vehicle. If the balloon is moving at five knots, the chase crew need drive only a short time to get in front of the balloon. The direction of flight is much easier to determine if the balloon is floating directly toward the vehicle rather than flying parallel to the vehicle’s path. If a radio is not being used, as the balloon flies over the chase vehicle, the pilot and crew can communicate by voice or with hand signals. In this instance, the crew should be outside the vehicle with the engine turned off.
The Crew Briefing
Crew briefings vary from a few last minute instructions (to an experienced, regular crew), or a long, detailed discourse on how to layout, assemble, inflate, chase, recover, and pack a balloon. [Figure 6-4] A pilot can give crew briefings by telephone the night before, or in the chase vehicle on the way to the launch site, but most crew briefings are done at the launch site prior to the flight. It is important for the pilot to remember who is ultimately responsible for the entire

Figure 6-4. Crew briefing.
operation and that the crew is the pilot’s representative on the ground.
Whether this is the crewmembers’ first time or one-hundredth time crewing, they should be briefed before each flight. Instructions contained in the briefing may be less detailed for an experienced crew. The following instructions should be given for each flight:
- Estimated length of flight and any information that aids the chase and recovery
- Anticipated direction of flight
- Position and duties during inflation
- Duties once the balloon has reached equilibrium
A typical flight briefing may be “I intend to make a 1 hour flight and I have about 2 hours of fuel on board. From my weather briefing and the pibal, I should travel in a southeasterly direction; but if I go west, I will land before getting to the freeway. I will probably do a lot of contour flying, but may go up to 2,000 feet to look around. Let’s use channel six on the radio. There is a county road map on the front seat.”
“Patricia, you will be the crew chief for today’s flight, as well as the driver. The keys to the van are in the ignition, and there is a spare set in the console. I would like you and Bob to do the mouth this morning. Bob, you will be on the side away from the fan. Pat will show you what needs to be done, and I will double check you during the inflation. You will also be navigating, so we will have a look at the map together in a minute. Susan, you will be on the fan. Be sure to keep people away from the plane of the fan, and please do not move the fan while it is running. Leslie, you are on the crown line today. You have done it before, so I know that you know the procedures, but as a reminder, do not wrap any lines around your hand, arm, or body. I will check with you a couple of times during the inflation to make sure you are positioned properly.”
“Any questions? Good. Sleeves down, gloves on, and let’s go!”
The Crown Line
The duty of the crown line crewmember is to hold the end of the line, lean away from the envelope, and use body weight to stabilize the envelope. As the air is heated and the envelope starts to rise, the crewmember holding the crown line should allow the line to pull him or her towards the basket, putting only enough resistance on the line to keep the envelope from swaying or moving too fast. Release the tension slowly after the envelope is vertical. [Figure 6-5]

Figure 6-5. Crew can often stabilize a rolling envelope by taking a single crown line 45° off of downwind and walking directly upwind on stand-up.
The crown line varies in length. Some pilots let the line hang straight down; some pilots connect the end of the line to the basket or burner frame. Other pilots keep the line only long enough to assist with a windy inflation, or deflation in a confined area. Usually, there are no knots in the crown line, but you might find a type of loop attached to it. Some pilots put knots in their line, or attach flags or other objects. These may snag in trees and cause problems. Lines tied to the basket form a huge loop that may snag a tree limb and should be secured with a light, breakaway tie.
To improve control, some pilots use a double crown line during very windy conditions. This technique, as shown in Figure 6-6, allows for better control of the envelope when winds may be gusting, but still within reasonable flight limits, as may be present in an afternoon launch. Many pilots launch in afternoon winds, knowing that winds generally decrease significantly as sunset approaches. One advantage of this technique is that the balloon can be kept stable in fairly gusty winds, even if held on the ground for an extended period of time. This may be helpful for the pilot who may be doing a static (non-flying) tether, or perhaps during an evening “balloon glow” when winds may remain gusty until well after sunset.

Figure 6-6. Double crown lines forming a 90° or wider angle offer the greatest inflation stability provided crew walk them directly upwind on stand-up.
Launch Site
When selecting a launch site, factors to consider are obstacles in direction of flight (powerlines, buildings, towers, etc.), available landing sites, and the launch site surface.
Location and Obstacles
The launch site is selected based on surface winds and winds aloft, in conjunction with the desires of the balloon pilot. Consideration is given to what type of flight is being made and to the overall goal of the flight. Upon arriving at a particular launch site, most pilots release another pibal to verify the wind direction, and ensure that the forecasts or earlier readings have not changed significantly.
Ideally, the launch site should be a large, open grassy area. Obstacles in the flight path are a consideration. As a general rule, the balloon should be placed as far as possible upwind of any obstructions to flight (powerlines, trees, buildings, etc.), using a minimum of 100 feet of clearance for each knot of wind. [Figure 6-7]

Figure 6-7. Examples of good (top) and poor (bottom) launch sites. In the top picture, the pilot would have adequate clearance above the power lines at the far end of the field, as well as more than adequate area to layout the envelope. In the bottom picture, the pilot would have a very short area to lay out. There are obvious obstacles, such as the trees and cell phone tower, which create hazards to a safe launch.
Landing Sites
The best launch site is of little use if there are no appropriate landing sites downwind. Many pilots examine their flight path from the perspective of the landing area, particularly in an area of few landing fields, and “reverse plan” their launch site in order to make the appropriate choice of launch sites. Occassionally, this may require using a launch site that may be somewhat less than desirable. As long as the launch can be made safely, with appropriate obstacle clearance, this is perfectly acceptable.
Launch Site Surface
After determining the flight direction, the next condition that determines the details of the balloon layout is the actual launch site surface. Of course, all pilots want to lay out their balloon on clean, dry, short, green grass. Most pilots are not that fortunate unless they have their own launch site and never fly from different places. Wise pilots modify their techniques according to available conditions, or they have more than one layout procedure to adapt to various launch sites.
Whether flying from a regular launch site, a brand new location, or from an assigned square at a rally, check the ground for items that may damage or soil the balloon. Look for and remove nails, sharp rocks, twigs, branches, and other foreign objects. If there are patches of oil or other substances, cover them with pieces of carpet, floor mats from the chase vehicle, tarps, or the envelope bag. Some pilots cover the ground where they lay out their balloon with a large tarp every time they fly.
Unless flying at a known site, do not assume it is all right to drive the chase vehicle directly onto the launch area. There are some locations (a soft athletic field, for example) where it is necessary to carry the balloon onto the launch area. If using private property, it is necessary to get permission to use the property for flight activities. This may be the first experience with landowner relations, and the considerate pilot takes action to minimize his or her impact on the landowner’s property. Landowner relations are an important part of ballooning, and are discussed in greater detail later in this chapter.
Balloon Placement and Wind Direction
Consider the wind direction before the balloon is unloaded from the chase vehicle. Take into account the surface wind at the time of cold inflation to avoid carrying a heavy balloon bag and basket around. A “Murphy’s Law” type of rule is that the wind always changes during inflation. Local knowledge is invaluable. If other balloons are around, check with the most experienced local pilot.
A wind change at or shortly after sunrise is normal in many places. If the balloon is laid out prior to sunrise, a wind change is likely. If flying in a new area, it is beneficial to watch the local pilots, as they have knowledge of local conditions and idiosyncrasies. Some general trends are that air usually flows downhill or down valley first thing in the morning, and air usually flows from cold to warm in the morning. The air drainage may stop very shortly after the sun rises and starts heating the ground. The early morning wind may come from a different direction than the prevailing or predicted wind. Some local pilots may lay their balloons out in a direction that does not match the airflow at the time, but that corrects 15 to 30 minutes later when the sunrise change occurs and the inflation starts.
Removing the Balloon from the Vehicle
Once the specific location on the launch field has been determined, the balloon should be removed from the vehicle, or unloaded from its trailer, and prepared for flight. [Figure 6-8] Good procedures and habit patterns formed here minimize the amount of lifting of balloon components, and reduces the wear and tear on the crew and the pilot, as well as the equipment itself. Despite being a lighter-than-air aircraft, the packed balloon and basket are heavy; the average sport balloon system can weigh over 550 pounds.

Figure 6-8. Unloading the basket and moving the vehicle forward minimizes equipment carrying.
One method is for the pilot to establish the specific location and direction of layout, and direct that the basket be placed there. The transport vehicle maneuvers to allow the basket to be removed and placed at the pilot’s discretion, and then pulls forward about 15 or 20 feet to allow for the envelope bag and inflator fan to be removed and placed on the ground. The vehicle may then be removed from the launch site, or moved to the back of the basket to serve as a tie-off point for the balloon’s quick-release system. This method minimizes the amount of lifting and carrying of heavy components. When used in reverse, it allows for the system to be packed up at the end of the flight, and kept ready for a future flight.
Assembly
If the basket is disassembled for transport and handling, it must be assembled in accordance with the flight manual prior to layout. The pilot, using the checklist, should either perform these functions or carefully supervise them.
Basket
Once the basket is appropriately placed, it is necessary to attach the uprights and burner frame (as appropriate). Each brand of balloon is slightly different, and the balloon’s flight manual should be checked for the specific procedures. Some balloon baskets must be placed on their side to install the uprights and burner, while some may be left standing upright. Either way, after the components are installed, they should be checked for installation, integrity, security, and general condition.
Burner and Fuel System
If not accomplished in the previous step, the burner(s) (or heater) should be mounted and connected. Retaining pins, as applicable, must be mounted, and fuel lines connected between the burner and the tanks. The practice of using an adjustable wrench on fuel line fittings is discouraged; while convenient, these wrenches usually cause excessive wear on the fittings over time, and may result in damage or early replacement. It is usually better to use the correct size open-end wrench. Fittings do not need to be heavily torqued into place; this is a common error with newer pilots. A good fitting usually seals with little more than finger-tight force. Anything more may indicate corrosion or a damaged flange seal in the fitting. [Figure 6-9]
It is appropriate to check for leaks in the fuel system at this point; this should be a checklist item. The pilot opens the fuel tank valves and checks each connection, at both tank and burner, by using a “sniff test.” The odorant in propane, ethyl mercaptan, has a very distinctive odor and is relatively easy to detect. The burner should also be examined to ensure that no fuel is leaking from fittings, pressure gauges, or interior plumbing. Once satisfied that there are no leaks, the fuel may be turned off and the pressure bled off. The basket should then be placed in a vertical position to prepare for the next function check.
Burner Check
Most manufacturers require burner checks as a necessary part of an equipment function check and are indicative of

Figure 6-9. Burner installation on a Lindstrand.
good habit patterns. Each system has a specific procedure, appropriate to that particular system, which is outlined in the flight manual for that model of balloon. In general, each burner, including the pilot light, is checked individually for correct operation to ensure that the burner is working properly. Each burner is checked using each fuel tank, and all backup systems should also be checked for correct function and operation.
As an example, assume a single burner balloon with three tanks connected into a common fuel line (tanks in parallel). The pilot would first light the pilot lights and check for correct operation. Then, one tank would be opened, and the blast valve activated. The pilot checks for correct operation, smooth blast valve movement, and for pressure in the fuel system, as excessive loss of pressure may be indicative of a fuel tank or line problem. This procedure should be repeated for each tank, closing off the first tank when moving to the second, and so on. After all tanks are checked, then the backup system (Fire2™, Whispervalve™, Liquid Fire™, Metering Valve, etc.) should also be tested. Once all systems are checked for functionality, then the tanks should be closed, pressure released from the fuel system by burning off the fuel, and the basket placed on its side in preparation for attaching the envelope. (NOTE: At no time should all of the tanks in a parallel-plumbed system be opened at once. In the event of a fuel leak or ruptured hose, there are three or more tanks feeding the leak. This is an extremely hazardous practice.)
Pilots should also note that there is a growing trend towards the use of inflation, or “pony” tanks, used to supplement on- board fuel for inflation. Use of an inflation tank allows the pilot to launch with completely full tanks, as the additional tank is either temporarily plumbed into the balloon’s fuel system by the use of a quick-disconnect fitting, or hoses are switched around at the burner fitting. There is no manufacturer’s written procedure available for the use of an inflation tank, and the procedure is strongly discouraged. Of perhaps greater concern is the mindset that the one or two gallon advantage this gives the pilot, is of greater concern than the safety aspect of the procedure. If a pilot consistently requires these one or two gallons of fuel to safely conduct a flight, then there are possibly other performance planning factors being neglected.
Most pilots conduct a burner check at the beginning of each flight. Others, if conducting multiple flights over a relatively short period of time (a weekend balloon rally, for example), may do a full burner check for the first flight only, and then only check for leaks on each remaining flight. This practice, while common, may violate the manufacturer’s operations manual and invites problems; it is best avoided.
Instrument Checks
It is appropriate to check the instruments at this point. Virtually all instrument systems currently in use require battery power; it is wise to check the instruments, and ensure that the batteries provide sufficient power to operate them. There is nothing more frustrating than being ready to fly and finding that the instruments do not work. After the instruments are checked for operation, they may be mounted in the basket. Some pilots choose to set the altimeter at this time; the barometric pressure should be set according to the information gathered during the weather briefing. In the absence of a barometric pressure setting, the altimeter should be set to the appropriate field elevation. The only time that the altimeter may be set to zero is when the balloon is being flown from an ocean beach; 14 CFR part 91, section 91.121 provides clarification on this requirement. This is necessary to avoid airspace issues. [Figure 6-10]
At this point, the basket is on its side with the instruments mounted and ready for the envelope to be attached. The pilot and crew should open the envelope bag, remove the suspension cables and attachment hardware (carabiners, “A-blocks,” or toggles), and attach the bottom of the envelope to the basket superstructure in accordance with the manufacturer’s instructions. Care should be taken that cables are not twisted and are free of damage, kinks, loose wires,
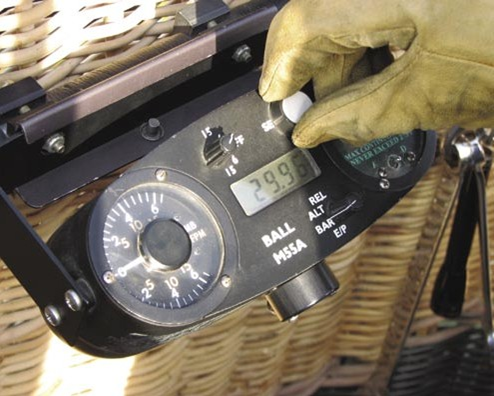
Figure 6-10. The altimeter should be set to barometric pressure, if available, or to the field elevation.
or missing sheathing (found on Kevlar® suspension cables). Once the envelope is attached, the hardware should be checked for security and the envelope laid out for inflation.
Layout
There are many variations of laying out a balloon and preparing it for inflation. The manufacturer of the balloon or the way the balloon is assembled sets some of these inflation styles. The launch site surface, the order in which the balloon is assembled, and how the balloon is removed from the chase vehicle have a bearing on the way the preflight layout and inspection proceeds. There is no one best way to lay out a balloon, as there is no one best way to inflate a balloon. The two most common ways to prepare the balloon for cold inflation are to spread it out or inflate from a long strip.
The pilot should be mindful of current conditions prior to removing the envelope from its bag. It is wise to take a moment and walk around the launch site to check the surface for any debris that may damage the balloon.
As a cautionary note, do not drag the envelope bag along the ground when pulling the envelope out. Many envelopes have holes and tears caused by being dragged over sharp objects while getting the envelope out of the bag. Lift the bag clear of the ground and carry it unless the launch surface is perfect with no sharp objects or dirty spots.
Spread Layout
The spread layout method for inflation is the most widely used method. By handling the envelope with the load tapes, the fabric is pulled away from the center until the envelope takes its normal shape while still flat on the ground. Exercise care when sliding the fabric across the ground to avoid causing damage.
All balloons have an even number of load tapes. By using the number on the load tape when spreading the envelope, the envelope can be arranged in a proper position for inflation. With one crewmember on each side of the envelope fabric, start at the mouth and travel the length of the appropriate load tape, pulling the fabric taut up to the equator. This allows the bottom to be laid out flat. Be careful to handle only the load tapes when positioning the envelope because pulling on the fabric could cause damage. Holding a load tape and flapping up and down gently helps avoid tears and other damage while spreading the envelope. This action traps a small bubble of air which floats, rather than drags fabric and keeps the balloon cleaner and easier to pull. [Figure 6-11]
Figure 6-11. A spread layout.
Check the deflation system at this time and properly position it in accordance with the balloon flight manual. While the envelope is filling with air, the crew can assist the process by lifting upward on the load tapes, allowing more cold air to pack the envelope. This method allows the envelope to deploy smoothly and easily, even with a small inflation fan.
Strip Layout
When inflating on pavement or a small or narrow launch site, many pilots prefer not to deploy the envelope on the ground. Instead, they prefer to pull the envelope straight out from the basket, making sure the top gore is on top its full length, and to inflate the envelope entirely with the fan. This may require a larger fan, depending on the size of the balloon and envelope material. [Figure 6-12]
Once the balloon is stretched out, ensure the control lines (deflation, cooling, or rotating) are correctly attached to the
Figure 6-12. A strip layout.
basket according to the manufacturer’s instructions. This method minimizes handling the fabric on a rough or dirty surface. It requires more diligence by the ground crew to ensure it deploys correctly.
Progressive Fill
Inflation out of the bag is a coordinated technique in which the envelope is cold inflated directly out of the bag. With the envelope suspension connected to the basket, it is pulled progressively out of the bag as the fan is running, inflating the envelope as the crew slowly, with pauses, carries the balloon bag away from the basket while the envelope fills. Another variation, the progressive fill, has the crew holding the envelope in their arms, gradually releasing more and more of the envelope, from mouth to top, until the very top of the envelope is released for filling. The progressive fill packs the lower portion of the envelope with cold air, and exposes less of the fabric to the ground. This method generally results in a faster inflation, but may create problems with attaching a parachute top or ensuring that lines are not tangled.
Inflator Fan Placement
The type of inflator fan needed for different layout techniques depends primarily on the amount of work required. The strip layout method requires a large, strong fan to force the envelope into shape, while the spread layout method requires less fan energy. Fan placement and techniques are as varied as the pilots who fly. It may appear that every pilot has a slightly different technique for placement and use of the fan, but the general principle is the same. The fan should be placed to the side of the basket [Figure 6-13], with the air flow directed into the mouth of the balloon to inflate the envelope, but far enough
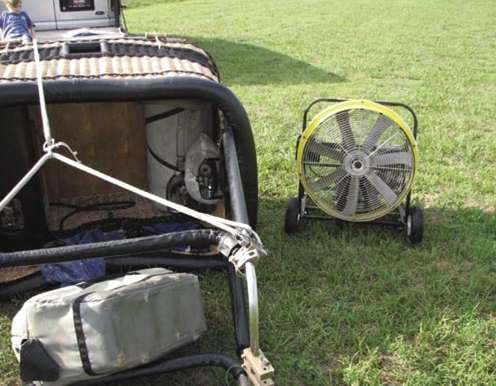
Figure 6-13. Placement of the inflation fan.
back to allow the airflow to “seal” the throat. This allows the most efficient use of the fan.
A method pilots use to determine the best placement of the fan is to attach small pieces of fabric or surveying tape on the lower portion of the mouth, using safety pins in such a manner as to not create damage or holes. Then, the crew holds the mouth of the balloon open with the fan running; if all pieces of the tape are pointing into the envelope, then the fan is properly placed; however, if any of the tapes are fluttering back out the mouth of the envelope, this demonstrates that the airflow is going into the envelope and coming back out again. This does not allow for a good inflation, and the fan should be adjusted to correct this deficiency. This demonstration
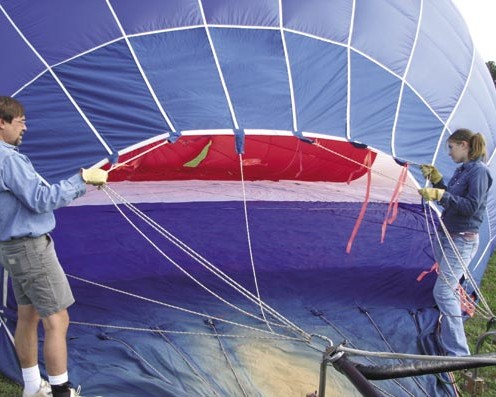
Figure 6-14. Determining correct inflation fan placement. Note that the strips of tape are generally pointing into the mouth. In this case, the pilot would do well to incline the fan slightly towards the right side of the mouth, in order to better “seal” the envelope opening, and get a more efficient inflation.
should be done without use of the burner, as the pilot may inadvertently cause damage or start a fire. [Figure 6-14]
It is generally better to pack the balloon full of cold air. This makes a tighter mouth, which avoids burning fabric, and the balloon may be less affected by a light wind when it is round and tight.
Safety Restraint/Quick-Release
The quick-release or safety restraint should be secured, with little or no slack in the line, to prevent possible damage or injury in the event of a break or premature release. Every major balloon manufacturer specifies the approved method for tying off. Balloon baskets, suspensions, load plates, and burner supports have been destroyed by improper tie-off in light winds. When tying down for inflation, reference the balloon’s flight manual for the recommended procedures and techniques. The use of a safety restraint is a recommended procedure for enhanced safety.
Passenger Briefing
Prior to inflation, a pilot should give passengers their first briefing for behavior during the flight and landing. Inform passengers that during the landing they should stand in the rear of the basket where shown by the pilot (based on wind conditions), facing the direction of flight, with feet and knees together, knees slightly bent, and holding tightly to the sides of the basket. They are not to exit the basket until instructed by the pilot to do so. This procedure allows the passengers to see the landing sequence, and is generally accepted throughout the ballooning community. In larger balloons, which usually have compartmentalized baskets, some pilots encourage the passengers to face away from the direction of flight. Either procedure is acceptable, as long as it is briefed prior to flight, and reinforced prior to landing.
The balloon is ready for inflation when the preflight preparation is complete. Excess equipment is stowed in the basket and chase vehicle, and a radio check is completed.
Inflation
The inflation procedure takes the balloon envelope from a pile of fabric to an aircraft capable of lifting a load. The pilot’s goal should be a smooth, controlled inflation that does not damage the environment, balloon, or harm the crew. At the end of the inflation, the balloon should be upright, close to equilibrium, and ready to fly.
Inflation Styles
There are many different styles of inflation. Some pilots use one or two large fans to inflate the balloon fast and get it tight. Some pilots prefer to fill the envelope slowly to give them time for preflight preparation. Some use many crewmembers; some use only a few crewmembers. Balloon size, available crew, weather, location, and personal preference are factors that determine procedures and number of crewmembers.
The Inflation
After the balloon is correctly laid out, place the inflation fan to the side of the basket within arm’s reach of the pilot, facing into the center of the envelope mouth, making sure the fan blades are not in line with the pilot, crew, or spectators. If the fan is well designed and maintained, it will not move around or require constant attention during operation. Exact fan placement depends on the type of fan, burner, and size of the envelope, as previously discussed. Pump air into the envelope and not under, over, or to the side of the mouth.
A crewmember should be placed at each side of the mouth of the balloon to lift the material and create an opening for air to enter the envelope. During cold inflation (i.e., with the fan only) hold the mouth open wide enough to admit the airflow from the inflator fan. It is best to inflate the balloon as full as possible. At a minimum, inflate the balloon to approximately 75 percent full of cold air.
As the envelope inflates, the pilot should check to see that control lines are correctly deployed and the deflation panel is correctly positioned. This can all be done through or in the vent or from the top; it is not necessary to walk on the fabric. During this phase of the inflation, the envelope should also be checked again for damage that would disqualify the balloon from flight.
Once the preflight inspection and cold inflation are complete, and the pilot is satisfied that the envelope contains enough ambient air to begin hot inflation, the two crewmembers at the mouth should hold it open as wide and as tall as possible to keep the fabric away from the burner flame. The crewmembers should face away from the burner. At this point, fan speed may be reduced to approximately one-half or two-thirds full throttle and the pilot may light the burner’s pilot lights in preparation for inflation. Before activating the blast valve, the pilot should make eye contact with each crewmember at the mouth and make sure each is ready. Crew readiness is paramount. The crew at the mouth of the envelope must be aware the burner is about to be used.
Allow the fan to run at a reduced speed until the balloon mouth lifts off the ground and is no longer receiving air. If the fan is turned off too soon, envelope air comes back out of the mouth and the backwash distorts the flame at the beginning and end of each blast. Do not hurry to turn off the fan. Some pilots elect to shut off the fuel to the inflator fan, which accomplishes two things. This procedure normally allows a fan to continue running for about a minute, which should be long enough to inflate the balloon, and also allow fuel in the fan’s carburetor to be used, eliminating the likelihood of gas fumes should the fan be stored in an enclosed space during transport.
The first burn or blast of the burner should be a short one to confirm the correct direction of the flame and to check the readiness of the mouth crew. If they are startled by the flame or noise and drop the fabric, the short burn prevents or minimizes damage. To reduce discomfort of the crew, it is best to inflate the balloon with a series of short burns and pauses, rather than one continuous blast. Inflate using standard burns, with short pauses of about 2 or 3 seconds between burns. The pauses give the fabric and skin a chance to cool and allow communication between the pilot and the crew, if necessary. Under some circumstances, contraction and inflation of the balloon mouth may be seen. Burns should be timed to match the expansion of the mouth. These mouth movements are called “breathing”; burns should be timed to match the open time to avoid damaging the fabric.
Some pilots prefer to inflate the balloon with one long blast of the burner. The advantage of this type of inflation is that the balloon inflates a few seconds faster and the mouth tends to stay fully open during the process. There are several disadvantages. Voice communication is nearly impossible due to the noise of the burner. Anyone or anything within a few feet of the burner may get burned. Also, some burners could be discolored or damaged by long burns.
The next step is to continue the burn-and-pause routine until the balloon is nearly ready to leave the ground. The crew should be standing by the basket ready to hold the balloon (“hands on” or “weight on”), in case of a miscalculation, allowing the balloon to start lifting off the ground before the pilot is ready. The use of the safety harness prevents unplanned departures.
Many pilots fail to achieve equilibrium or neutral buoyancy immediately after inflation. If equilibrium is not achieved, the balloon is much more susceptible to wind. For example, if the envelope is not full, a slight wind can cave in a side causing a spinnaker effect. If the balloon is standing, but not ready to fly, the pilot has only one option should the balloon start to move horizontally; the pilot must deflate. If the balloon is only 5 or 10 seconds of heat away from lifting off, the pilot has the choice of deflation or launch.
The inflation is the first action of ballooning that requires a pilot in command (PIC). The inflation should be safe and efficient. Now, the balloon is almost ready to launch.
Prelaunch Check
After the balloon is inflated and upright, the pilot should perform a pre-launch check. Ensure that loose equipment is properly stowed and secured. For balloons using multiple tanks, it may be appropriate to shut off the tank that was used for inflation, and open the tank that will be used first for flight. Some pilots make another quick check of the burner to ensure that there are no leaks or deficiencies present. The top cap should be activated to release the tabs (as necessary), and ensure that the mechanism is functioning properly. The altimeter, if not previously set, should be set to the proper barometric pressure or field elevation, and the temperature indicating system should be checked for a proper reading. If used, radios should be turned on and secured. The pilot should note the time of inflation, and quickly check the fuel level in each tank to ensure that there is sufficient fuel for the planned flight. This pre-launch check should be brief and verified through the use of a pre-launch checklist.
Launch
If carrying passengers, now is the time to invite them in the basket. Immediately compensate for the additional weight with sufficient heat to regain equilibrium. The passengers have already been briefed on the correct landing procedure. Brief them again on behavior in the basket. Advise passengers not to touch any control lines, take care of their possessions, stay within the confines of the basket, and, above all, to obey the PIC.
At least one crewmember should remain near the basket in case the pilot or passengers need assistance. This is a good time to give the crew a final briefing regarding the expected distance and length of the flight, radio channels, and other last minute instructions. If other balloons are launching from the same area, ask a crewmember to step back from the balloon to check that it is clear above.
Two or three standard burns in a row from equilibrium usually provide a slow departure from the ground. If there are no nearby, downwind obstacles to clear, a slow ascent rate is preferred to test wind direction and detect subtle wind changes. Climbing at a slow rate is the best way to avoid running into balloons above. There is an unwritten rule in ballooning (not regulatory) that the balloon below has the right of way (due to lack of visibility above). Although the balloon below has the right of way, the higher balloon needs time to climb out of the way, if necessary. Pilots must maintain awareness of other balloons operating near them, particularly in crowded or rally situations. [Figure 6-15]
A fast ascent rate from launch is only to avoid ground obstacles or to pass quickly through an adverse wind, and only when it is clear above. Should circumstances require a

Figure 6-15. The balloon below has the right of way while ascending. The pilot of the higher balloon should, as a courtesy and in the interest of safety, yield the right of way to the ascending balloon, as that pilot is probably unable to see the balloon above
fast ascent rate, the pilot should set up for the lift off by having the ground crew put their weight on the basket by hanging their arms over the side, not holding on. The pilot should then heat the balloon to a temperature beyond that needed for equilibrium; 20° above the neutral buoyancy point may be a good starting point. After getting a check of possible traffic above the balloon, the pilot instructs the crew, “weight off,” and the crew responds by removing their weight from the basket. It is imperative that the crew clears the basket, and that no crewmembers are left hanging outside. The balloon then rises at a fairly rapid ascent rate. The pilot must be aware that the balloon is marginally under control at this point, and that too excessive a climb rate may result in a condition known as “floating the top.” This is a scenario where the air pressure created by the climb may push the top cap of the balloon down, causing an out-of-control descent. Maximum climb rates are specified in the operating limitations section of the balloon’s flight manual.
It is very easy to be distracted during launch and make an unintentional descent. Make sure all ground business is taken care of, such as instructing the chase crew and stowing all equipment correctly, before leaving the ground.
The pilot should be aware of the possibility of uncommanded lift (often referred to as “false lift”) and the possibility of an unplanned descent caused by surface wind or an ascent from a sheltered launch site. Pay attention to people and obstacles, including the chase vehicle, fences, and particularly to powerlines. Realize where all powerlines are and visually locate them as soon as possible.
Uncommanded (False) Lift
One consideration that must be made at the outset of any balloon flight is the possibility of experiencing phenomena variously referred to as “false lift,” “false heavy,” or “uncommanded buoyancy.” These terms all describe an onset of various factors and conditions, which, despite the differences in terminology, all relate to the result of air moving over or under the balloon. The most important thing to remember is a balloon encountering one or more of these factors is not under the full and complete control of the pilot, and is therefore a hazard. Pilots should be aware of these conditions, avoid them if possible, and be aware of procedures and practices to minimize their effect on the balloon’s flight.
Three areas of focus warrant discussion:
- False lift
- False heavy (air flow under the lower portion of balloon, creating downward lift)
- Envelope distortion causing diminished capacity
It is important to understand the total physics involved. While the balloon is at neutral buoyancy on the ground, there are two lift forces at work. The first is from the heating of the air, creating buoyancy inside the envelope. The second is the flow of air over the top. The lift from these two elements combine to create the lift necessary to be at equilibrium. The addition of a small amount of heat, through a short burn, increases the total lift and allows the balloon to rise.
False Lift
During initial flight training, pilots are taught about the effects of air flowing over the top of the envelope. While the balloon is static on the ground, the shape of the top forces the flow of air to compress over the top creating a low pressure area. [Figure 6-16] This low pressure area creates lift in much the same way an airplane wing does. There are two components of lift: heated air inside the envelope and the lift created by the air passing over the top. As the balloon takes off and accelerates to the speed of the air mass, the flow of air over the top diminishes, thus any lift created by it is no longer available. If the balloon is at equilibrium at launch, and there is not some response by the pilot to add more heat, there will

Figure 6-16. False lift dynamics.
not be sufficient lift to stay in the air, as a portion of the total lift has diminished.
Pilots are usually taught that the lift created by air flow over the top is to be considered “false lift,” because it was not created by applying heat to the envelope. The lift is real; as long as the speed of the air flow and the balloon remain sufficiently different, the lift continues to be generated. As the balloon accelerates, the lift created by the air flow is lost and more heat must be added to maintain the same rate of ascent.
The same condition can exist when descending through a low level wind shear or jet. As the balloon penetrates the lower boundary of the wind shear, the top of the balloon is momentarily in a faster moving layer of air which increases the air flow lift component of the total lift generated. For a short period, there may be equilibrium with the two components of lift, heat and air flow. As the descent continues, the top of the balloon moves out of the faster moving air (the value of one of the lift components), and air flow is diminished. The rate of descent increases, unless the pilot takes action to increase the buoyancy portion of the total lift by making a burn. Some pilots, when experiencing this, believe it to be a “false heavy” situation, an incorrect perception.
False Heavy (Downward Lift)
False heavy is a condition which is the exact opposite of the false lift scenario described above, except that it is happening at another part of the balloon and the force generated has a downward component.
This phenomenon occurs when descending into a faster moving air mass or wind shear. The lower half of the balloon enters the shear and the surface of the balloon allows the air flow to generate lift. This lift is tangent to the surface of the balloon. Because it is below the equator, where the tangent line points in a downward direction, the lift has a downward component. This downward component of lift pulls the balloon down. [Figure 6-17]

Figure 6-17. False heavy dynamics.
This effect is more severe on a fully loaded balloon than a lightly loaded one, by reasons of skin tension. A lightly loaded balloon has more slack in the fabric on the lower portion of the balloon. On a heavily loaded balloon, the fabric below the equator has greater tension providing a surface where a low pressure can develop.
A scenario having much less impact is fast moving air across the mouth of the balloon. This creates a dynamic low pressure, similar to a venturi, which may cause the air to be pulled out of the envelope. As the air moves over the mouth of the balloon, it creates the dynamic low pressure, which pulls the static air inside the envelope out. Of all the possibilities discussed here, this point has the least impact on the lifting capability of the balloon, but is important when standing on the ground following the initial inflation to equilibrium.
Diminished Capacity
Another way in which a wind shear can increase the rate of descent is by diminishing the capacity of the envelope. For example, when descending, below is a low level wind shear with the air near the surface moving much faster or slower than the air mass in which the balloon is traveling. As the balloon enters the lower air mass, the side of the balloon is pushed in, decreasing the capacity of the envelope and pushing the air out the mouth. The larger the difference between the speed of the two air masses, the greater the effect. The lift created by buoyancy is decreased and the balloon starts to descend. If this happens at a low altitude, and the pilot has not responded in a timely manner, this may result in a hard landing.
If a balloon descends abruptly from a 30 mph wind into a 15 mph wind, it experiences an effective abrupt increase in wind across its surface from no wind to a 15 mph wind. This removes the boundary layer on its surface and greatly increases heat lost by conduction, while causing distortion in the form of a “dish.” This condition is very dangerous to the low level flight of a fully loaded balloon. It should be noted that as the envelope lowers into the slower wind and begins to distort and slow-up, the effective wind speed over the top begins to increase. Air moving over the top of an envelope produces false lift. Combined with diminished capacity, this again presents a hazardous condition which may result in an extremely hard landing.
“Dishing” usually does not affect the flight path of a lightly loaded balloon as much as a more heavily loaded balloon because no internal lifting heat is dumped; it is only redistributed inside the distorted envelope. To understand what a “dish” can do to lift, the balloon pilot needs to understand how the “heat line” fluctuates under different loading conditions. A balloon “floats” in the air because the hot air inside it weighs less than the volume of air it displaces. Usually the bottom of the heated air is down close to its mouth. Notice that a normal two-second single burn on a heavily loaded balloon adds only a small percentage of heat compared to its total required hot air volume. The same burn in a lightly loaded balloon adds a much larger percentage of lifting heat compared to its total required hot air volume. This is a simple way to visualize responsiveness.
If a heavily loaded envelope experiences a major “dish,” important lifting heat can be squeezed out. This condition is extremely serious if on a final approach to landing because there is not enough time and altitude to add enough heat. Remember, not only must the heat loss be replaced to make the balloon neutrally buoyant, but more must be added to stop any downward momentum.
Heat loss can change the slope of the approach and, pilot unaware, make it steeper. The stronger the shear, the greater the change in slope. Knowledge of this and the importance of adding heat quickly could prevent an excessively hard landing or an accident.
Some signs of shear to watch for are any movement of crown lines, handling lines, throat ropes, skirt, or even basket movement. It is important to realize that as the balloon lowers into the slower moving air, distorts, and starts slowing, the effect of heat loss can be masked by false lift. Even if the shear is a mild one, false lift momentarily exists. When the balloon slows enough and exits the faster moving air, the hidden false lift and dishing disappear and the balloon descends out of control.
Some pilots intentionally create a situation of diminished capacity when making a high performance descent. In low or stable wind conditions, this can be successfully executed. However, in the presence of strong wind shears, this technique can prove disastrous.
If a pilot is in a false lift scenario, the first action should be to continue to fly the balloon. If the situation is encountered during lift-off, or is believed to exist, the pilot should maintain a positive rate of climb until the false lift dissipates. If the false heavy scenario exists during the landing, the pilot must be prepared for an acceleration in the descent rate. An appropriate action would be to add heat to slow the descent, unless a steep approach to landing is desired.
In reality, there is nothing false about any of these situations. They are real and may create hazardous flight dynamics. In many cases, more than one of these elements is at work. It is important for the pilot to be aware of them, their effects, and consider what actions are necessary when they are encountered. The best prevention is anticipating these conditions and maintaining situational awareness. If the conditions are extreme, it may be said that the best and first consideration is staying on the ground.
Landowner Relations
An otherwise perfect flight can be marred without the use of the proper relationship skills needed to foster good landowner relations. Often neglected, these skills provide the balloon pilot the locations necessary to inflate, launch, and land. Without these properties, ballooning would be severely limited. Taking the time to explain one’s actions to a landowner, or dealing with a farmer whose livestock have been spooked by an ill-timed contour flight, can create lasting impressions that have tremendous long-term negative impact on the continued evolution of the sport.
During the launch phase of a flight, building/landowner relations is an easy task. The pilot should select launch sites that avoid flight paths and landings around sensitive areas, such as livestock, expensive crops, nature preserves, etc.
Once a launch site is selected, the pilot should make an effort to identify the property as public or private. Generally, school fields and local parks may be used without further inquiry unless there have been previous problems with balloons. In such a case it would be appropriate to check with the local authorities for the use of these facilities.
Private property, however, is another issue. A balloon pilot and crew should never assume the right to use a private location to launch or recover a balloon. To do so exhibits a degree of arrogance that has no place in ballooning and subjects everyone participating to trespass laws. The landowner usually lives on the property and has paid for that right. In the event that no one is immediately available, the pilot should either select another launch site or perhaps inquire of neighbors who may be able to inform you of the landowner’s location. Finding the landowner and obtaining permission to use a particular field may be one of the most important tasks of the launch process for the crew chief, if one is assigned. Undoubtedly, the one time the pilot does not have appropriate authorization for use of a launch site and uses another’s property, someone will be watching and problems later ensue.
The positive side of this is that most landowners welcome the balloon pilot and his crew, want to learn a little about balloons, and gladly allow the use of their property for the launch. Many see this as an opportunity and actively participate in the process. Others may grant permission, but stand back from the activity. Whichever type of landowner is encountered, they usually respond positively to a pilot and crew that respect rights and protects landowner interests.
Chapter Summary
It is frequently said that every pilot sets up equipment and prepares for flight in a different manner. The purpose of this chapter is not to emphasize those differences, but rather to illustrate the underlying similarities and procedures that every balloon pilot must follow to safety begin a flight.


