Night Operations and the Powered Parachute
Flying a powered parachute after sunset requires a private pilot powered parachute certificate. In addition, the powered parachute needs to be equipped for night operations by adding position lights for taxi and flight. Position lights are green on the right, red on the left, and white in the back. Anti-collision strobe lights can also be used in addition to position lights. [Figure 12-1]
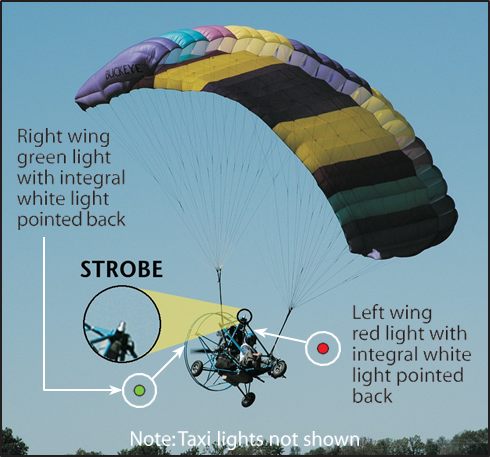
Figure 12-1. Powered parachutes must be specifically equipped for night flight.
The use of lighted runways for night flight imposes several problems for the powered parachute pilot. Setting up on a runway and conducting a preflight on a powered parachute cart and wing in the dark could tie up a designated runway area for a considerable amount of time, not to mention raise issues about be- ing able to see the aircraft and wing components for proper preflight inspection.
A pilot planning to fly a powered parachute at night should ensure adequate illumination is provided for takeoff. The wing needs to be illuminated to ensure the wing cells are all open, the wing is centered, and the lines are not tangled (LOC). The takeoff area needs adequate illumination to ensure hazards are avoided. Typically, lights on poles can present a hazard at an airfield.
A powered parachute flight where the preflight in- spection was completed during daylight, just prior to sunset, and then the final landing made after sunset may be a more feasible endeavor. If a powered para- chute pilot holding a private pilot certificate or higher were to venture into night flight, Chapter 15 of the Pilot’s Handbook of Aeronautical Knowledge should be carefully reviewed to understand the parameters that need to be considered prior to conducting a flight in the dark.
Emergency Situations
This section contains information on dealing with un- expected situations that may occur in flight. The key to successful management of an emergency situation, and/or preventing a problem from progressing into a true emergency, is a thorough familiarity with, and ad- herence to, the procedures developed by the powered parachute (PPC) manufacturer. Hence, the following guidelines are generic and are not meant to replace the manufacturer’s recommended procedures. Rather, they are meant to enhance your general knowledge in the area of emergency operations. If any of the guidance in this chapter conflicts in any way with the manufacturer’s recommended procedures, the manu- facturer’s recommended procedures take precedence.
Review the lost procedures and flight diversion tech- niques in Chapter 14 of the Pilot’s Handbook of Aero- nautical Knowledge. You must be able to select an appropriate alternate airport or landing area and route, determine there is sufficient fuel to fly to the alternate airport or landing area, turn to and establish a course to the select alternate destination, and maintain the appropriate altitude and heading while doing so. As a PPC pilot you must be able to select an appropriate course of action if you become lost, including main- taining an appropriate heading and climb if necessary, identify prominent landmarks, and use your naviga- tion system (GPS) or contact an ATC facility for as- sistance, as appropriate.
Review the POH for the aircraft you fly to be familiar with the necessary pilot actions required for system and equipment malfunctions. You must be prepared to analyze the situation and take action if you experi- ence any of the following system and equipment mal- functions: engine/oil and fuel, electrical, carburetor or induction icing, smoke and/or fire, flight control/trim, pitot static/vacuum and associated flight instruments, propeller, ballistic recovery system malfunction (if applicable), or any other emergency unique to the powered parachute you are flying.
It is estimated that 85 percent of accidents occur dur- ing the takeoff process, 10 percent transpire during landings, and 5 percent happen in flight. The vast majority of these accidents are the direct result of complacency. The cause of this complacency is that the PPC is relatively easy to fly. Hence, if you find complacency setting in, you need to turn from outside distractions, and direct your attention to the immedi- ate situational awareness of the aircraft.
The following are some reasons for PPC complacency during flight:
- The PPC does not require quick reactions.
- When compared to other light-sport aircraft
(LSA), the PPC flies very slowly.
- The PPC has only two axes around which you can directly control (lateral-pitch and vertical- yaw). Note: As there are no ailerons on a PPC, roll or movement around the longitudinal axis cannot be directly controlled. However, there is longitudinal roll invoked during a steep turn as the centrifugal force of the cart directs the
cart to the outside of the suspension point of the
- The controls are very intuitive (push right to go right, left to go left, more throttle to go up, and less to go down).
It is possible the outside environment can become a distraction to the necessary situational awareness of flying (i.e., situational complacency). Hence, in-flight accidents can be due to the pilot’s failure to see ob- structions (power lines and tower cables) and to an- ticipate weather-related turbulence and its resultant negative effects on a PPC’s light wing (i.e., wind rotors or mechanical turbulence). Landing accidents are usually the result of porpoising (too rapid throttle movements), thermals, or unsafe field terrain. Takeoff problems can be caused by: (1) failure to get a wing LOC before adding airborne power; and (2) failure to
take off into the wind.
Potential Hazards of the Standing PPC
Even while parked on the ground, high winds can pick up the wing of an unsecured powered parachute and begin carrying it away. To regain control of a free- standing PPC with a semi-inflated, dragging wing, rescuers need to grasp the steering lines —not the cart! Then with a steering line in hand, pull the line back toward the front of the cart (into the wind) and tie it off to any structured part of the PPC. This will keep the wing from gathering air and re-inflating. If you are by yourself, you do not have to do both lines simultaneously. It would be best to get both lines, but with a PPC that is dragging down the field, grab any steering line and get at least one line secured; then secure the second line. When you pull a steering line, the canopy will be pulled down on that side and the air in the wing will literally be pulled out, as the wing is hauled back and down.
The best safety procedure is prevention. To safeguard a PPC from high winds, immediately after landing, secure the wing. Even if you only intend to refuel, it is highly recommended to condense the exposure of the wing to the elements: the harmful ultraviolet rays of the sun and those unexpected wind gusts. As soon as possible after landing, condense the wing by folding it on top of itself and put something on top of it to secure it. It is best to pack the canopy to keep it out of the sun and make sure the wind cannot inflate the wing and if possible, lean the nose wheel up, then place the fan guard of the cart back and down on the folded wing. Securing it this way will usually be adequate for short breaks when the make and model allows for this static positioning. [Figure 12-2]
Figure 12-2. Secure the PPC wing when on the ground.
Restricted Lines During the Takeoff Roll
If the lines (steering or suspension lines) become re- stricted, such as around part of an outrigger, a trim lock, or an accessory —then while safely maintaining your ground direction into the wind and holding your RPM down to kiting speed—reach out and push the line off of the restricting object. If this is not possible, then shut the PPC down and abort the takeoff.
To abort a takeoff (i.e., to shutdown) maintain your ground steering clear of obstacles as you: (1) power down the throttle, (2) push the magneto switches into the OFF position, and (3) pull the wing down.
If the lines become entangled or embedded with de- bris, then shut the PPC down and clean up the lines. If you don’t, and you load the wing by beginning the lift-off, the stress on the lines as they pull through the debris (twigs, sticks, and so forth) can break the lines.
If the lines go under a wheel, IMMEDIATELY abort the takeoff. Shut down: power, magnetos and wing down.
A Wing Wall
The term “wall” is simply defined as the canopy liter- ally forming a wall-like appearance behind the PPC. [Figure 12-3] The trailing edge of the canopy is still on the ground, while the leading edge of the canopy forms the top of the wall. The “wall” is the first can- opy problem that might occur during the initial kiting of the wing.
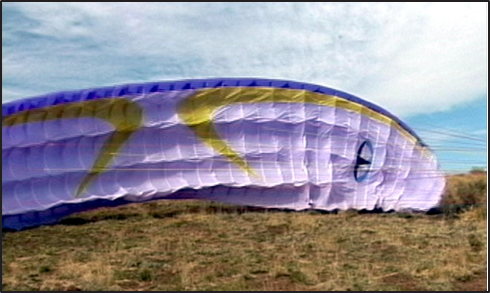
Figure 12-3. A wing wall.
Even though some pilots will try to “pop” the canopy out of the “wall,” the only safe solution is to immedi- ately abort the takeoff, and re-layout the canopy. By shutting down and restarting the takeoff preflight, pi- lots will save the expense of many line and propeller repairs. Lines will inevitably become damaged when a pilot tries to “pop” the canopy out of the wall via sharp throttle movements. When you fight the wall, you create an ideal situation for lines to get sucked into the propeller.
A wing “lock-out” occurs when the initial forward momentum is insufficient to move the canopy through the prop-wash and up and above the PPC cart. [Figure 12-4] During this phenomenon, the inflated canopy will hang at about a 45° angle behind the cart. This is a “parachutal wing stall” while the pilot is still on the ground. Usually, regardless of how much ground- speed is increased, the wing will stay in a parachutal wing stall behind the cart as long as the tension on the suspension lines remains the same; the wing will stay “locked-out” in that 45° position.
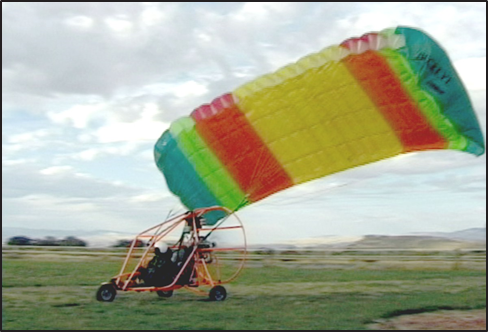
Figure 12-4. A wing lock-out.
There are two techniques that can be used to correct this “parachutal-wing stall” position of a rectangular wing:
- Lower the groundspeed until the canopy begins to fall down and back behind the cart. Then before the wing touches the ground, smoothly and firmly increase the groundspeed to move (“sling-shot”) the canopy up and above the cart.
- Maintain the groundspeed and pull the canopy back via a flare (i.e., pushing both foot steering bars). Hold the flare until the drag caused on the tail of the wing pulls the wing back down—about a 60° angle— and then smoothly release the flare. The release of the flare will again “sling-shot” the canopy up and above the cart.
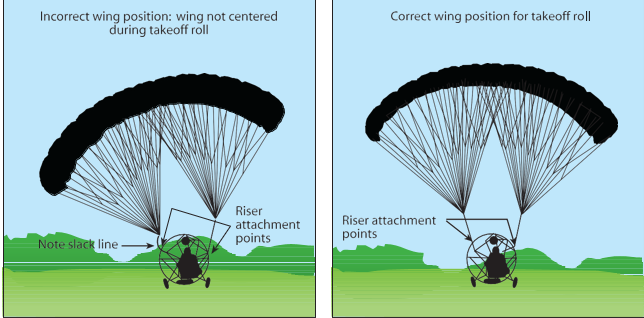
Figure 12-5. The wing should be centered and forward to the rise attachment points prior to takeoff.
Note: Ask the advice of an instructor before using these techniques on an elliptical-shaped wing. The characteristics between the two types of PPC wings are significant in correcting the “Locked-Out” scenario.
Wing Not Centered Overhead
No takeoff should ever be attempted until the wing is centered above the cart and forward to the riser at- tachment points. [Figure 12-5]
Hence, if the wing is not centered when it comes
ahead to the riser attachment of the cart:
- Keep steering into the wind, and
- Keep your groundspeed below airborne (liftoff) speed.
The most noteworthy aspect of the takeoff preflight roll is to verify that the wing is positioned correctly. Due to the design, the wing will normally want to be up and centered above the cart. It also wants to weathervane into the wind. If you don’t rush the take- off roll, and give the wing the time and speed it needs to adjust and settle overhead, the takeoff will be fine. The wing wants to be centered over the cart and point- ing into the wind. You must steer into the wind during the entire takeoff roll.
You can adjust the wing’s position during your take- off preflight roll once the wing is up and past the 45° position. When the wing is down on one side, apply steering input to the opposite side. Hence, if the wing is hanging down on the left side of the cart, push on the right steering bar. The additional drag created on the right side will begin to pull the wing up to a more centered position (from being down on the left).
To compensate for the inertia of the wing’s movement as it is traveling upward, reduce the initial steering bar pressure, just before (not when) the wing is centered overhead. Then slowly add slight opposite steering bar pressure to compensate for possible over-correc- tion (inertia) of the wing from center.
Remember: you do NOT need to manually move the wing center. The design of the wing and its attachment points create the tendency for the wing to be centered and overhead. You need only to steer the wing into the wind, allow the time needed to self correct, and pro- vide the proper groundspeed to achieve proper wing position prior to takeoff.
The Cart Turns Over (Roll-Over)
During a PPC taxi, you have two entities to steer: the wing and the cart. Until united in an airborne pendu- lum, the independent wing can follow one path, while the “grounded” cart may insist on another. This can result in a pull-over. [Figure 12-6] Normally this situ- ation occurs when pilots are not headed into the wind during takeoff, or try a crosswind taxi beyond the PPC limitations or their current skill level.
The strongest inclination of a taxiing ram-air wing is to weathervane. The wing wants to point into the wind. However, if the pilot is steering the cart in a different direction and has failed to notice the differ- ence and has not corrected the wing over the center of the cart, then the wing can pull the cart over. The cart will be pulled over when the wing has been given the required airspeed to create the necessary lift to over- come the weight of the cart.
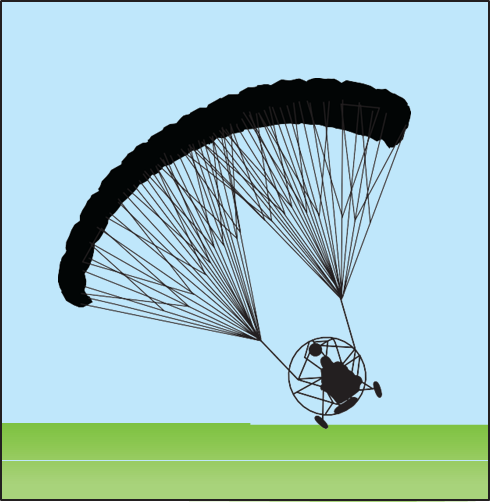
Figure 12-6. A wing pull-over.
Since a taxiing cart has all its wheels on the ground, friction exists between the ground and the wheels. The friction causes the cart to travel in a particular di- rection. If the wing is in the air and pulling the cart in a different direction, opposing forces may be working against each other. You must prevent the wing from gaining enough force (horizontal lift) to pull the cart over on its side. Hence, caution must be used during taxi turns. Therefore, if the wing is not centered, and all the wing’s cells are not open, or the suspension or steering lines are not clear of debris and free of frame obstructions, DO NOT increase the throttle to provide the wing enough airspeed to generate lift. Either shut down or slow down while pointing the cart into the wind and then correctly build the wing.
On a takeoff or landing, when you get hit with an un- expected side gust of wind, or try to take off before the wing is centered, the cart may be placed into a condition where it could be pulled over on its side by the horizontal lift of the wing. During a pull-over, you will react to one of two possible situations:
- Your cart is lifting on one side, but you still have time to recover.
- Your cart is up on one wheel; past the point of recovery and beginning to tip over.
In the first situation, to enhance the recovery, imme- diately remove the lifting force from the wing by re- ducing the groundspeed (i.e., reduce engine RPM via the throttle).
In the second and most uncomfortable situation of not
being able to prevent the pull-over:
- Immediately place the magneto switches OFF, to turn OFF the engine and stop the propeller.
- Do not try to prevent the pull-over with your body (i.e., sticking out your arms and legs). Pull your arms and legs up into a tuck position to protect your limbs. When the aircraft comes to a stop, immediately unstrap and get out of the cart.
- In the event the situation does not conflict with the provisions of Title 49, Code of Federal Regulations, Volume 5, Chapter VIII, Part 830 (49 CFR 830), move the unit back into an upright position (to prevent gas and oil from spilling out).
Keep in mind the above paragraph does NOT imply a wing pull-over should ever be a normal or periodi- cal occurrence. These accidents can cause death or serious injuries and damage to your aircraft. With the proper training and understanding, a wing pull-over is easily prevented during the takeoff roll if you:
- Keep the cart headed into the wind.
- Stay calm, relaxed and don’t rush your takeoff roll.
- Realize it is the airspeed that is giving the wing lift, so slow down if you feel side lift and one rear wheel rising in a tipping fashion.
- Let the cart settle back on all wheels as you maintain your heading into the wind.
- Let the wing settle overhead, and allow all the cells to fully inflate.
- Re-check the lines to make sure they are free and unrestricted.
- Verify you do not have a “pig-tail” in the rear of the wing fabric or a friction knot in the lines.
- Get your wing repositioned for takeoff, or abort the takeoff and get situated.
Engine Failure on Climbout
Urgency characterizes all power loss or engine fail- ure occurrences after lift-off. In most instances, the pilot has only a few seconds after an engine failure to decide the course of action and execute it. Unless pre- pared in advance to make the proper decision, there is a chance the pilot will make a poor decision, or make no decision at all and allow events to rule.The altitude available is, in many ways, the control- ling factor in the successful accomplishment of an emergency landing. If an actual engine failure should occur immediately after takeoff and before a safe ma- neuvering altitude is attained, it is usually not advis- able to attempt to turn back to the field from where the takeoff was made. Instead, it is safer to immediately establish the proper glide attitude, and select a land- ing area directly ahead or slightly to either side of the takeoff path. Complete the landing in accordance with the next section.
In the event of an engine failure on initial climb-out, the powered parachute is typically at a high pitch angle with the cart well in front of the wing. When the engine fails, the cart swings back under the wing and the wing can surge forward bringing the PPC into a temporary and potentially dangerous dive. If the engine-out occurs close to the ground, and the wing starts to surge out in front of the cart, it is neces- sary to immediately flare the wing to slow the surge. Gradually release the flare when the forward surge is controlled and the wing is back overhead in a normal flying position.
Engine Failure In Flight
Never fly over something you cannot land on (con- sidering your altitude and glide slope) and remain constantly aware of the surrounding terrain and hence potential landing zones. If you adhere to these rules, an in-flight engine failure will not directly correlate to an accident or incident. If this happens, continue to fly the aircraft. You simply glide it away from all obstacles and toward the safest landing area.
The safest landing zone may perhaps be in the middle of the flight park if you have a lot of altitude. Or, the best landing zone may be straight ahead if you are below 100 feet. If at all possible, set up your landing approach so you touch down into the wind—but the number one priority of an engine-out scenario is safe terrain (not ground wind direction). Wind direction is a secondary concern. Land into the wind if possible; otherwise land downwind. Crosswind is the least fa- vorable wind direction to land into.
When you are about one second from touchdown, be- gin applying a full flare. [Figure 12-7] With a single 1-2-3 rhythmic timing motion, push both foot steer- ing bars completely forward and hold that position as the rear wheels touch the ground. You can increase the amount of flare before landing, but you cannot release it when you are close to the ground and with- out power! Once on the ground smoothly release the flare and pull down the canopy (since the engine is already off).
Figure 12-7. Engine-out, beginning full-flare about one second above the ground.
Engine Failure in a PPCL
When planning any over-water flight, wear a life vest. Maintain an altitude that will allow you to safely glide to land should the engine fail. [Figure 12-8] If you consistently fly over water, consider attaching an au- tomatic, inflatable device or pontoons to the bottom of your PPC (i.e., so it becomes a PPCS with pontoons, as opposed to a PPCL in water). Carry a line-cutter that is easy to access, yet placed so as not to cause additional injury upon impact. Practice emergency procedures so you are prepared and brief your pas- sengers on evacuation procedures prior to any over- water flight.
Figure 12-8. You should not fly over water beyond your glide slope to the shore.
If you find yourself over water with an engine failure, too far to glide to shore, remain strapped in so the cart can provide some impact protection. It is possible you will become disorientated, as the PPCL will likely flip over when you hit the water and settle upside-down in the water. You may become entangled in the wing and lines as it descends upon the craft and the occupants .
Although your PPCL may float for a few minutes, it will eventually sink. The time before sinking will de- pend on the amount of fuel left, the condition of the seals on the ends of your tubing, and the air left in your tires after impact.
As soon as you know a water landing is inevitable, your first step is to align your PPCL into the wind if possible, and move as close to shore as possible.
- Don’t panic. Use the ADM “DECIDE” method.
- Stay seated.
- Turn off all electronics.
- Remove any objects that will delay your evacuation of the aircraft prior to impact (i.e., communication cords, camera straps, etc.).
- Discard any objects that may penetrate your skin upon impact (or hit you, such as cameras).
- Tighten your seatbelt and shoulder harnesses.
- At approximately 2 seconds (~25 feet) above the water, bring your head, neck, and legs in as close to your body as possible. Place your arms along the side of your head, with your hands over the lower back of your head.
- If experienced, you could execute a full flare and a parachutal-wing stall approximately 3 seconds (~40 feet) above the water (recommended for PPCs with foot steering bars only).
- Once in the water, release your seatbelt and shoulder harness and exit the cart.
- Help your passenger with his or her restraints.
- Do not try to retrieve items on the aircraft or try to save the aircraft. When surfacing, avoid the wing and swim to the side of the PPC (if entangled with the canopy lines, cut them with the line cutter and work your way to the edge of the wing).
- Swim to shore.
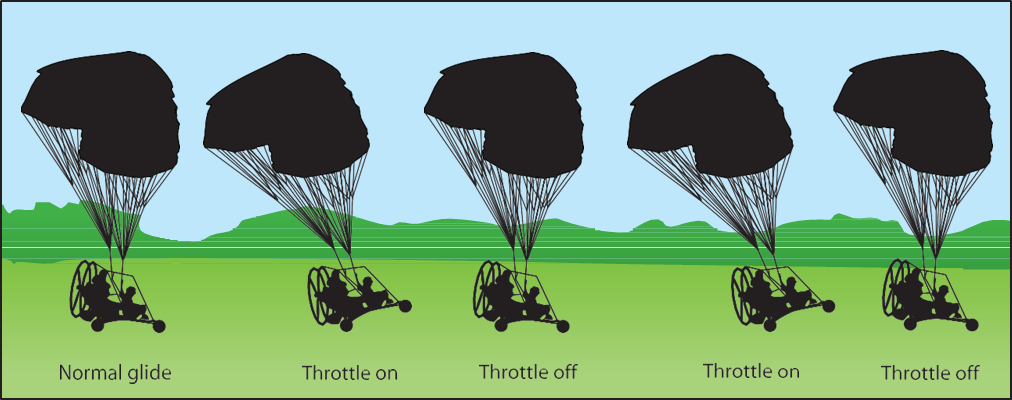
Figure 12-9. Porpoising during a landing approach.
In-Flight Fire
Considering the flammability of a ram-air wing, it is easy to realize that in-flight fire—especially an engine or fuel fire—is one of the most serious emergencies a PPC pilot can encounter. (Note: An electrical fire in the front of the cart is unlikely to cause anything more than an engine failure. Therefore, see “Engine Failures” above for this specific emergency.) If there is any sign of fire near the engine, fuel containers, or fuel lines, do everything possible to reduce the pos- sibilities of the fire spreading and land as soon as pos- sible. The necessary procedures are:
- Reduce throttle to idle;
- If possible, shut off fuel valves;
- Shut off magnetos;
- Shut off all electronics;
- Land immediately and stop as quickly as possible; and
- Evacuate the aircraft immediately.
After landing, get far away. The principal danger after evacuating the PPC is that the fuel will ignite and ex- plode, with the potential to injure people at consider- able distances.
Landing Porpoise
Porpoising refers to pitch oscillations, most notice- able during a landing. These erratic pilot-induced movements are a result of rapid throttle movements. This is a common, correctable error pilots need to be aware of. There is a delay between throttle changes and pitch changes. Porpoising will result if you over- control the throttle during a landing attempt, causing pitch oscillations. As a result of over-reacting, the PPC, which is now dangerously close to the ground, will be further induced into increasing the forward/ rearward swinging oscillations from the pilot throttle movements. [Figure 12-9]
If this happens, immediately abort the landing and climb back to pattern altitude. On the next turn to final, relax and work with a slow, smooth throttle action.
Gust-Induced Oscillations
Gusty headwinds can induce pitch oscillations as the lightweight wing responds faster and more easily to the wind gust than the cart. Crosswinds can also induce side-to-side swing oscillations. A crosswind from the right, for instance, tends to weathervane the PPC wing into the wind, causing an unexpected yaw to the right. Right crosswind gust also tends to lift the upwind side of the wing. When crosswinds are gusty, these effects vary rapidly as the speed of the crosswind varies.
Local terrain can have a considerable effect on the wind. Wind blowing over and around obstacles can be gusty and chaotic. Nearby obstacles, such as buildings, trees, cliffs, and mountains can have a pronounced ef- fect on low altitude winds, particularly on the down- wind side of the obstruction. In general, the effect of an upwind obstacle is the creation of additional tur- bulence. These conditions are usually found from the surface to a height 10 times above the obstacle. Flight in these conditions should be avoided.
Pilot-induced side-to-side swinging can occur as the pilot continues to over-control the steering controls. This usually occurs with new pilots during the land- ing phase, and typically begins after a side gust of wind during the approach. The solution is similar: re- lax your steering control pressures; realize the PPC wants to be centered (side to side, as well as fore and aft). Ease the pressure on the steering controls, and let your inputs balance the PPC pendulum movements. [Figure 12-10]
Cross-Country Flights
Preparation is essential to handling an emergency while on a cross-country flight. Carry your wing bag and line sleeve whenever possible. If you have these items with you during a flight, should you confront unexpected bad weather, you need not consider going around it or fighting it. Simply find a suitable landing site — preferably next to a road. Avoid private prop- erty and landing in crops. Pack up your wing and se- cure the canopy bag to the cart any time you are on the ground. You then have the option to wait until the weather passes or walk to a phone or shelter.
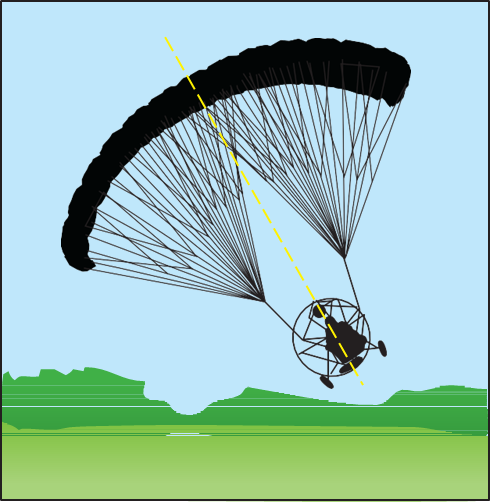
Figure 12-10. Side-to-side swinging on landing approach.
Emergency Equipment and Survival Gear
It is a good idea (especially at a fly-in) to circle a new flight park before departing, making a note of the lo- cal landmarks, so you can find your field (via pilot- age) on your return. Be sure to file, open, and close a flight plan with Flight Service (FSS).
- Flashlight.
- Reflection mirror.
- Water and food (enough for 2 days).
- Matches.
- A utility tool: combo pliers, knife, and so forth.
- Your canopy bag and line sleeve whenever possible—just in case you are forced to drive the cart back to civilization. Note: You should drive the cart to the nearest phone—BUT NO FARTHER.
- Tire repair can which includes a sealer and air pressure.
- Tape to repair small canopy tears. The manufacturer’s POH typically has specifications for repairs but as guideline, a tear less than
2″ can be repaired with common duct tape. However, cut lines will ground you and hence force you to drive the cart back or walk home.
Communication can be your radio, cell phone, vi- sual, or audible signals. Signal mirrors, flashlight or light beacons at night, signal fire flames at night, signal smoke during daylight hours, signal flares, and a prominent wing display are effective methods.
Search and rescue squads (SAR) are particularly tuned to signals of threes. Hence, three fires arranged in a triangle, three bangs against a log, or three flashes of a mirror—all of these will initiate a rapid response by search and rescue.
The aviation transceiver can be tuned to broadcast and receive on the emergency frequency 121.5 MHz or any other usable frequency that will elicit a response.
The wing can be employed to lay out a prominent marker to aid recognition from the air by other air- craft. The wing can also be used as an effective layered garment when wrapped around the body to conserve body heat or to provide relief from excessive sunlight.


