Most powered parachute incidents occur during the takeoff. This is because unlike most other types of aircraft, a powered parachute needs to create the airfoil before flight can be attempted. This critical process happens during the takeoff roll. The importance of thorough knowledge, faultless technique, and judgment cannot be overemphasized.
Terms and Definitions
Although the takeoff and climb is one continuous maneuver, it will be divided into four separate steps for purposes of explanation:
- Equipment staging — the portion of the takeoff procedure during which the powered parachute is positioned and the chute is set up for takeoff.
- Takeoff roll (ground roll) — the portion of the takeoff procedure during which the powered parachute is accelerated from a standstill to an airspeed that provides sufficient lift for it to become airborne.
- Rotation and liftoff — enough lift is on the wing to rotate the nose wheel and lift the powered parachute off the ground.
- Initial climb — begins when the powered parachute leaves the ground and a rate of climb is established.
Normally, the process is considered complete when the powered parachute has reached a safe maneuvering altitude, or an enroute climb has been established.
Laying Out the Wing
Refer to Chapter 5 to understand wing inspection, a separate procedure from wing layout. There are several ways to successfully lay out a powered parachute wing. What an instructor teaches is usually determined by the terrain, wind conditions, wing shape, and personal preference. There are two major layout methods: the inverted method and the stacked method.
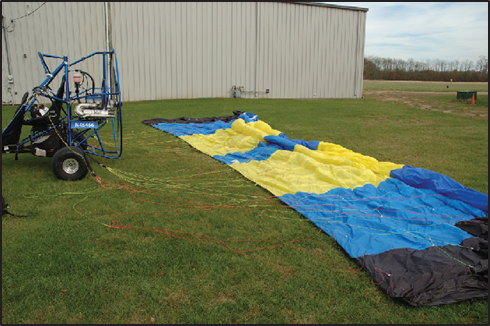
Figure 7-1. The inverted method of laying out the wing.
The Inverted Method
The inverted method of laying out a wing involves spreading it out with the bottom surface of the wing facing up like a blanket on the beach. [Figure 7-1] The trailing edge of the wing is positioned closest to the cart and the leading edge is pulled out as far behind the cart as it will lay without pulling the cart backward.
This method allows for a clear inspection of the wing and the attachment points of the suspension lines. It also allows the propeller blast on most carts to go over the wing, keeping it from inflating too early.
The main advantage to the inverted method is that when the cart rolls forward on the takeoff roll, it pulls the leading edge (A-lines) before it pulls the other suspension lines. This allows for a quick inflation of the wing. However, the inverted method is prone to lifting at the edges of the wing when there is wind. The wind can get under the corners of the wing and blow it up and back before you are ready to take off which can delay the proper inflation of the wing during the takeoff roll. Keep in mind that if the wind is blowing hard enough to lift the wing from its layout position, the flight conditions should be reviewed before continuing with the flight.
The Stacked (or Accordion) Method
The stacked method of laying out a wing involves piling the wing up like an accordion with all of the suspension lines stretched out as far as possible to the rear of the cart. [Figure 7-2] The pilot can choose to change from the inverted layout to the stacked method on days where a slight wind is blowing or if the pilot is concerned with the condition of the takeoff area. Pavement or areas of the ground not covered in grass in the takeoff runway will make it necessary to get the wing off the ground with as little ground drag as possible to avoid tearing or jeopardizing the integrity of the wing fabric and/or lines.
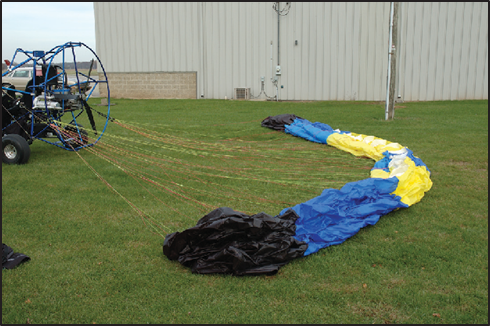
Figure 7-2. The stacked method of laying out the wing.
With the wing spread out in the inverted configuration and the lines inspected, you can pull the cart forward to tighten all of the lines. This will begin the stacking process. When the slack has been removed from all lines, the pilot then goes back to the wing and finishes the stacking process by hand. This usually means taking the trailing edge of the wing and tucking it under the rest of the wing.
To complete the process of stacking the wing there are two options for laying out the leading edge. Generally, if there is no wind you may want to leave the leading edge open on top of the stack. If it is a little windy, take the leading edge and tuck it behind and under the rest of the wing. By “hiding” the leading edge over and under the rest of the wing, the wind will blow over the top of the stacked wing without catching the open edges of the wing cells. When you start the take-off roll, the leading edge is pulled forward and up, is exposed to airflow, and begins a quick inflation.
Cockpit Management
The FAA regulations require the pilot to brief each person on board on how to fasten and unfasten his or her seatbelt and if installed, shoulder harness. This passenger briefing should be accomplished before starting the engine, to include information on the proper use of safety equipment and exiting the aircraft. You should also inform the passenger as to what to expect during takeoff, flight, and landing, what feelings and jolts are normal, what to do if the cart should roll over, and what to do if the engine fails. Make sure passengers are aware of the hazards and risks of a moving propeller and educate them on the necessity of keep- ing items secured so they don’t get sucked through the propeller. Help them to secure their helmets (if worn) and explain how to control the intercom. Show them where to put their hands and feet and make sure any cameras or equipment are secure. A passenger should be aware that an aborted takeoff is always a possibility. Tell them everything depends upon the wing —if the wing does not inflate properly, or does not inflate and rotate in time to take off and clear an obstacle, the engine will be shut down. Finally, emergency procedures should be discussed. At a minimum, it should be explained that in the case of a rollover, the passenger should keep arms and legs inside the protected areas of the cart. In case of an accident, the passenger should not be holding onto a part of the structure that could hit the ground or an obstacle and hurt their hand or any other part of their body. The informed passenger is a safe passenger and one that will enjoy the flight.
After entering the cart, you should first ensure that all necessary equipment, documents, checklists, and navigation charts appropriate for the flight are on board and secure. If a portable intercom, headsets, or a hand-held global positioning system (GPS) is used, the pilot is responsible for ensuring that the routing of wires and cables does not interfere with the motion or the operation of any control. Regardless of what materials will be used, they should be neatly arranged and organized in a manner that makes them readily available. Loose items should be properly secured to ensure nothing goes through the propeller or departs the aircraft. All pilots should form the habit of good housekeeping.
When you are comfortably seated, fasten the safety belt and shoulder harness and adjust to a comfortably snug fit. The shoulder harness must be worn at least for the takeoff and landing, although because of the open cockpit, it is highly recommended both pilot and passenger wear seat belts at all times. If the seats are adjustable, it is important to ensure the seat is locked in position. Accidents have occurred as the result of seat movement during acceleration or pitch attitude changes during takeoffs or landings. When the seat suddenly moves too close or too far away from the controls, you may be unable to maintain control of the powered parachute.
Before Takeoff Check
The before-takeoff check is the systematic procedure for making a final check of the engine, controls, systems, instruments, and avionics prior to flight. In addition, it gives the pilot an opportunity to establish a go or no-go decision. The engine temperatures should be rechecked, especially if any considerable amount of time has passed since the engine warm-up was completed, to make sure the engine and fluids are still within the manufacturers’ recommended minimums. If the air temperature is cold, the engine will cool down faster than when the air temperature is warmer; take a few minutes to bring the engine temperature back up to a minimum. Recheck the wind direction. If the wind has changed, adjust your takeoff position so you remain into the wind. Double check the steering and suspension lines are not in the way of the forward movement of the tires and the steering lines are not tangled in the riser cables.
Start the Engine/Initial Rollout
Prime the engine, if so equipped, switch magnetos to the ON position, recheck that the throttle is not open beyond idle, and turn the electric master switch to the ON position. Visually check the area, shout “CLEAR PROP” and start the engine. Monitor the engine temperatures and check the security of harnesses and helmets. Check that the strobe lights are ON, the electric fuel pump is ON (if applicable), oil pressure is within limits (if applicable), and complete a final ignition system check.
Once again, the pilot has this opportunity to establish a go or no-go decision point. Check the intended runway and traffic pattern for existing traffic, and if radio equipped and a nontowered airport, announce field, type of aircraft, runway heading, and flight intentions; if a tower-controlled airport, contact ground or tower control to request a departure clearance. By adding thrust smoothly to about half to three-quarter throttle, the powered parachute will begin the takeoff roll.
Wing Inflation and Kiting
During the takeoff roll of an airplane, the goal is to build sufficient airflow over the wing to generate the lift required to lift the aircraft off the ground. Powered parachutes have two goals during the takeoff roll: to pressurize and raise the wing overhead making sure proper inflation exists for takeoff, and to create the airflow over the wing to generate the necessary lift. [Figure 7-3]
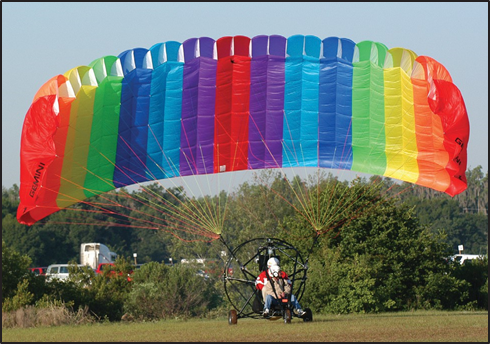
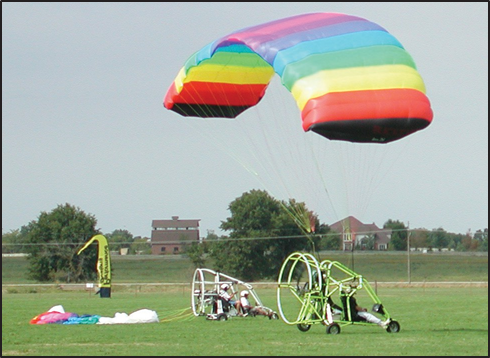
Figure 7-3. Pressurizing, or kiting, the wing.
Make a final check to confirm that the cart is pointed in the right direction and nothing has moved in the way. Look over your shoulder to observe the canopy inflation. Advance the throttle smoothly and firmly to about one-half to two-thirds takeoff power. Too abrupt an application of power may cause the cart to yank the wing too roughly forward. This can damage the riser system and shorten wing life. This is more of a problem with higher horsepower engines than in lower powered aircraft. As the cart starts to roll forward, make sure both feet are on the steering bars to begin steering the parachute immediately.
As the wing starts to rise off the ground and climb, it is acting like a parachute with lots of drag; the cart does not move forward much. As soon as the wing passes through the 50° angle to the ground, the drag dramatically decreases as the parachute becomes a wing and the cart will begin to pick up forward speed very rapidly. You must reduce the engine thrust enough at this point to prevent the powered parachute from becoming airborne prematurely. If the initial thrust reduction is too great, the wing will begin to lose pressurization and settle back to the ground. If the thrust reduction is not adequate, the powered parachute will continue to accelerate and become airborne. On occasion the wing can become locked, or stuck in the prop wash; easing back on the throttle will allow the wing to settle out of the prop wash. Once again, easing the throttle smoothly forward will assist the wing in climbing through the prop wash and climbing overhead above the fuselage.
As the wing is coming up in the back of the cart, one side of the wing may inflate and rise faster than the other side. That higher side should be given a little bit of steering control to allow the other side of the wing to catch up. If you don’t make the correction early, the wing will want to fly over to the slower-inflating side. This may create wing oscillations, especially if combined with too slow a takeoff speed. While it is important to not over-control, remember that wing controls during kiting are sluggish and more control inputs are needed than during flight.
Now is the most critical point during takeoff and possibly during the entire flight. While the parachute is inflating and rising overhead, most of the powered parachute’s weight is still being carried by the wheels and the suspension system. The goal is to get the wing overhead and then transition the load from the wheels to the wing.
During the inflation and takeoff roll, you need to divide your attention between the direction the cart is going and the wing. When the wing is overhead, perform the “rolling preflight.” You need to quickly inspect the wing to make sure it is fully inflated and there are no line-overs, end cell closures, pressure knots, or huge oscillations before adding full power for takeoff. This all has to be done with quick glances.
Line-overs are very easy to detect because the wing will be obviously deformed and look like it is pinched by the line that is over the top of the wing. If you see a line-over, shut down and set up again.
End cells of the wing not inflating are something additional to watch for. Most powered parachute wings have large cross-venting in the cells to allow the entire wing to pressurize evenly. Generally, the wing will pressurize in the middle first. As the pressure evens out across the wing sometimes the end cells of the wing simply do not want to inflate. It is imperative that the pilot visually sees end cells inflate before taking off. Sometimes all you have to do is wait for the end cells to open. On some wing configurations, it is recommended that the steering tubes be “pumped” lightly to help open the end cell openings.
Pressure knots are harder to determine during a rolling preflight. It may be very hard to see what is going on with the lines themselves, so the pilot may find it better to look for deformations on the bottom surface of the wing caused by one line being pulled more than it should be. Trying to take off with a pressure knot will result in the powered parachute turning very sharply to the side of the pressure knot. It will be nearly impossible to correct for that turn without nearly stalling the wing with the input on the other side. The engine will have to be kept at a very high setting just to maintain what little altitude is gained.
Wing oscillations occur for several reasons. There may not have been enough power added initially to kite the wing, or the pilot may have waited too long to correct for a wing that was flying to one side. Some light oscillation is okay, and will merely lift one side of the powered parachute into the air before the other. On the other hand, large oscillations will actually change the lift from a straight upward vector to an upward and side-pulling force. An oscillating wing forced into takeoff will most likely roll the airframe, which is an undesirable cause and effect.
Oscillations are easier to prevent with good inflation techniques than they are to correct. However, if a wing is oscillating, it is possible to correct by steering the wing opposite to the side that the wing is drifting towards. In other words, manage the wing, and steer it straight. The wrong inputs can make the problem worse. If the oscillations become too severe, it is best to abort the takeoff and set up again.
It is critical for the wing and lines to become verified, or fully inflated, directly overhead and centered, with the lines free of tangles. An acronym of LOC is often used to verify the wing is ready for takeoff: L – Lines Free, O – Cells Open, C – Wing Centered. Once the wing is fully pressurized, centered above the cart and the suspension and steering lines are free of tangles, slowly increase the throttle to takeoff thrust. The in- creased thrust accelerates the powered parachute for- ward until the airflow over the wing generates enough lift to get the PPC airborne. Continue to increase the throttle gradually to the desired pitch attitude. Your feet have been resting on the steering bars throughout all the ground operations and can be used to steer.
Normal Takeoff
A normal takeoff is one in which the powered parachute is headed into the wind and the wind is light to moderate. [Figure 7-4] The takeoff surface should be firm, free of debris, and not have any obstructions along the takeoff path. The takeoff surface should have sufficient length to permit the powered parachute to quickly accelerate to normal flight speed.
There are three reasons for making a takeoff as directly into the wind as possible:
- A slower ground speed reduces wear and stress on the landing gear;
- The headwind helps inflate the wing and get it overhead more quickly;
- A shorter ground roll, and therefore less runway length, is required to lift off.
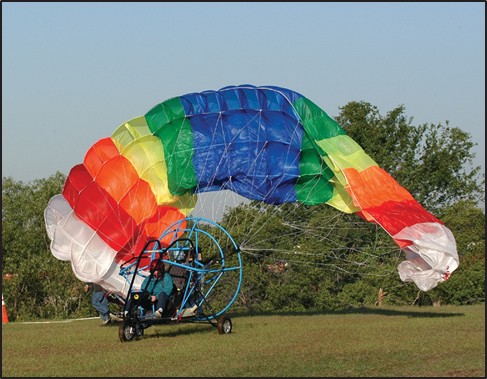
Figure 7-4. The powered parachute should be headed into the wind during takeoff.
Takeoff Roll
Once there is a commitment to take off, it takes a minimum airspeed to keep the wing inflated. Inflating the chute, then cutting the power, will usually result in the wing deflating and falling to the ground. This can be difficult to recover from and should only be done if you wish to abort the takeoff.
Otherwise, as the speed of the takeoff roll increases, more and more pressure will be felt on the steering control tubes. It is important during this time to keep the wing going in the same direction as the cart. This means using the ground controls and/or the flight controls to keep the cart and the wing coordinated.
After kiting the wing and performing the LOC pre-flight check as discussed in Chapter 5, takeoff power is applied and you accelerate to flying speed.
Rotation
When the wing has enough lift to rotate the cart nose off of the ground, nosewheel steering becomes ineffective. This means that even though the back wheels of the machine are still on the ground, the cart will be steered by the wing. You should not attempt any kind of tight radius turn during this process.
Lift-Off
Once the wing is overhead and enough power is added, the powered parachute will lift off the ground.
Initial Climb
Once the cart is off the ground, it is important to maintain at least the same throttle setting that got it off the ground in the first place. When the cart is free from ground friction on the landing gear, it will begin to climb.
Once the powered parachute is off the ground, prop torque may become noticeable. It will typically steer the aircraft to the left (with a clockwise spinning propeller). Wind can also affect the direction of the PPC after liftoff. During initial climb, it is important that the initial climb path remain aligned with the runway to avoid drifting into obstructions, or the path of another aircraft that may be taking off from a parallel runway. Proper scanning techniques are essential to a safe takeoff and climb, not only for maintaining attitude and direction but also for collision avoidance in the airport area.
The powered parachute’s takeoff performance will be much different when there is less weight with only one person in the PPC. Due to decreased load, the powered parachute will become airborne sooner, climb more rapidly, climb at a much steeper angle, and the flight controls may seem more sensitive.
Common errors in the performance of normal take-offs and departure climbs are:
- Failure to adequately clear the area prior to taxiing into the staging position.
- Poor selection of a staging position. (Not allowing for enough takeoff area.)
- Failure to set up the powered parachute into the wind.
- Abrupt use of the throttle results in additional
stress on the wing during inflation.
- Not using enough power to kite the wing.
- Failure to observe the wing during inflation.
- Failure to perform the rolling LOC preflight to clear the wing.
- Abrupt use of the throttle resulted in the aircraft porpoising.
- Failure to anticipate the left turning tendency (as discussed in Chapter 2) on initial acceleration.
- Overcorrecting for left turning tendency.
Centering the Wing
The steering controls can be used to reduce the wing’s side-to-side oscillation or assist with the centering of the wing during the rolling (takeoff) preflight. For example, if the wing is far left of center, and is beginning to move back to center (from left to right) you can add some left control pressure to slow the wing’s (right moving) inertia and thus keep it from overshooting the center position above the cart. Or, if the wing is far right of center and you want to begin the wing’s motion back to its normal and safe position above the cart, you could help initiate the wing’s motion to the left by applying slight left steering pressure.
Encourage Cell Openings
During the pretake-off roll (when building and verifying your wing before takeoff—particularly if operating on a soft field) you may find it useful to press the pedals multiple times, and hold it (about half a second) after the wing comes overhead. This has two beneficial uses. First, it assists with opening the outside cells by temporarily increasing internal wing pressure, pushing the air forward, and transferring the pressure out to the tips. Second, it helps confirm the steering lines are clear of any impediments, ensuring they are not caught on or wrapped around any outrigger tubing or obstructions.
“Lock-out” Avoidance
Improper canopy layout, wind conditions, or inappropriate throttle movements during the initial building of the wing during your takeoff roll may cause the wing to “lock-out” or stall behind the cart at a 30 to 45 degree angle on its rise. To correct the lock-out, reduce power and push both steering controls simultaneously out in a flaring motion until the wing is pulled back to where the tail is almost touching the ground. Then rapidly release the flare so the wing “sling-shots” up and overhead of the cart. Note: This method is not recommended with elliptical-shaped wings, as these wings, with their reduced drag, may over-fly the cart and land ahead of the rolling cart.
Crosswind Takeoff
Powered parachutes have very limited crosswind capability. You should take off directly into the wind. If the wind is slowly changing direction and the powered parachute is positioned to take off into a crosswind, it is better to wait and see if the winds will change back to headwinds before committing to a takeoff. If winds are changing direction very quickly, the flight should be canceled.
Sometimes there is only one runway and the winds are blowing across it. It is still possible to take off, but it will involve positioning the powered parachute so the initial inflation and roll will be into the wind. If you fly at a field that has only one main runway, you must be familiar with the principles and techniques involved in crosswind takeoffs or not fly when there is a crosswind.
Positioning the CartIn all but the lightest of crosswinds, it is still a good idea to position the powered parachute into the wind. Lay out the powered parachute wing directly into the wind, as you would for a normal takeoff. [Figure 7-5]
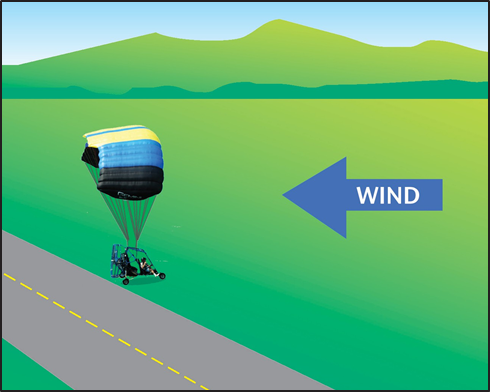
Figure 7-5. Initial inflation.
Wing Inflation and Kiting
The initial inflation and kiting should be done as it would be for a normal takeoff. As soon as the wing is overhead and flying, steer the cart into the direction desired for takeoff. This procedure requires practice coordinating the controls for the ground steering and the wing. The wing needs to be producing some lift before the turn can be attempted. This may mean a more aggressive inflation and kiting if the takeoff area is relatively small.
Takeoff Roll
The technique used during the initial takeoff roll in a crosswind is generally the same as used in a nor- mal takeoff, the wing should be turned approximately into the wind; this is done with steering bar control held to the side from which the crosswind is blowing. This will help keep the wing from pulling the cart to the down wind side. It is important there is sufficient airspeed over the wing to create lift. Otherwise, the wing will have a tendency to fall towards the downwind side of the powered parachute. This exposes the powered parachute to a rollover since the wind will be blowing into the bottom of the wing that is now acting as a sail, thereby pulling the cart over.
The sequence of events will usually be moving fast during a crosswind takeoff, but it is still important to do a rolling preflight: LOC.
As the nosewheel is being raised off the runway, the steering control for the powered parachute is transferred fully to the wing flight controls.
If a significant crosswind exists, it will take longer for the powered parachute to take off because the steering control adds drag to the wing. This may be naturally compensated for by the headwind component of the wind as well as the tendency for the deflected side of the wing to act as a flared wing.
As both main wheels leave the runway and ground friction no longer resists drifting, the powered parachute will be slowly carried sideways with the wind unless you maintain adequate drift correction. Therefore, it is important to establish and maintain the proper amount of crosswind correction prior to lift-off by continuing to apply steering bar pressure.
If proper crosswind correction is being applied, as soon as the powered parachute is airborne, the cart will rotate so it is lined up with the wing. Firm and aggressive use of the steering bars may be required to keep the powered parachute crabbed down the in-tended takeoff path. Continue the climb with a wind correction angle to follow a ground track aligned with the runway centerline or takeoff path direction. However, because the force of a crosswind may vary markedly within a few hundred feet of the ground, make frequent checks of the actual ground track, and adjust the crab angle as necessary. The remainder of the climb technique is the same used for normal takeoffs and climbs.
Common errors in the performance of crosswind takeoffs are:
- Failure to adequately clear the area prior to taxiing into the staging position.
- Poor selection of a staging position.
- Not allowing for enough takeoff area.
- Not allowing for enough area to kite the wing and turn to the intended takeoff path.
- Failure to set up the powered parachute into the wind.
- Not using enough power to kite the wing.
- Failure to observe the wing during inflation.
- Failure to perform a rolling preflight (LOC).
- Failure to maintain enough thrust to keep the wing properly loaded during the turn and alignment with the intended takeoff path.
Rejected Takeoff/Engine Failure
Emergency or abnormal situations can occur during a takeoff that will require you to reject the takeoff while still on the runway. Circumstances such as a malfunctioning powerplant, inadequate acceleration, inadequate wing kiting, runway incursion, or air traffic conflict may be reasons for a rejected takeoff.
Prior to takeoff, you should have in mind a point along the runway at which the powered parachute should be airborne. If that point is reached and the powered parachute is not airborne, take immediate action to discontinue the takeoff. Properly planned and executed, chances are excellent the powered parachute can be stopped on the remaining runway without using extraordinary measures, such as excessive braking or trying to stop by using your feet as brakes. Neither of these measures should be used and may result in powered parachute damage and/or personal injury. In the event a takeoff is rejected, reduce the power to idle and shut down the engine. Immediately, pull down the trailing edge to collapse the wing so it can be used as a drogue chute, semi-inflated behind you.
Urgency characterizes all power loss or engine failure occurring after lift-off. In most instances, the pilot has only a few seconds after an engine failure to decide and execute the proper course of action. In the event of an engine failure on initial climb-out, the powered parachute will be at a high-pitch angle, with the cart well in front of the wing. When the engine fails, the cart will rock back under the parachute, possibly causing a temporary but potentially dangerous dive. The level of danger in the dive is dependent on how high the PPC is above the ground when the engine fails. The best situation is if the pilot can establish a normal glide and execute a normal engine-out landing (see Chapter 12). However, if the engine-out occurs close to the ground, it may be necessary to immediately flare the parachute so the parachute does not rotate over the cart and into a dive which will increase the descent rate.
Runway Surface and Gradient
Runway conditions affect takeoff performance. Typically, powered parachutes take off from level grassy surfaces. However, runway surfaces vary widely from one airport to another. The runway surface for a specific airport is noted in the Airport/Facility Directory (A/FD). Any surface that is not hard and smooth will increase the ground roll during takeoff. This is due to the inability of the tires to smoothly roll along the surface. Tires can sink into soft, grassy, or muddy runways. Holes or other ruts in the surface can be the cause of poor tire movement along the surface. Obstructions such as mud, snow, or standing water reduce the powered parachute’s acceleration down the runway. Many of these same hindrances are multiplied in effect by the use of soft or wide tires that increase resistance themselves.
The gradient or slope of the runway is the amount of change in runway height over the length of the runway. The gradient is expressed as a percentage such as a 3 percent gradient. This means that for every 100 feet of runway length, the runway height changes by 3 feet. A positive gradient indicates that the runway height increases and a negative gradient indicates that the runway decreases in height. An upsloping runway impedes acceleration and results in a longer ground run during takeoff. A downsloping runway aids in acceleration on takeoff resulting in shorter takeoff distances. Runway slope information is contained in the Airport/Facility Directory.
Takeoff Performance
Takeoff performance is partly a condition of accelerated motion. For instance, during takeoff, the powered parachute starts at zero speed and accelerates to inflate the wing, then to takeoff speed and becomes airborne. The important factors of takeoff performance are as follows:
- The takeoff speed.
- The rate of acceleration during the takeoff roll.
- The takeoff roll distance is a function of both acceleration and speed.
The minimum takeoff distance is of primary interest in the operation of any powered parachute because it defines the runway requirements. The minimum takeoff distance is obtained by taking off on a length of runway that allows sufficient margin to inflate the wing, perform the LOC procedure, and then satisfactory room to initiate a lift-off and climb.
The powerplant thrust is the principal force providing the acceleration and — for minimum takeoff distance
— the output thrust should be at the maximum after the wing is inflated and successful LOC procedure pre-formed. Use smooth, gradual throttle settings to avoid porpoising. Drag is produced as soon as the powered parachute moves forward. The drag of the wing decreases as it rotates into position over the cart.
In addition to the important factors of proper procedures, many other variables affect the takeoff performance of a powered parachute. Any item that alters the takeoff speed or acceleration rate during the takeoff roll will affect the takeoff distance.
The most important variable to affect the takeoff performance is how fast the pilot can get the wing overhead, centered, and ready to take the load of the cart. Often, most of the runway used will be for the inflation and wing LOC procedure. Unlike almost any other type of flight, a powered parachute pilot has to create the airfoil and clear it on the ground before liftoff. It is always best to practice this skill at a longer field where mistakes can be made and corrected in plenty of time before taking off.
Even a slight headwind will have a dramatic effect on takeoff distances for powered parachutes because a wind helps inflate a wing much faster than can be done on a calm day. Even light winds can be a large percentage of the flying speed of a powered parachute. A powered parachute that flies at 35 mph taking off into a headwind of only 3.5 mph is working with a 10 percent headwind. A headwind that is 10 percent of the takeoff airspeed will reduce the takeoff distance by approximately 19 percent. In the case where the headwind is 50 percent of the takeoff speed (a brisk 17.5 mph), the takeoff distance would be approximately 25 percent of the zero wind takeoff distance (75 percent reduction).
Gross weight also has an effect on takeoff distance. Proper consideration of this item must be made in predicting the powered parachute’s takeoff distance. Increased gross weight can be considered to produce a threefold effect on takeoff performance:
- Higher lift-off speed,
- Greater mass to accelerate, and
- Increased retarding force (drag and ground friction).
If the gross weight increases, a greater speed is required to produce the greater lift necessary to get the powered parachute airborne at the takeoff lift coefficient. As an example of the effect of a change in gross weight for a typical PPC, a 21 percent increase in takeoff weight will require a 10 percent increase in lift-off speed to support the greater weight.
A change in gross weight will change the net accelerating force and the mass that is being accelerated.
The takeoff distance will vary at least as the square of the gross weight. Adding a 200-pound passenger to a machine that already weighs 400 pounds, with a pilot weighing 200 pounds, will increase the gross weight by 33 percent. That increase of one passenger will degrade the performance of the powered parachute dramatically. The 33 percent increase in takeoff gross weight would cause:
- At least a 25 percent decrease in rate of acceleration, and
- At least a 76 percent increase in takeoff distance.
For the powered parachute with a high thrust-to-weight ratio, the increase in takeoff distance might be approximately 76 percent, but for the powered parachute with a relatively low thrust-to-weight ratio, the increase in takeoff distance would be more. Such a powerful effect requires proper consideration of gross weight in predicting takeoff distance.
The effect of pressure altitude and ambient temperature is to define primarily the density altitude and its effect on takeoff performance. While subsequent corrections are appropriate for the effect of temperature on certain items of powerplant performance, density altitude defines specific effects on takeoff performance. An increase in density altitude can produce a fourfold effect on takeoff performance:
- Greater takeoff speed.
- Decreased thrust and reduced net accelerating force.
- Reduced rate of climb.
- Increased runway required.
If a powered parachute of a given weight and configuration is operated at greater heights above standard sea level, it will still require the same dynamic pressure to become airborne. Thus, the powered parachute at altitude will take off at the same indicated airspeed as at sea level, but because of the reduced air density, the true airspeed will be greater.
Proper accounting of pressure altitude (field elevation is a poor substitute) and temperature is mandatory for accurate calculation of takeoff roll distance.
The most critical conditions of takeoff performance are the result of some combination of high gross weight, altitude, temperature, and unfavorable wind. In all cases, the pilot must make an accurate calculation of takeoff distance from the performance data of the AFM/POH, regardless of the runway available, and strive for a polished, professional takeoff procedure. In the calculation of takeoff distance from the AFM/POH data, the following primary considerations must be given:
- Pressure altitude and temperature — to define
the effect of density altitude on distance.
- Gross weight — a large effect on distance.
- Wind — a large effect on wing inflation and
- Runway slope and condition — the effect of an incline and the retarding effect of factors such as snow, ice, or uncut grass.
Noise Abatement
Aircraft noise problems have become a major concern at many airports throughout the country. Many local communities have pressured airports into developing specific procedures that will help limit aircraft noise while operating over nearby areas. For years now, the FAA, airport managers, aircraft operators, pilots, and special interest groups have been working together to minimize aircraft noise in nearby sensitive areas. As a result, noise abatement procedures have been developed for many of these airports that include standardized profiles and procedures to achieve these lower noise goals.
Standard noise abatement procedures don’t necessarily apply to powered parachutes, but similar issues exist. Powered parachutes fly at lower altitudes, fly tighter patterns, and tend to fly early in the morning and late in the evening when the winds are lightest. Powered parachute pilots should actively work with airport management to determine takeoff areas, patterns, and procedures that emphasize both safety and good neighborhood relations. Specific noise abatement flight procedures are found in the A/FD where runway surface, slope and elevation can be found for flight planning.


